
Bollinger Bands Mean Reversion Strategy is a fade strategy: it bets that price snapping back inside a stretched Bollinger Band will keep travelling to the middle band, and it uses RSI to avoid fading a band pierce that is really the start of a breakout. This page covers the exact entry and exit rules, a real Strategy Tester run of those rules on EURUSD M15, how the stop and time-stop scale across other pairs and timeframes, and where the rules break down.
For more like this, browse the forex strategy hub.
Strategy overview

Bollinger Bands Mean Reversion Strategy trades EURUSD on the M15 chart. EURUSD carries the tightest spreads of the majors, which suits tight-stop rules.
The two tools have to agree. A band pierce on its own happens constantly; requiring RSI to also sit at an extreme cuts that down to the pierces that carry real exhaustion behind them. That is the whole edge this strategy is built around – it does not try to predict the reversal, it waits for the market to already be showing one.
Tools used
- Bollinger Bands (20 periods, 2.0 deviations)
- RSI (14) with 30/70 zones
- Higher-timeframe trend filter (EMA50 on H1, optional)
- MT4 and MT5 for chart, alerts, and order placement.
Entry rules
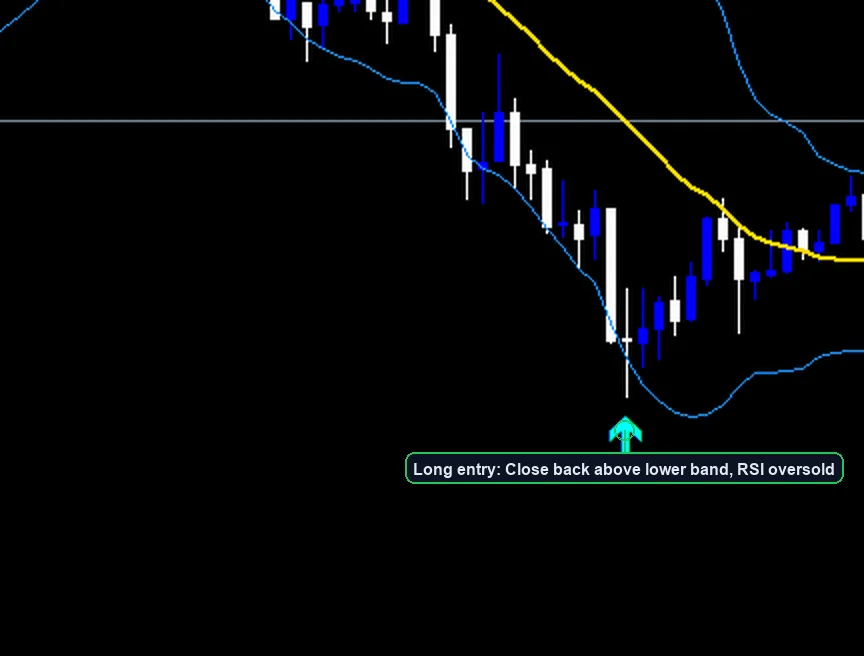
Long entry:
- Wait for a bar to pierce the lower Bollinger Band (20, 2.0). Its low must trade below the band.
- Let the bar close. The close must come back inside the bands. That recovery close is the trigger.
- Check RSI (14) on the same bar. It must sit at or below 30.
- Optional: require price above the EMA50 on H1. The trend filter input turns this on.
- Enter at the open of the next bar. The indicator prints a aqua arrow under the signal bar.
Short entry: Price pierces the upper band, closes back inside, and RSI sits at or above 70. The indicator prints a orange-red arrow above the bar.
Exit rules
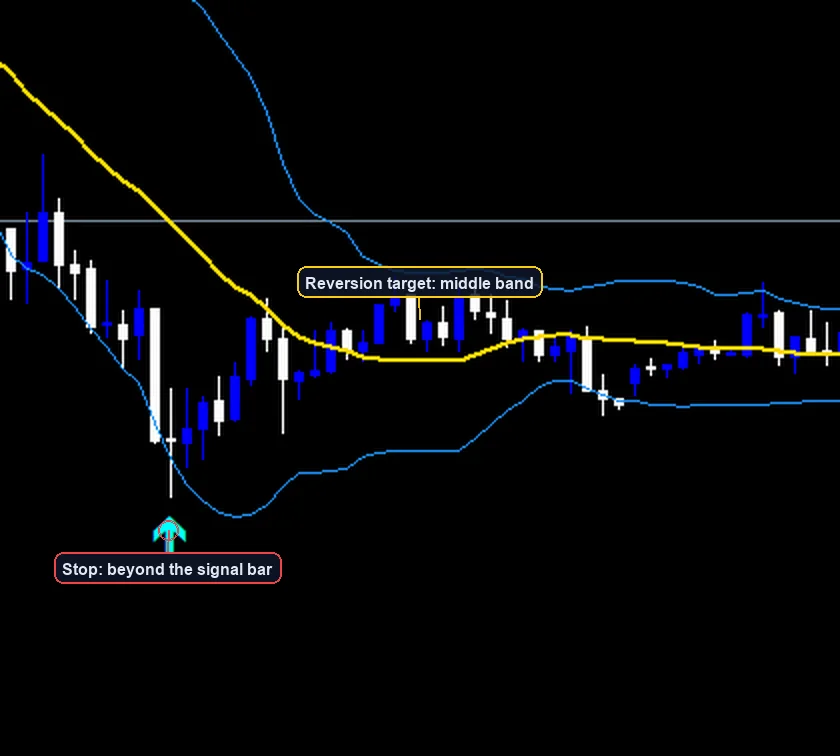
- Reversion target. The first target is the middle band — the 20-period average. Price that snaps back from a band extreme tends to rotate to the mean. Take at least partial profit there.
- Stop loss. Place the stop just beyond the signal bar’s extreme: below its low for longs, above its high for shorts. On EURUSD M15 that usually lands 8–18 pips out. Add a small buffer so a simple retest cannot tag you.
- Time stop. If the trade has not reached the middle band after 10 closed bars (about two and a half hours), exit at market. A stale reversion trade has lost its edge.
Filters that improve the setup
- Turn on the EMA50 H1 trend filter for live trading. It blocks longs below the higher-timeframe mean and blocks shorts above it. The input ships off so you can study raw signals first.
- The indicator waits at least 3 bars between same-side signals. This cooldown stops signal clusters inside one grinding move.
- Trade the London–NY overlap, when spreads are tight and flow is two-sided.
- Skip red-folder news for the pair’s currencies. A band pierce during a news spike is not a reversion setup.
Worked example
- Price stretches below the lower band and RSI dips under 30. The bar closes back inside the bands. The indicator prints a aqua arrow.
- You enter at the open of the next bar.
- The stop sits just below the signal bar’s low — on EURUSD M15, typically 8–18 pips from entry.
- The first target is the middle band. If momentum carries further, trail the rest behind M15 swing points.
These numbers are illustrative. They are not a forecast and they are not a promise.
Indicator settings
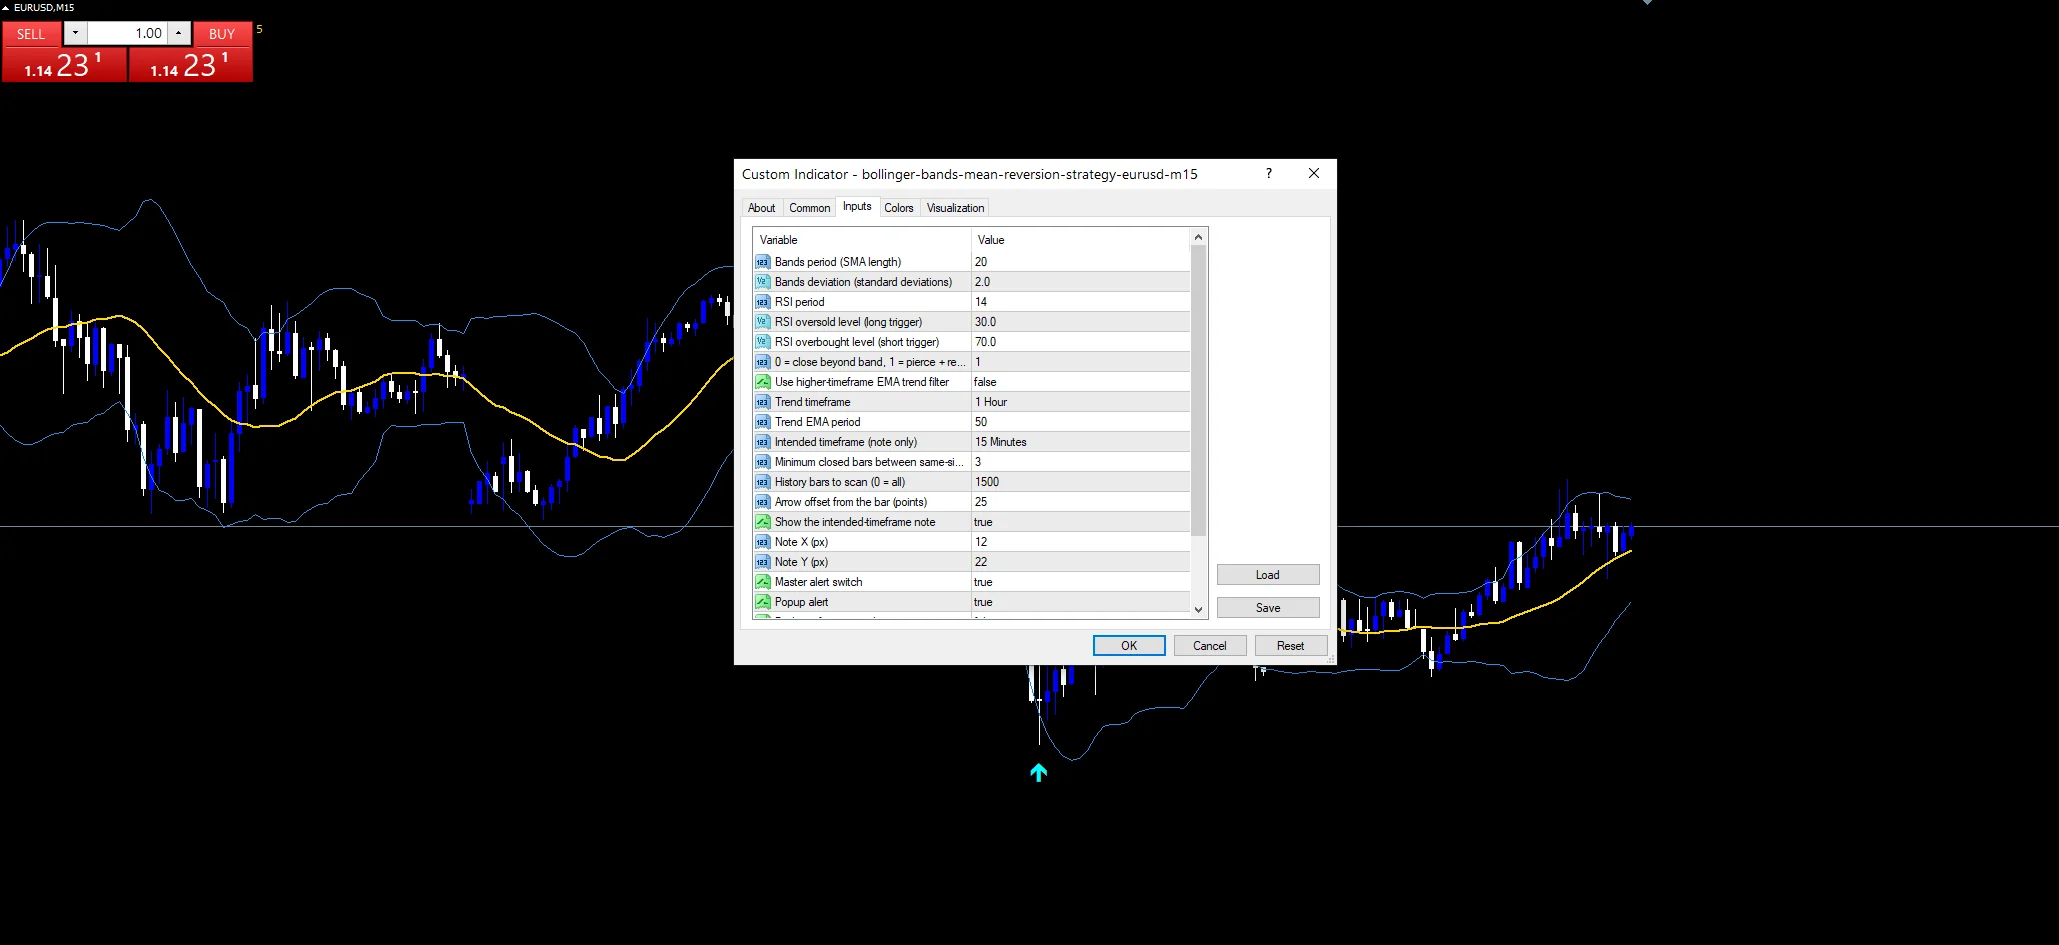
The download ships with these defaults. Every input is adjustable from the indicator’s settings panel.
| Input | Default | Purpose |
|---|---|---|
| BandsPeriod / BandsDeviation | 20 / 2.0 | Bollinger Band length and width |
| RsiPeriod | 14 | RSI length for the extreme filter |
| RsiOversold / RsiOverbought | 30 / 70 | RSI zones that allow a signal |
| PierceMode | 1 | 1 = pierce + recovery close (classic); 0 = close outside the band |
| UseTrendFilter | false | Require price on the right side of the EMA50 on H1 |
| MinBarsBetween | 3 | Cooldown bars between same-side signals |
How the rules adapt across pairs and timeframes
The entry and exit logic above does not change from market to market – only the stop distance and the time-stop window scale with each instrument’s own volatility. These are the real per-market figures the rule set uses, not a single copied number:
| Pair | Timeframe | Typical stop | Time-stop window |
|---|---|---|---|
| EURUSD | M15 | 8–18 pips | about two and a half hours |
| GBPUSD | H1 | 15–35 pips | about half a trading day |
| XAUUSD | H4 | $7–$15 | about two trading days |
| USDJPY | H1 | 15–35 pips | about half a trading day |
Backtest results
We coded the exact entry, exit, filter and time-stop rules above into a rules-testing Expert Advisor (bb_mean_reversion_backtest_ea.mq4 – not the download package above, which only draws signals) and ran it through the MT4 Strategy Tester on EURUSD M15, open-price model, fixed 0.01 lots, a $10,000 starting balance, magic-number isolated from any other order. The broker’s own history for this symbol and timeframe covered 2026.06.12 03:15 to 2026.08.18 23:59.
Over that window the rules produced 33 trades, 58% of them profitable, for a small net gain of $+3.80 (gross profit $+18.39, gross loss $-14.58, profit factor 1.26). Maximum drawdown over the run was 0.05% of the test balance.
33 trades is a small sample – not enough to draw a firm conclusion about the rules’ long-run edge, only enough to show the exact logic above actually executes as described against real historical price data rather than a hand-picked chart example. Test the rules yourself over a longer window and on your own broker’s feed before risking capital. Results are not guaranteed; past performance is not indicative of future results.
Where this strategy fails
- A strong trending market rarely lets price close back inside the band – it pierces and keeps going, so the entry trigger simply does not fire and the strategy sits out (which is the intended behaviour, not a flaw, but it means this rule set adds nothing during a strong trend).
- The middle-band target is close by design. In a widening-volatility session the stop can be tagged before the target because the band itself is expanding under the trade.
- RSI(14) can sit at an extreme for many bars in a row during a slow grind, so the same stretched condition can trigger more than one signal in a choppy patch even with the cooldown gate active.
How this page was verified
The signal indicator behind the download is our own build, compiled for MT4 and MT5 and checked on live charts before release; it draws signals once per closed bar and does not repaint. The Backtest results section above verifies the underlying rule logic separately, against real historical price data, not against the indicator’s chart output.
Download the Bollinger Bands Mean Reversion Strategy template
Download the complete Bollinger Bands Mean Reversion Strategy package for MT4 and MT5 below. The zip contains the compiled signal indicator for both platforms, a ready chart template for each, a STRATEGY-RULES.txt file with the exact rule list, and a README with install steps.
Download this strategy free
Enter your email and the file is yours. You also get the full MT4 and MT5 library.
You will receive the package by email after a one-step confirmation. If you are new to MetaTrader, follow the step-by-step MT4 and MT5 indicator install guide to load the indicator and the chart template.
FAQ
Why is this a bollinger bands mean reversion strategy, not just a generic setup?
A fade strategy: it bets that price snapping back inside a stretched Bollinger Band will keep travelling to the middle band, and it uses RSI to avoid fading a band pierce that is really the start of a breakout.
How many trades did the real backtest produce?
On EURUSD M15, the rules-testing EA logged 33 trades over 2026.06.12 to 2026.08.18 – see the Backtest results section above for the full numbers.
Why does this strategy target the middle band instead of the far side of the range?
The middle band is the 20-period average the whole indicator is built around. Price that has just pierced and recovered tends to travel back toward that average first; aiming further, at the opposite band, turns a mean-reversion trade into a breakout bet the rule set was not designed to make.
What happens if RSI and the band pierce disagree?
No trade. Both conditions have to line up on the same closed bar – a band pierce with RSI still in the middle of its range, or an RSI extreme with no pierce, does not qualify. That overlap requirement is what keeps the signal count down.
Can I run this on a different pair or timeframe than shown here?
Yes – the settings-by-pair/timeframe table above shows how the stop distance and time-stop window change across a few real combinations. The core rules (the indicator settings table) stay the same; only the distances scale with the instrument’s own volatility.
Are results guaranteed?
No. Trading involves risk. Results are not guaranteed. Past performance is not indicative of future results. This bollinger bands mean reversion strategy is a rule-based framework, not a signal service; test it and adapt it to your own risk tolerance before using live capital.
Related on forexmt4systems.com: Bollinger Bands Mean Reversion Strategy for EURUSD on H1 · Bollinger Bands Mean Reversion Strategy for EURUSD on H4 · Hurst Bands Indicator MT4 + MT5.
Authoritative references
- Learn more about Bollinger Bands.
- General background on technical indicators.

About the author
Written by Dominic Walsh, a Forex trader and MT4/MT5 indicator, Expert Advisor and script developer. Every tool on forexmt4systems.com is tested on live charts before release and ships with ready-to-use compiled MT4 (.ex4) and MT5 (.ex5) files. Learn more about the trader and developer behind this site.
How we build, test and correct every tool: Editorial & Testing Policy. Trading carries risk; see the disclaimer.