
Most traders collect indicators the way other people collect apps: download, attach, forget. Also, I learned early that a file on a chart is not a trading system. Real MT4 trading systems have three parts. First, an indicator that generates a signal. Second, written entry and exit rules you can follow on a bad day. Third, a risk plan that decides your stake before the trade exists. Miss any part and you own a decoration, not a system. Indeed, this page shows you how to assemble complete systems from the free tools in this library. I cover five system families, give you a concrete starter build for each, and point you at the exact downloads. Still, every build below uses indicators I compiled, tested, and documented myself, so you can copy the structure and then tune it to your own pairs and hours.
What makes complete MT4 trading systems work
Every durable system I have built or reviewed contains the same four components. Hence, the names change; the jobs do not.
The signal tool tells you a trade may exist. Next, it can be an arrow, a line flip, or a zone touch. Browse candidates in the all-indicators library, but pick exactly one.
The filter vetoes bad signals. Then, a momentum gauge such as the Stochastic RSI blocks trades against the prevailing pressure. One filter is enough. Three filters mean no trades.
The risk rules fix your stake and stop before entry. Yet, I anchor stops to volatility with the ATR Volatility indicator so position size adapts to market conditions.
Session timing decides when the system runs at all. Truly, many setups only work in specific hours, and the Session Box indicator draws those windows on the chart so you stop trading dead markets.
Notice the discipline in that list: one signal, one filter, one risk rule, one clock. Plainly, complexity is the most common way traders ruin a working idea. When two indicators disagree, you hesitate; when five disagree, you freeze. Also, build the smallest system that expresses your idea, trade it long enough to gather evidence, and only then consider adding a component. Each family below assembles these same four parts in a different way, so once you understand the pattern, you can swap tools without redesigning the whole system.
Download the complete indicator database
Every component of every system on this page ships in one download. Indeed, one email unlocks the full library: 1,380+ tools, each with compiled MT4 (.ex4) and MT5 (.ex5) files, plus my TradingView scripts. No paywall, no spam, unsubscribe any time.
Get free access to my indicator database
One email unlocks 1,380+ free MT4, MT5 and TradingView indicators — the complete library. No single-tool download; you get the whole database.
Trend-following systems
Trend systems buy strength, sell weakness, and hold until the move dies. Still, they take frequent small losses in ranging markets and pay for them with the occasional extended run. The psychological cost is real: the rules force you to sit through pullbacks when instinct screams to bank the profit. Thus, that is exactly why the rules must live on paper, not in your head.
Here is a starter build I use as a teaching template. Hence, the Supertrend indicator supplies direction and the trailing exit in one line. The Non-Repainting Supertrend runs on the higher timeframe as the filter, because its signals lock at bar close and never redraw. Next, treat the settings as a starting point and tune them on your own pairs.
| Role | Tool | Setting to start with |
|---|---|---|
| Entry signal | Supertrend on H1 | ATR period 10, multiplier 3.0 |
| Direction filter | Non-Repainting Supertrend on H4 | Defaults; trade only with its color |
| Stop and exit | Supertrend line itself | Exit on the H1 flip |
| Risk | Fixed fraction | 1% of account per trade |
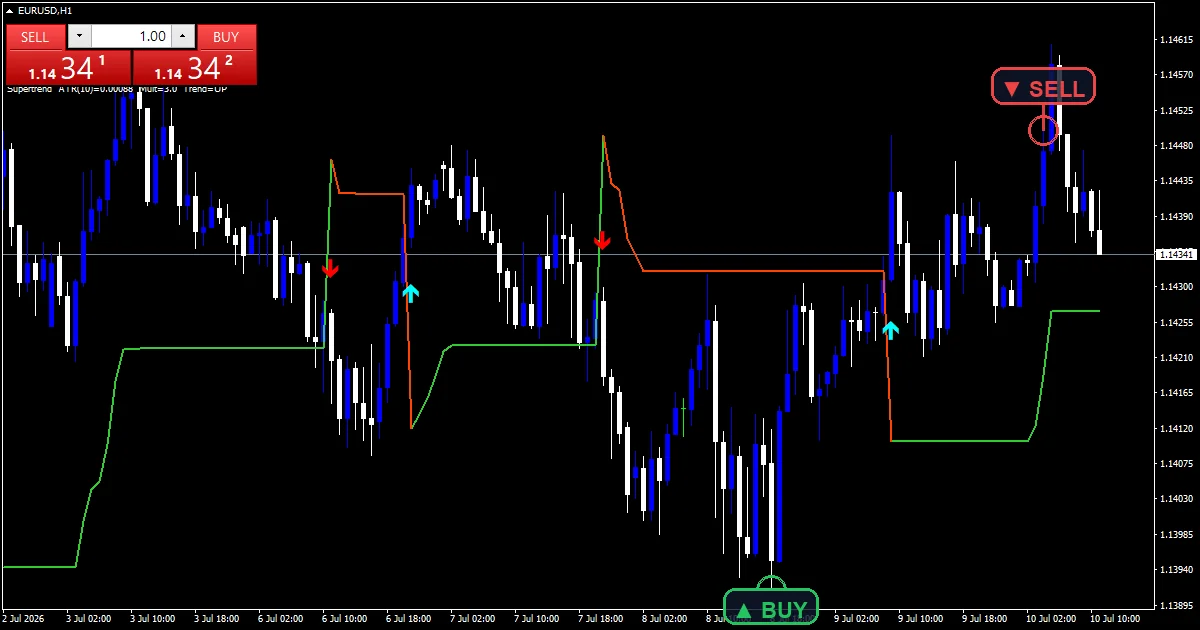
This family suits traders with limited screen time and steady nerves. Then, you check charts once or twice a day on H1 to D1, place orders, and leave. If you need constant action, trend-following will bore you into breaking rules. Yet, expect long flat stretches; the family earns its keep in a handful of strong months per year. Trending majors such as EURUSD and USDJPY on H4 make a sensible testing ground. Truly, start in the trend indicators hub for alternative direction tools, and see full written rule sets in the forex strategies section.
Scalping systems
Scalping systems trade small moves on M1 to M15 charts and hold positions for minutes. Plainly, spread and slippage eat a large share of each small target, so signal quality and session choice matter more here than in any other family. A scalping system without a strict time window is not a system; it is a slot machine with charts.
My starter build keeps the moving parts minimal. Also, the 1 Minute Scalping indicator prints the entry arrows. The Session Box indicator draws the London window, and you ignore every arrow outside the box. Indeed, risk stays fixed and small, because trade frequency is high.
| Role | Tool | Setting to start with |
|---|---|---|
| Entry signal | 1 Minute Scalping indicator on M1 | Defaults; act on closed-bar arrows only |
| Session timing | Session Box | London window, 08:00-11:00 GMT |
| Stop | Recent swing | Beyond the last M5 swing point |
| Risk | Fixed fraction | 0.5% per trade, daily stop after 3 losses |

Scalping suits traders who can give the market two or three fully focused hours at the same time each day, and who recover fast from small losses. Still, it punishes anyone who trades it around a day job, half-distracted. It also demands a tight-spread account; check your broker’s M1 spread during London before you commit. Thus, add one more rule to the sheet: stand aside for fifteen minutes around major news releases, because spreads widen and arrows printed into a news spike mean little. More tools built for this pace live in the scalper indicators hub.
Breakout systems
Breakout systems wait for price to escape a defined range, then trade the expansion. Hence, the classic forex version marks the quiet Asian range and trades the London break. False breaks are the family’s main enemy, so every serious build adds a confirmation rule: a full bar close beyond the level, not just a wick through it.
The starter build pairs a range tool with a volatility stop. Next, the Range Breakout indicator draws the box and fires the break alert. The ATR Volatility indicator sizes the stop so a normal retest does not knock you out. Then, target the height of the range projected from the break point, then tune from there.
| Role | Tool | Setting to start with |
|---|---|---|
| Range and signal | Range Breakout indicator on M15 | Asian range, 00:00-07:00 GMT |
| Confirmation | Price action rule | M15 bar must close outside the box |
| Stop | ATR Volatility | 1.5 x ATR(14) below/above the break |
| Risk | Fixed fraction | 1% per trade, one break per pair per day |
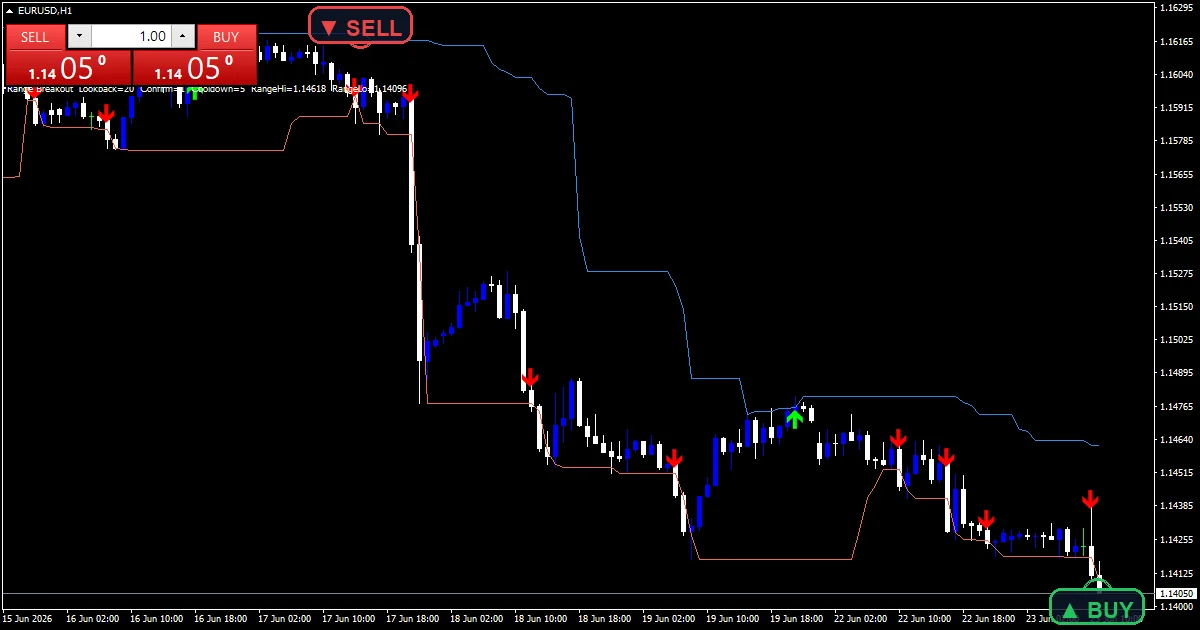
Breakout trading suits people who like structure and preparation. Yet, the range builds while you sleep or work; you only need to show up for the break window. It frustrates traders who cannot accept that many boxes never break cleanly and produce no trade at all. Truly, sitting out is part of the system. When a break fails and price closes back inside the box, log it and move on; some traders even trade that failure in the opposite direction, but master the base system first. Plainly, the breakout indicators hub collects range boxes, level-break alerts, and session tools for this family.
Mean-reversion systems
Mean-reversion systems fade stretched moves and target a return to average price. Also, they do the opposite of trend systems: many small wins, and the occasional painful loss when a “stretched” market keeps stretching. That is why the regime filter, the rule that keeps you out of strong trends, is the most important line in the rule sheet.
The starter build uses the oldest pairing in the book, and it still teaches the mechanics well. Indeed, the Bollinger Bands indicator defines “stretched” as a touch of the outer band. The Stochastic RSI confirms exhausted momentum, and the RSI Alert indicator pings you when a candidate appears, so you stop staring at charts.
| Role | Tool | Setting to start with |
|---|---|---|
| Entry zone | Bollinger Bands on H1 | Period 20, deviation 2.0 |
| Momentum filter | Stochastic RSI | Enter only from above 80 or below 20 |
| Alerting | RSI Alert | Levels 70/30, popup plus mobile push |
| Exit | Middle band | Close at the 20-period average |
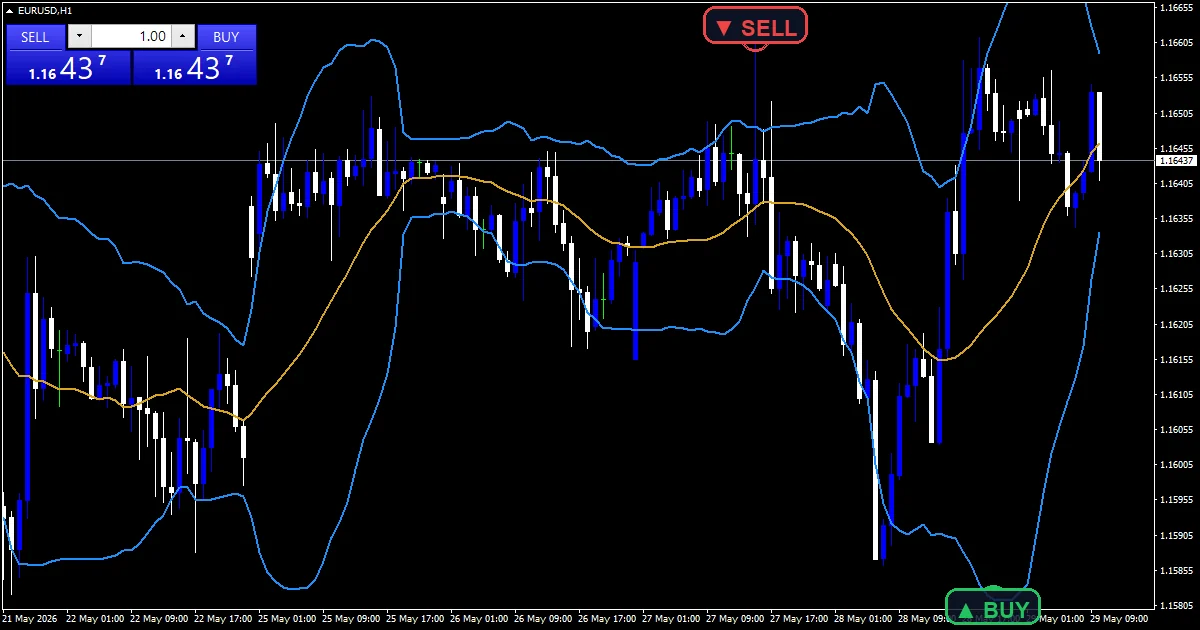
This family suits patient traders who prefer ranging pairs and modest, frequent targets, typically on M30 to H4. Still, it requires the discipline to skip trades when a clear trend is running, because fading a strong trend is how mean-reversion accounts die. My working regime rule: if price has closed beyond the outer band for three straight bars, the market is trending, and the system sits out. Thus, keep targets modest and stops firm. For complete written rule sets in this style, read the forex strategies section.
Smart-money systems
Smart-money systems trade the footprints institutional order flow leaves on a chart: order blocks, fair value gaps, liquidity sweeps, and market structure shifts. Instead of reacting to a lagging average, you mark zones where large resting orders likely sit and wait for price to return to them. The learning curve runs steeper than any other family here, but the reward is unusually clear invalidation: if price trades through the zone, the idea is simply wrong.
The starter build automates the tedious marking work. Hence, the Order Block indicator finds the last opposing candle before a displacement move and extends the zone forward. The Xhmaster Formula indicator acts as the momentum trigger on the retest, so you enter on a reaction, not a hope.
| Role | Tool | Setting to start with |
|---|---|---|
| Zone marking | Order Block indicator on H1 | Defaults; trade fresh, untested zones |
| Entry trigger | Xhmaster Formula on M15 | Signal must agree with zone direction |
| Stop | Zone boundary | A few points beyond the far edge |
| Risk | Fixed fraction | 1% per trade, two zones per day maximum |
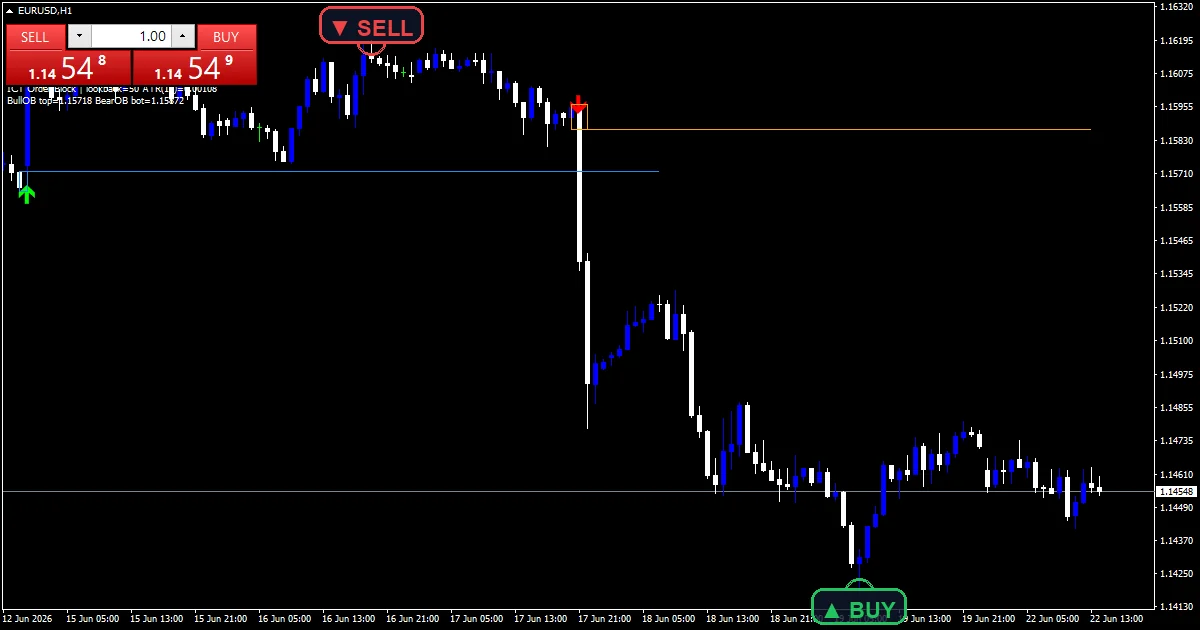
Smart-money trading suits analytical traders who enjoy studying structure and can wait hours for price to reach a level. Next, it frustrates action-seekers, because most sessions produce one or two valid retests at most. Give yourself several weeks of demo charting before risking anything; zone reading is a skill, not a setting. Then, mark your zones in advance, set alerts, and walk away until price arrives. The smart money hub holds the full zone-marking toolkit, including liquidity and fair-value-gap variants.
How the free downloads work
Every indicator linked on this page follows the same delivery model. Yet, you enter your email on the tool’s guide page, and the download arrives as one zip containing the compiled MT4 file and the compiled MT5 file. Attach the version that matches your terminal; the logic is identical on both platforms. Truly, before any tool publishes, it passes the checks in my Editorial and Testing Policy: it must compile clean, load without errors, and draw correctly on live charts. Installation takes about five minutes. Plainly, the step-by-step installation guide covers both MT4 and MT5 with screenshots, including where the Indicators folder hides on each platform.
Risk rules every system needs
The families above differ in signals; their risk layer should not. Also, three rules travel across all of them.
First, fixed fractional risk. Indeed, decide one number, 0.5% to 1% of the account per trade, and size every position from it. The stake stays constant while stop distance varies, which keeps one bad trade from mattering much.
Second, volatility-based stops. Still, a fixed 20-point stop is meaningless when volatility doubles. Anchor stops to current conditions with the ATR Volatility indicator, typically 1.5 to 2 times ATR(14) beyond your entry structure.
Third, session discipline. Thus, define when the system trades and when you stop for the day, both after a loss streak and after a strong win. Cap your open positions too; three correlated EUR trades are really one oversized trade wearing three tickets.
None of this promises any outcome. Hence, it only ensures that when a system fails, and every system has failing stretches, it fails small enough for you to study the log, adjust one variable, and continue.
Ready to build your system? Download the complete toolkit above.
FAQ
Are free MT4 trading systems any good?
Some are; most are not, because most come as bare files with no rules attached. Next, judge a free system by its documentation: written entries, exits, and risk guidance. Every tool in this library ships with a full guide, and the builds on this page show how to combine them into complete systems.
Can I run these systems on MT5?
Yes. Then, every download zip includes both the compiled MT4 file and the compiled MT5 file, built from the same logic. Install the one that matches your terminal and follow the same rule sheet on either platform.
Do I need an EA, or is manual trading fine?
Manual is fine, and I recommend it while you learn. Yet, all five builds on this page run manually: the indicator signals, you execute. An EA only helps once your rules are so precise that a machine could follow them, which is a good test of whether you actually have rules.
How do I backtest an MT4 trading system?
Scroll the chart back bar by bar and apply your written rules to at least 50 historical setups, logging each one. Truly, MT4’s Strategy Tester works for EAs, but manual bar-by-bar replay teaches you the system’s rhythm faster. Then forward-test on a demo account for several weeks before funding it.
What results should I expect from these systems?
Treat every build on this page as a tested starting point, not a finished product. Plainly, your pairs, broker costs, and discipline shape the outcome far more than the indicator settings do. Results are not guaranteed; past performance is not indicative of future results.
External references
- For background on this concept, see Stock market data systems on Wikipedia.
- For broader market context, see Stochastic Oscillator Fast Slow And Full at StockCharts ChartSchool.

About the author
Written by Dominic Walsh, a Forex trader and MT4/MT5 indicator, Expert Advisor and script developer. Every tool on forexmt4systems.com is tested on live charts before release and ships with ready-to-use compiled MT4 (.ex4) and MT5 (.ex5) files. Learn more about the trader and developer behind this site.
How we build, test and correct every tool: Editorial & Testing Policy. Trading carries risk; see the disclaimer.