
An order block that price ignores is not noise. It is information. Breaker Block Reversal Engine, a free breaker block indicator TradingView traders can run on any market, tracks exactly those failures. Also, it finds the origin candle behind a structural break, waits for price to close back through it, then flips its polarity. Old resistance becomes support. Indeed, the zone that trapped one side now guides the other.
It is free and open source. Still, you can add it to any chart from the Breaker Block Reversal Engine script page on TradingView, and the full Pine source is published there for you to read.
What Breaker Block Reversal Engine plots on the price chart
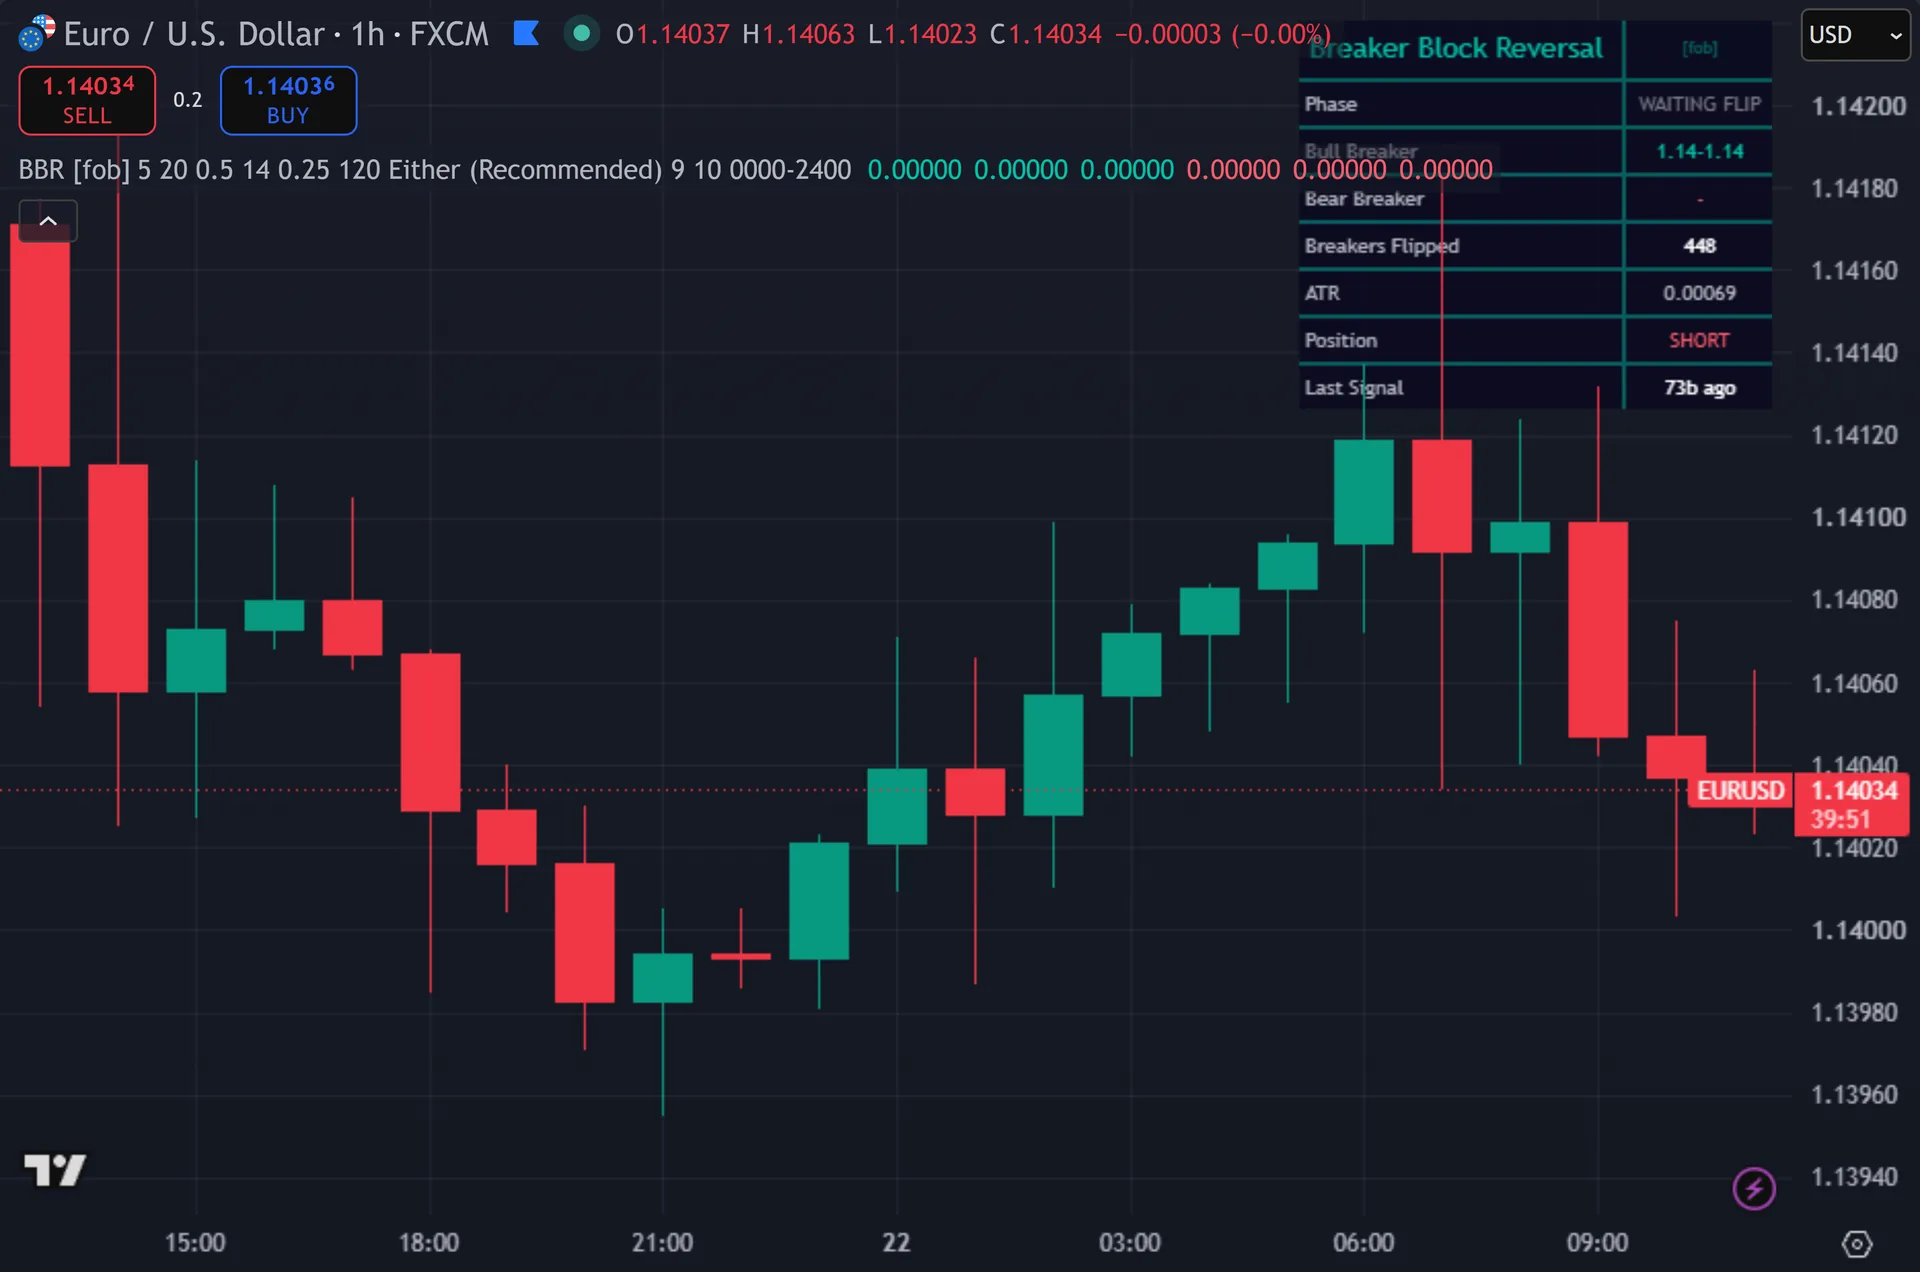
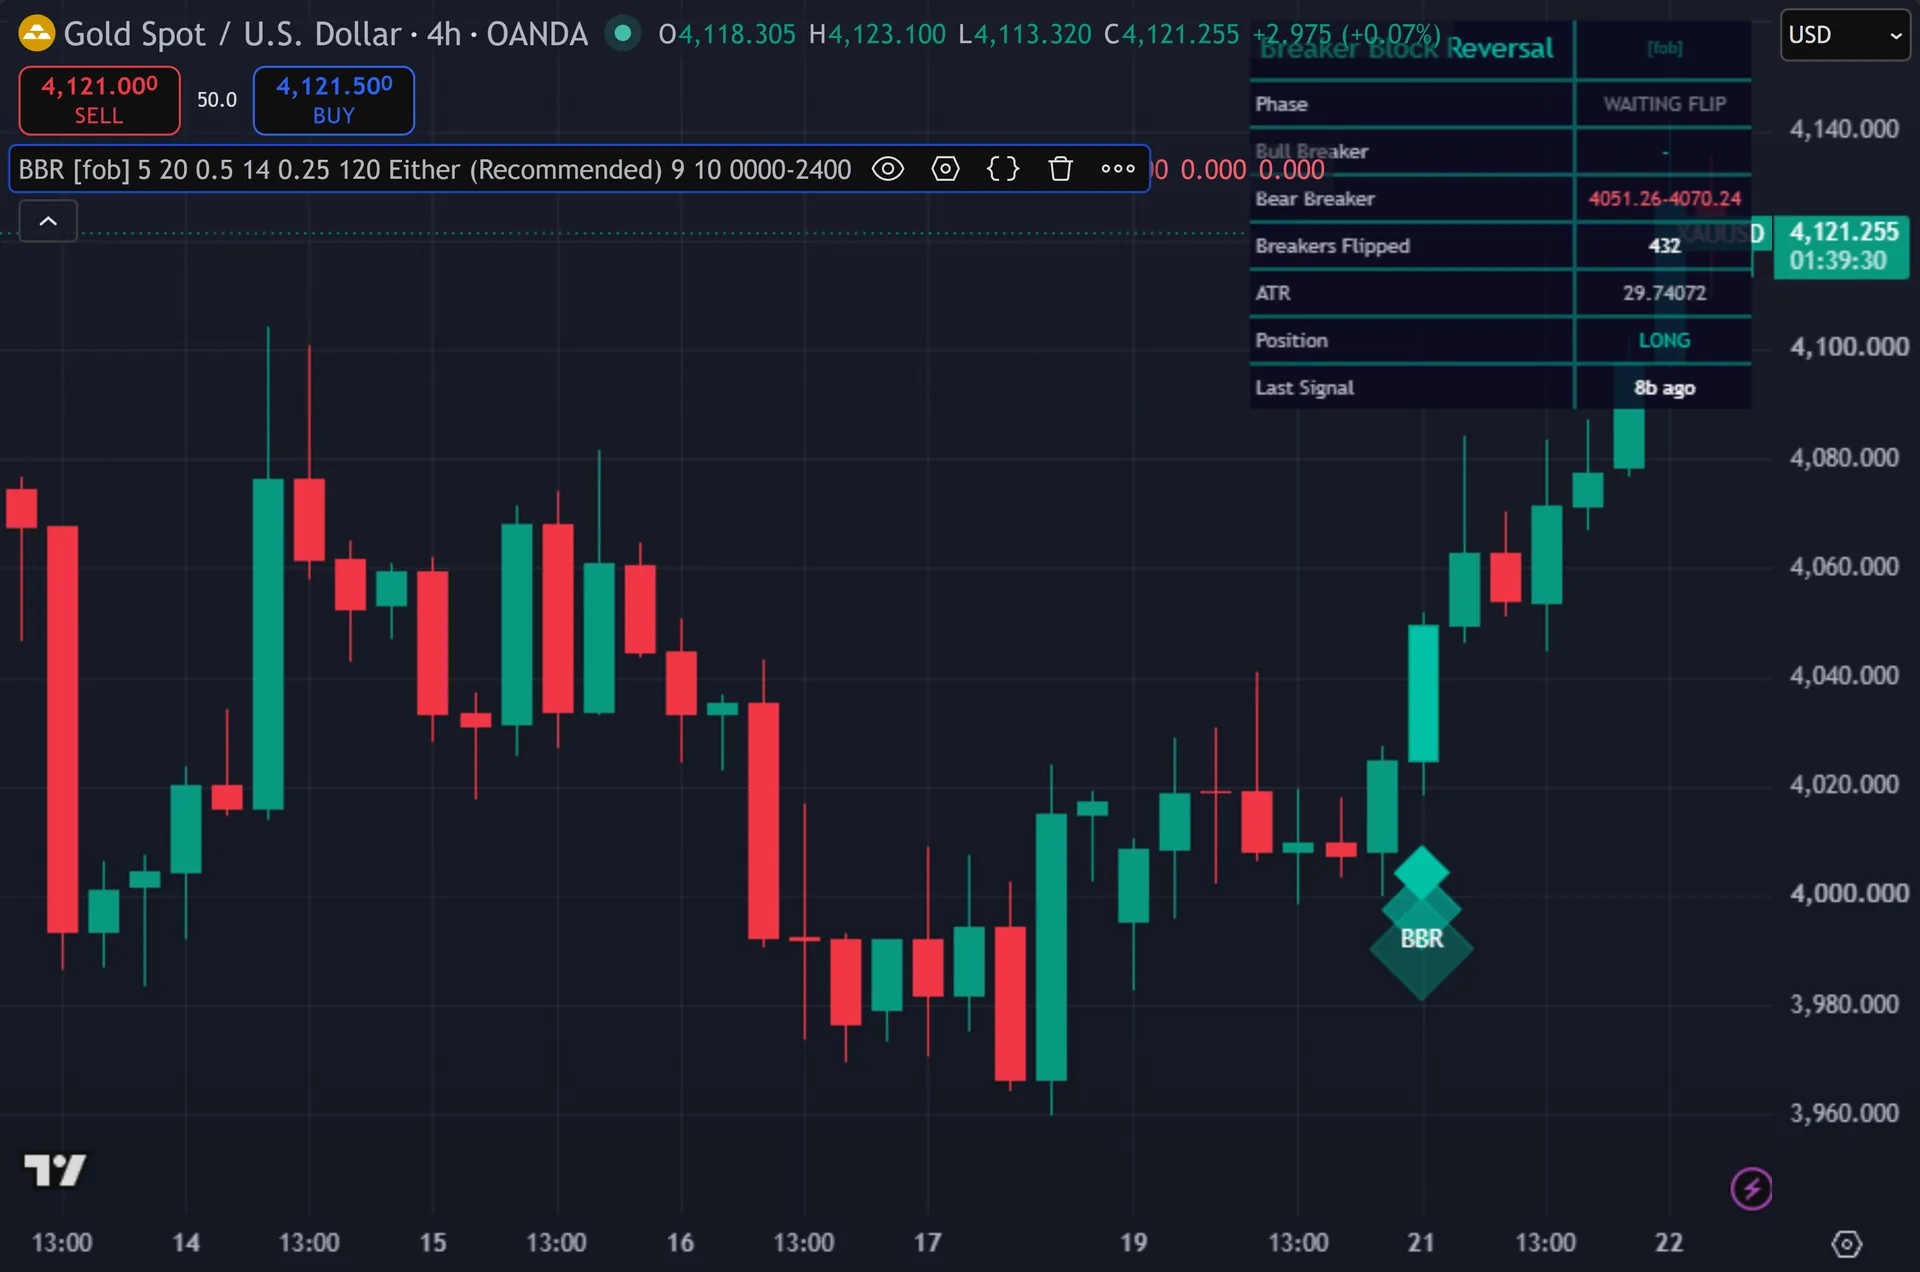
Flipped breakers appear as shaded boxes, drawn from 20 bars back to 25 bars ahead, teal for bullish and red for bearish. Thus, diamond markers tag each signal, stamped BBR, wrapped in two wider glow layers. Signal bars recolor. Hence, a soft background tint runs while a directional bias stays armed. An eight-row dashboard sits top right. Next, it shows the current phase, both breaker price ranges, the count of breakers flipped, live ATR, position state and the age of the last signal.

How Breaker Block Reversal Engine is built
Finding the block that failed
Structure comes first. Then, the script tracks confirmed swing pivots using a 5-bar window on each side. A down break happens when the close drops under the last pivot low while the prior close sat at or above it. Yet, an up break mirrors that against the last pivot high.
On a down break, the script scans back up to 20 bars for the nearest up-close candle. Truly, that candle is the bearish order block: the last sign of buying before the market fell. It records the high and low. One filter applies. The distance from that candle low down to the break close must reach 0.5 ATR by default. Plainly, weak drifts through structure fail the test and set nothing.
Nothing is a breaker yet. Also, the zone waits in a pre-flip state, and it expires after 120 bars if nothing happens. The polarity flip comes later, when price closes back above the block top. Indeed, at that moment the failed bearish block becomes a bullish breaker, the counter increments, and the box appears on the chart.
Timing the entry
A flip arms a directional bias. Still, from there two triggers can fire. The first is a retest: the bar must trade into the breaker zone, with a tolerance of 0.25 ATR added on both edges. Thus, the second is a reclaim of the 9-period EMA in the bias direction. The Signal Trigger input lets you keep both or restrict to one.
Gates follow. Hence, a 10-bar cooldown blocks clustered fires. An optional session window can restrict signals to your trading hours. Next, every signal also requires barstate.isconfirmed, so the diamond prints on the close and stays put. A buy takes precedence over a sell on the same bar.
Then the engine resets. Then, a fired signal clears the bias and the breaker state, so the script re-arms on the next structural break instead of holding one regime for hundreds of bars. Bias also expires on its own after 120 bars. Yet, that age-out keeps the dashboard honest about whether a setup is still live.
How to read the signals
Work the dashboard phase row first. Truly, WAITING FLIP means the script holds no active breaker. BULL BIAS or BEAR BIAS means a block has flipped and the engine now hunts a trigger. Plainly, BULL BREAKER or BEAR BREAKER means a live zone exists, and the row beside it prints the exact price range.
Treat the box as your risk reference, not the diamond. Also, the zone gives you two edges. A long taken on a bullish breaker retest fails cleanly once price closes back below the box low. Indeed, that gives you an objective invalidation instead of a guess.
Remember the pivot lag. Still, swing points need 5 bars on each side, so the script recognizes a structural break only after those bars complete. It learned that level later than a historical chart implies. Thus, signals still gate on the bar close, so they never move once printed.
Every Breaker Block Reversal Engine setting explained
The script exposes 18 inputs, grouped in the settings panel exactly as shown below. Defaults are the published values.
Structure
| Setting | What it does | Default | Range |
|---|---|---|---|
| Pivot Length | Bars each side for swing pivot confirmation. Lower = more frequent structural breaks. | 5 | 2 to 30 |
| OB Search Lookback | Bars scanned back to locate the origin candle. | 20 | 2 to 50 |
| Min Impulse x ATR | Required distance (in ATR) from OB origin to current close on the break. 0 disables the filter. | 0.5 | 0.0 to 5.0 |
| ATR Length | Sets the atr length used in the calculation. | 14 | 5 to 50 |
| Retest Buffer x ATR | Tolerance added around the breaker on retest. | 0.25 | 0.0 to 2.0 |
| Breaker Max Age (bars) | Stale breakers/bias are cleared after this many bars without a signal, so the engine can re-arm on fresh structure. | 120 | 10 to 500 |
| Confirm Flip on Close | On = polarity flips only when CLOSE passes through. Off = wick-touch flip (more aggressive). | on | on / off |
Signal Logic
| Setting | What it does | Default | Range |
|---|---|---|---|
| Signal Trigger | Either = fires on whichever happens first — breaker-zone retest OR EMA reclaim during bias. | Either (Recommended) | Either (Recommended), Retest Only, EMA Reclaim Only |
| Entry Reclaim EMA | After a breaker flips, a close-cross of this EMA in the breaker direction times the entry. | 9 | 2 to 50 |
| Cooldown Bars | Sets the cooldown bars used in the calculation. | 10 | 1 to 200 |
Filters
| Setting | What it does | Default | Range |
|---|---|---|---|
| Restrict to Session | Toggles restrict to session on the chart. | off | on / off |
| Session Window | Controls session window. | 0000-2400 |
Visual
| Setting | What it does | Default | Range |
|---|---|---|---|
| Show Breaker Zones | Toggles show breaker zones on the chart. | on | on / off |
| Show Dashboard | Toggles show dashboard on the chart. | on | on / off |
| Show 3-Layer Glow | Toggles show 3-layer glow on the chart. | on | on / off |
| Buy Color | Colour used for buy color. | #00c2a8 | |
| Sell Color | Colour used for sell color. | #ff5d6c | |
| Dashboard BG | Colour used for dashboard bg. | color.new(#0a0820, 16) |

Alerts built into Breaker Block Reversal Engine
The script ships 15 alert conditions. Hence, open the alert dialog on the chart, pick the indicator as the condition source, then choose the event you want. Alerts fire on the close of the bar, so they follow the same confirmed-bar rule the on-chart signals use.
- BBR Buy
- BBR Sell
- BBR Any Signal
- BBR Down Break
- BBR Up Break
- BBR Bull Flip
- BBR Bear Flip
- BBR Bull Retest
- BBR Bear Retest
- BBR Bull OB Set
- BBR Bear OB Set
- BBR Structure
Other markets and timeframes
Every threshold here scales with ATR, and the script uses no volume at all. Next, that makes it market agnostic in the strict sense. The same 0.5 ATR impulse filter and 0.25 ATR retest buffer behave the same way on EURUSD, gold, indices and crypto. Then, only the pivot length deserves a second look. Fast intraday charts break structure often, so a 5-bar pivot can spawn many small zones. Yet, raise it toward 8 or 10 on noisy symbols.
Limitations worth knowing
The script marks zones and times entries. Truly, it sets no stops, no targets and no size. It also applies no trend filter beyond the structure logic, so a bullish breaker can flip inside a strong downtrend and still trigger.
Order block selection stays mechanical. Plainly, the script takes the nearest up-close candle within 20 bars of the break. Discretionary traders often pick a different candle. Also, expect the boxes to disagree with hand-drawn zones some of the time.
Signals consume the state. Indeed, once a buy fires, the bullish breaker clears, so a second entry on the same zone becomes impossible by design. Stale setups also expire after 120 bars. Still, both choices trade missed continuation for a cleaner, self-resetting engine.
Get Breaker Block Reversal Engine on TradingView
Open Breaker Block Reversal Engine on TradingView
If you also trade MetaTrader, the MT4 and MT5 indicator library is available below.
Get the complete indicator library
One email unlocks the full MT4 and MT5 indicator library. Thus, this TradingView script stays free on TradingView – the button above adds it to your chart.
Using it alongside MetaTrader
Adding a script on TradingView takes one click, so there is no install step here. Hence, if you want the same idea on MetaTrader, the MT4 and MT5 indicator installation guide walks through copying files into the data folder and attaching them to a chart. You can also browse the full MetaTrader indicator library, the MT4 indicators section, or the other free TradingView scripts published on this profile. For related chart tools see the MT5 indicators section and the forex trading strategies guides.
External references
- Price action trading on Wikipedia
- Support and Resistance at StockCharts ChartSchool
- Trendanalysis at Investopedia
Frequently asked questions
What is a breaker block?
It is an order block that failed. Next, price closed straight through the zone instead of respecting it. Traders positioned there now sit offside. Then, when price returns, their exits and the opposing side often defend the level from the other direction, which is why the zone flips polarity.
Does the Breaker Block Reversal Engine repaint?
Signals do not. Yet, both conditions require barstate.isconfirmed, so a diamond prints on the bar close and stays. The zone boxes draw backwards to the origin candle, which is normal for order block tools, and the pivots behind the structure need 5 bars each side to confirm.
Which Signal Trigger setting should I use?
Either is the default and fires on whichever comes first, the retest or the 9 EMA reclaim. Truly, retest Only gives fewer signals at tighter locations inside the zone. EMA Reclaim Only suits traders who want momentum confirmation and accept entries away from the zone edge.
Why did the dashboard sit on WAITING FLIP for so long?
No block met the criteria. Plainly, either structure held, no qualifying origin candle sat inside the 20-bar lookback, or the move failed the 0.5 ATR impulse filter. Zones also expire after 120 bars. Also, lower the pivot length or the impulse filter to see more.
How much should I rely on this indicator?
Treat it as one input, not a decision. Indeed, it is a chart analysis tool, not trading advice. Test it on your own markets and timeframes before relying on it. Results are not guaranteed; past performance is not indicative of future results.

About the author
Written by Dominic Walsh, a Forex trader and MT4/MT5 indicator, Expert Advisor and script developer. Every tool on forexmt4systems.com is tested on live charts before release and ships with ready-to-use compiled MT4 (.ex4) and MT5 (.ex5) files. Learn more about the trader and developer behind this site.
How we build, test and correct every tool: Editorial & Testing Policy. Trading carries risk; see the disclaimer.