
Money Flow Regime sorts buying and selling pressure into five plain bands. Also, this money flow indicator TradingView traders can run on any symbol builds an accumulation distribution line. It takes the spread between its 3 and 10 period EMAs, then z scores that spread over 50 bars. Indeed, a reading above 1.0 marks strong inflow. Entries then wait for a close cross of the 9 period EMA in the same direction.
It is free and open source. Still, you can add it to any chart from the Money Flow Regime script page on TradingView, and the full Pine source is published there for you to read.
What Money Flow Regime plots on the price chart
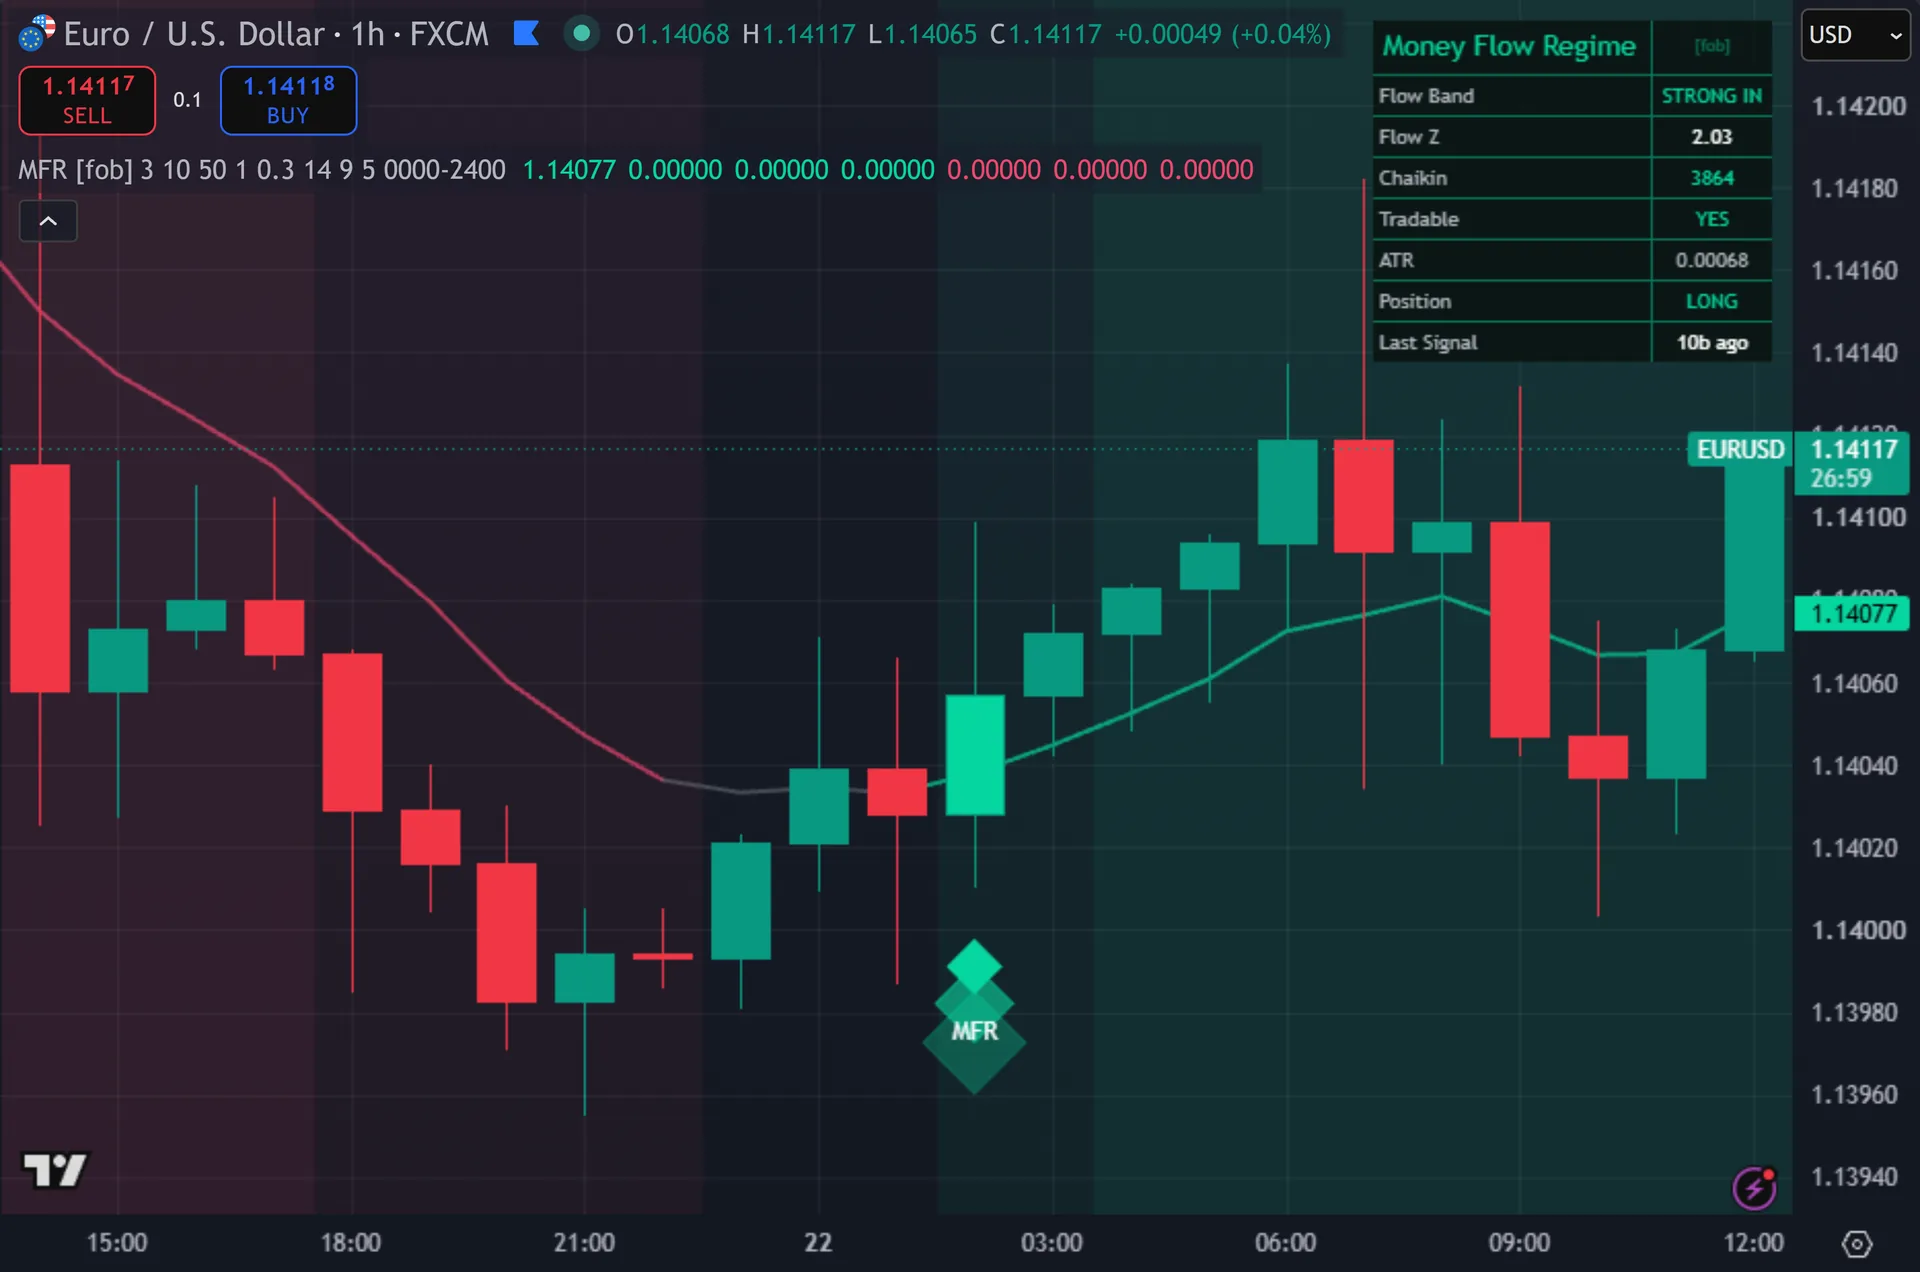
The chart background tints with the flow band. Thus, green shades mark inflow, red shades outflow, and a heavier tint marks the strong band. The 9 period reclaim EMA plots in the bias colour and turns gray while flow sits neutral. Hence, diamonds mark entries above or below the bar in three glow layers, each carrying an MFR tag, and the script tints the signal bar. An eight row dashboard reports the band name, the flow z score to two decimals and the raw Chaikin value. Next, it also shows whether the regime is tradable, plus ATR, the position state and bars since the last signal.
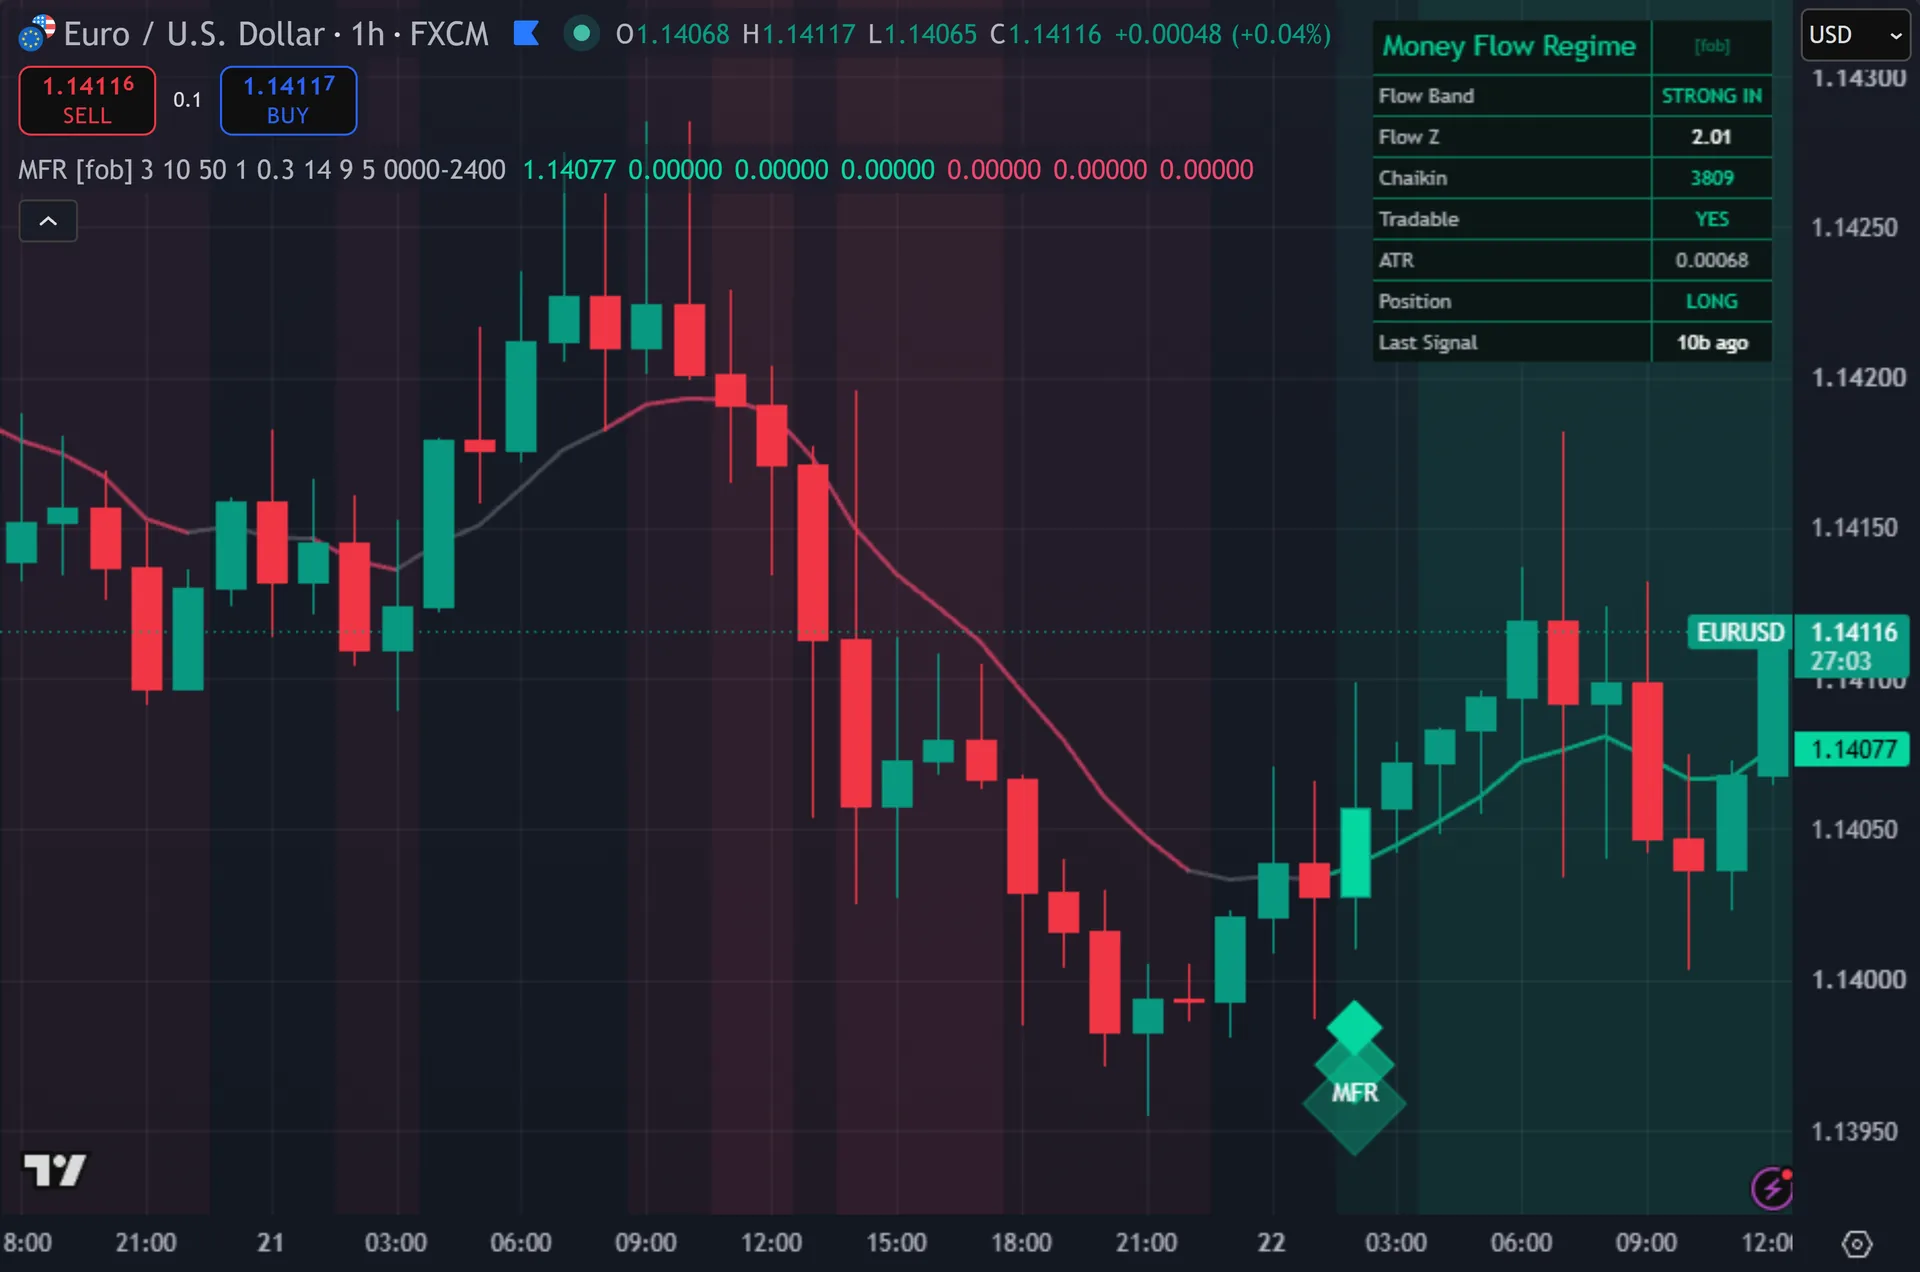
How Money Flow Regime is built
From candle position to a flow z score
Each bar starts with the money flow multiplier. Then, the script takes close minus low, subtracts high minus close, then divides the result by the bar range. A close at the high returns +1. Yet, a close at the low returns -1. A midpoint close returns 0.
That multiplier times volume accumulates into a running accumulation distribution line. Truly, the Chaikin reading is the spread between a 3 period EMA and a 10 period EMA of that line. A positive spread means recent accumulation outruns the slower average.
The raw Chaikin number depends on how much history your chart loaded, so the script never uses it directly. Plainly, it takes a 50 bar mean and a 50 bar standard deviation, then converts the spread into a z score. That figure compares cleanly across symbols and timeframes. The dashboard shows both numbers.
Five bands, then a reclaim cross
The z score maps onto five bands. Also, above 1.0 reads strong inflow. Between 0.3 and 1.0 reads mild inflow. Indeed, mirror thresholds handle outflow, and everything between -0.3 and 0.3 stays neutral. Both cut points are inputs, so you can demand a rarer regime.
The band sets bias only. Still, it never fires an entry by itself. A long needs a bullish bias plus a close crossing above the 9 period EMA. Thus, a short needs a bearish bias plus a close crossing below it. Switch on Require Strong Band and mild regimes stop qualifying.
Three gates finish the job. Hence, a position state flag blocks a second signal in the same direction until the other side fires. Five bars must pass after the last signal. Next, and the bar must close, since the signal reads barstate.isconfirmed. An optional session window can restrict trading hours, and it stays fully open by default. Then, ATR appears on the dashboard for context and filters nothing.
How to read the signals
Read the background before the diamonds. Yet, a deep green tint means the flow z sits above 1.0, so buyers have pushed closes toward the highs on rising volume for a stretch. The diamond only times an entry inside that condition.
Watch for the band and the cross to disagree. Truly, price can reclaim the 9 EMA while flow sits neutral. The script stays quiet there, and that silence carries information. Plainly, it says the move has no volume behind it yet.
The position row tells you what the script thinks it holds. Also, it flips only on a signal, so it can read LONG for a long time. The script owns no exit logic, so treat that row as the last signal direction rather than a trade instruction.
Every Money Flow Regime setting explained
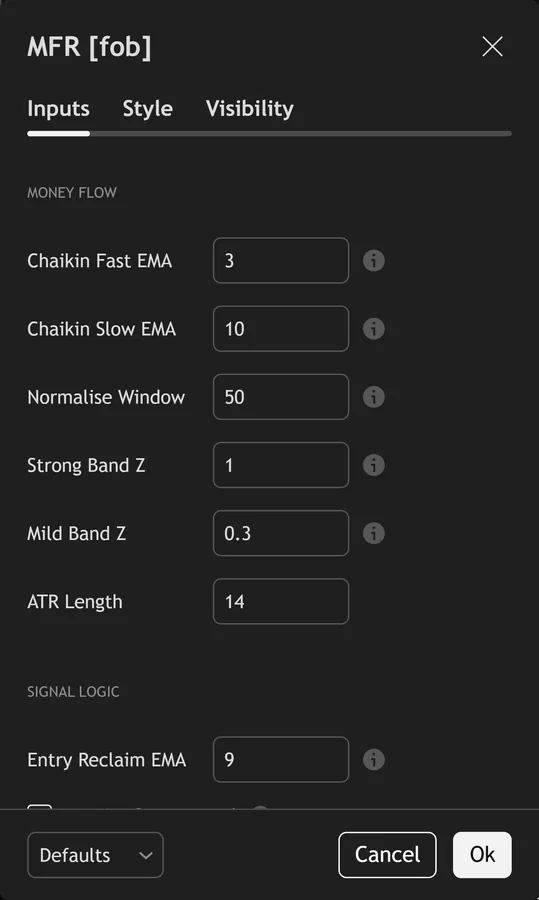
The script exposes 17 inputs, grouped in the settings panel exactly as shown below. Defaults are the published values.
Money Flow
| Setting | What it does | Default | Range |
|---|---|---|---|
| Chaikin Fast EMA | Fast EMA of the A/D line. | 3 | 2 to 20 |
| Chaikin Slow EMA | Slow EMA of the A/D line. | 10 | 5 to 50 |
| Normalise Window | Window the flow is z-normalised over for regime banding. | 50 | 10 to 200 |
| Strong Band Z | |z| above this = strong flow regime. | 1.0 | 0.3 to 4.0 |
| Mild Band Z | |z| above this but below Strong = mild flow. | 0.3 | 0.0 to 2.0 |
| ATR Length | Sets the atr length used in the calculation. | 14 | 5 to 50 |
Signal Logic
| Setting | What it does | Default | Range |
|---|---|---|---|
| Entry Reclaim EMA | After the flow band sets a bias, a close-cross of this EMA in that direction times the entry. | 9 | 2 to 50 |
| Require Strong Band | On = only trade in the strong flow regime; Off = mild or strong. | off | on / off |
| Cooldown Bars | Sets the cooldown bars used in the calculation. | 5 | 1 to 40 |
Filters
| Setting | What it does | Default | Range |
|---|---|---|---|
| Restrict to Session | Toggles restrict to session on the chart. | off | on / off |
| Session Window | Controls session window. | 0000-2400 |
Visual
| Setting | What it does | Default | Range |
|---|---|---|---|
| Show Dashboard | Toggles show dashboard on the chart. | on | on / off |
| Show 3-Layer Glow | Toggles show 3-layer glow on the chart. | on | on / off |
| Show Reclaim EMA | Toggles show reclaim ema on the chart. | on | on / off |
| Buy Color | Colour used for buy color. | #06d6a0 | |
| Sell Color | Colour used for sell color. | #ef476f | |
| Dashboard BG | Colour used for dashboard bg. | color.new(#08130f, 14) |
Alerts built into Money Flow Regime
The script ships 15 alert conditions. Indeed, open the alert dialog on the chart, pick the indicator as the condition source, then choose the event you want. Alerts fire on the close of the bar, so they follow the same confirmed-bar rule the on-chart signals use.
- MFR Buy
- MFR Sell
- MFR Any Signal
- MFR Strong In
- MFR Strong Out
- MFR Bias Bull
- MFR Bias Bear
- MFR EMA Up
- MFR EMA Down
- MFR Flow Zero
- MFR Band Change
- MFR Armed
Other markets and timeframes
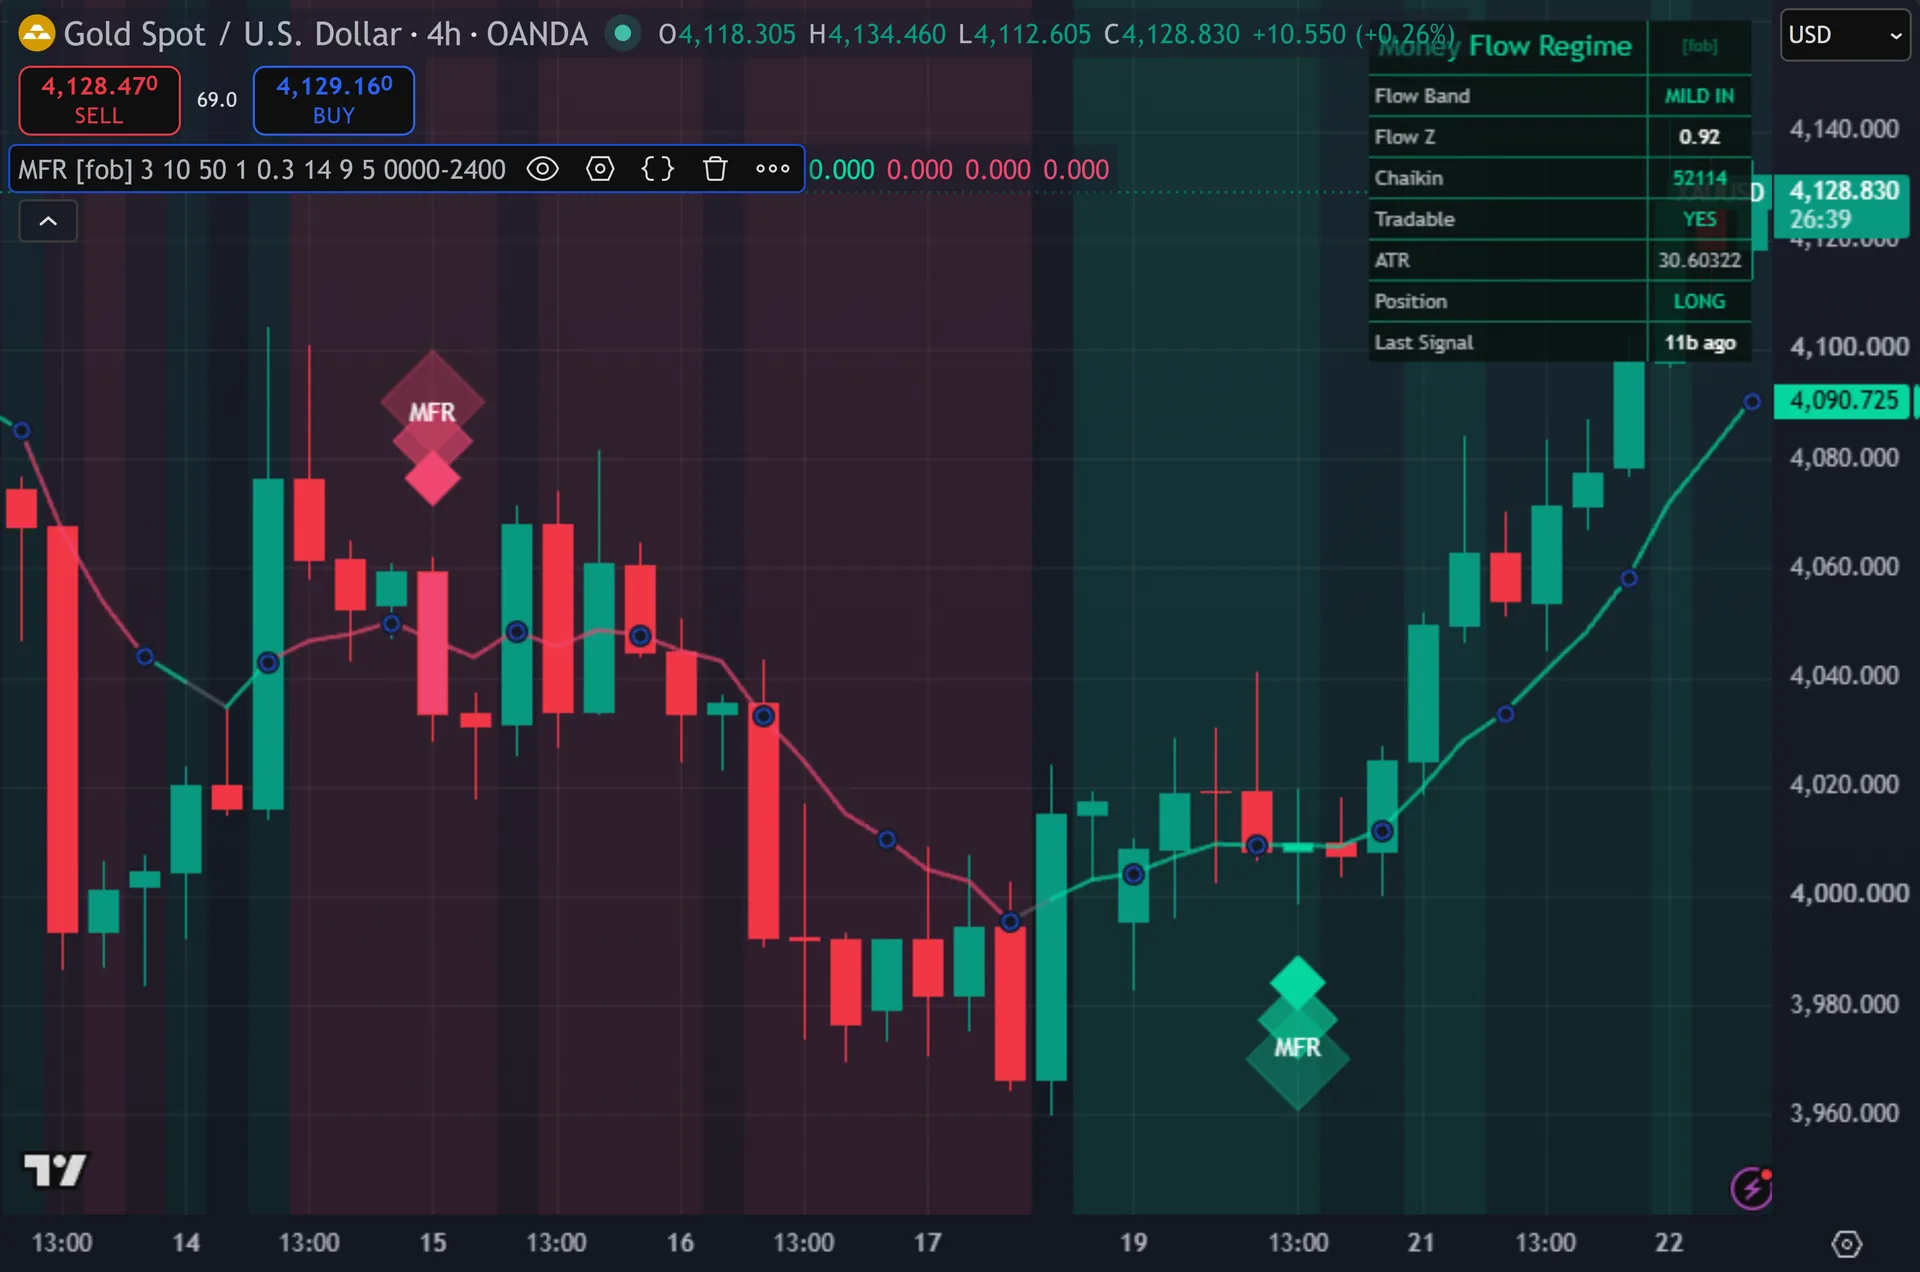
Every threshold here is relative. Still, the band cut points work on a z score, so 1.0 means the same thing on gold as on EURUSD. The candle position multiplier is a ratio too. That makes the defaults portable. Volume is the catch. Thus, spot forex feeds report broker tick counts rather than exchange contracts, so the accumulation distribution line reflects activity instead of traded size. On futures, crypto and stocks the volume input carries far more meaning.
Limitations worth knowing
The script marks entries and never marks exits. Hence, it holds no stop, no target, no trailing rule and no sizing. The position row simply remembers the last direction until the opposite signal arrives.
It depends entirely on volume. Next, a symbol with no volume feed produces a flat accumulation distribution line, a zero standard deviation and no bands at all. Tick volume also varies between brokers, so two feeds can print different z scores on the same pair.
A z score compares flow only against its own last 50 bars. Then, during a long steady trend, flow can stay high and still normalise back toward zero, so the band cools while price keeps running. Shorten the window for a faster read, or lengthen it for a steadier one.
Get Money Flow Regime on TradingView
Open Money Flow Regime on TradingView
If you also trade MetaTrader, the MT4 and MT5 indicator library is available below.
Get the complete indicator library
One email unlocks the full MT4 and MT5 indicator library. Yet, this TradingView script stays free on TradingView – the button above adds it to your chart.
Using it alongside MetaTrader
Adding a script on TradingView takes one click, so there is no install step here. Truly, if you want the same idea on MetaTrader, the MT4 and MT5 indicator installation guide walks through copying files into the data folder and attaching them to a chart. You can also browse the full MetaTrader indicator library, the MT4 indicators section, or the other free TradingView scripts published on this profile. For related chart tools see the MT5 indicators section and the forex trading strategies guides.
External references
- Money flow index on Wikipedia
- On-Balance Volume at Investopedia
- CandleVolume at StockCharts ChartSchool
Frequently asked questions
Does Money Flow Regime repaint?
No. Plainly, signals require barstate.isconfirmed, so the diamonds, bar tints and alerts all resolve at bar close. The background band tint does update inside the live bar, because it reflects the current z score. Also, treat that tint as context rather than a signal.
Is this the same as Chaikin Money Flow?
Not quite. Indeed, chaikin Money Flow sums money flow volume over a fixed window and divides by volume over the same window. This script builds a running accumulation distribution line, then takes the spread between its 3 and 10 period EMAs, which sits closer to the Chaikin Oscillator. Still, the z score banding on top belongs to this tool alone.
What does the flow z score actually mean?
It counts standard deviations. Thus, a z of 1.5 means the current Chaikin spread sits one and a half deviations above its own 50 bar mean. It compares flow against its own recent history, never against an absolute level.
Why did a strong inflow band produce no diamond?
The band sets bias only. Hence, price still has to cross the 9 period EMA upward on a closed bar. The 5 bar cooldown has to clear too, and the position state must not already read long. Next, the Tradable row on the dashboard shows whether the regime itself qualifies.
How much should I rely on this indicator?
Treat it as one input, not a decision. Then, it is a chart analysis tool, not trading advice. Test it on your own markets and timeframes before relying on it. Results are not guaranteed; past performance is not indicative of future results.

About the author
Written by Dominic Walsh, a Forex trader and MT4/MT5 indicator, Expert Advisor and script developer. Every tool on forexmt4systems.com is tested on live charts before release and ships with ready-to-use compiled MT4 (.ex4) and MT5 (.ex5) files. Learn more about the trader and developer behind this site.
How we build, test and correct every tool: Editorial & Testing Policy. Trading carries risk; see the disclaimer.