
Quiet markets rarely stay quiet. Also, squeeze Memory Cone is a price compression indicator TradingView traders can use to time the release. It marks compression whenever the 20-period Bollinger Bands sit fully inside the Keltner Channel. Indeed, when the bands push back out, the script stores the release price, reads direction from a detrended linear regression, and opens an expansion envelope from that point.
It is free and open source. Still, you can add it to any chart from the Squeeze Memory Cone script page on TradingView, and the full Pine source is published there for you to read.
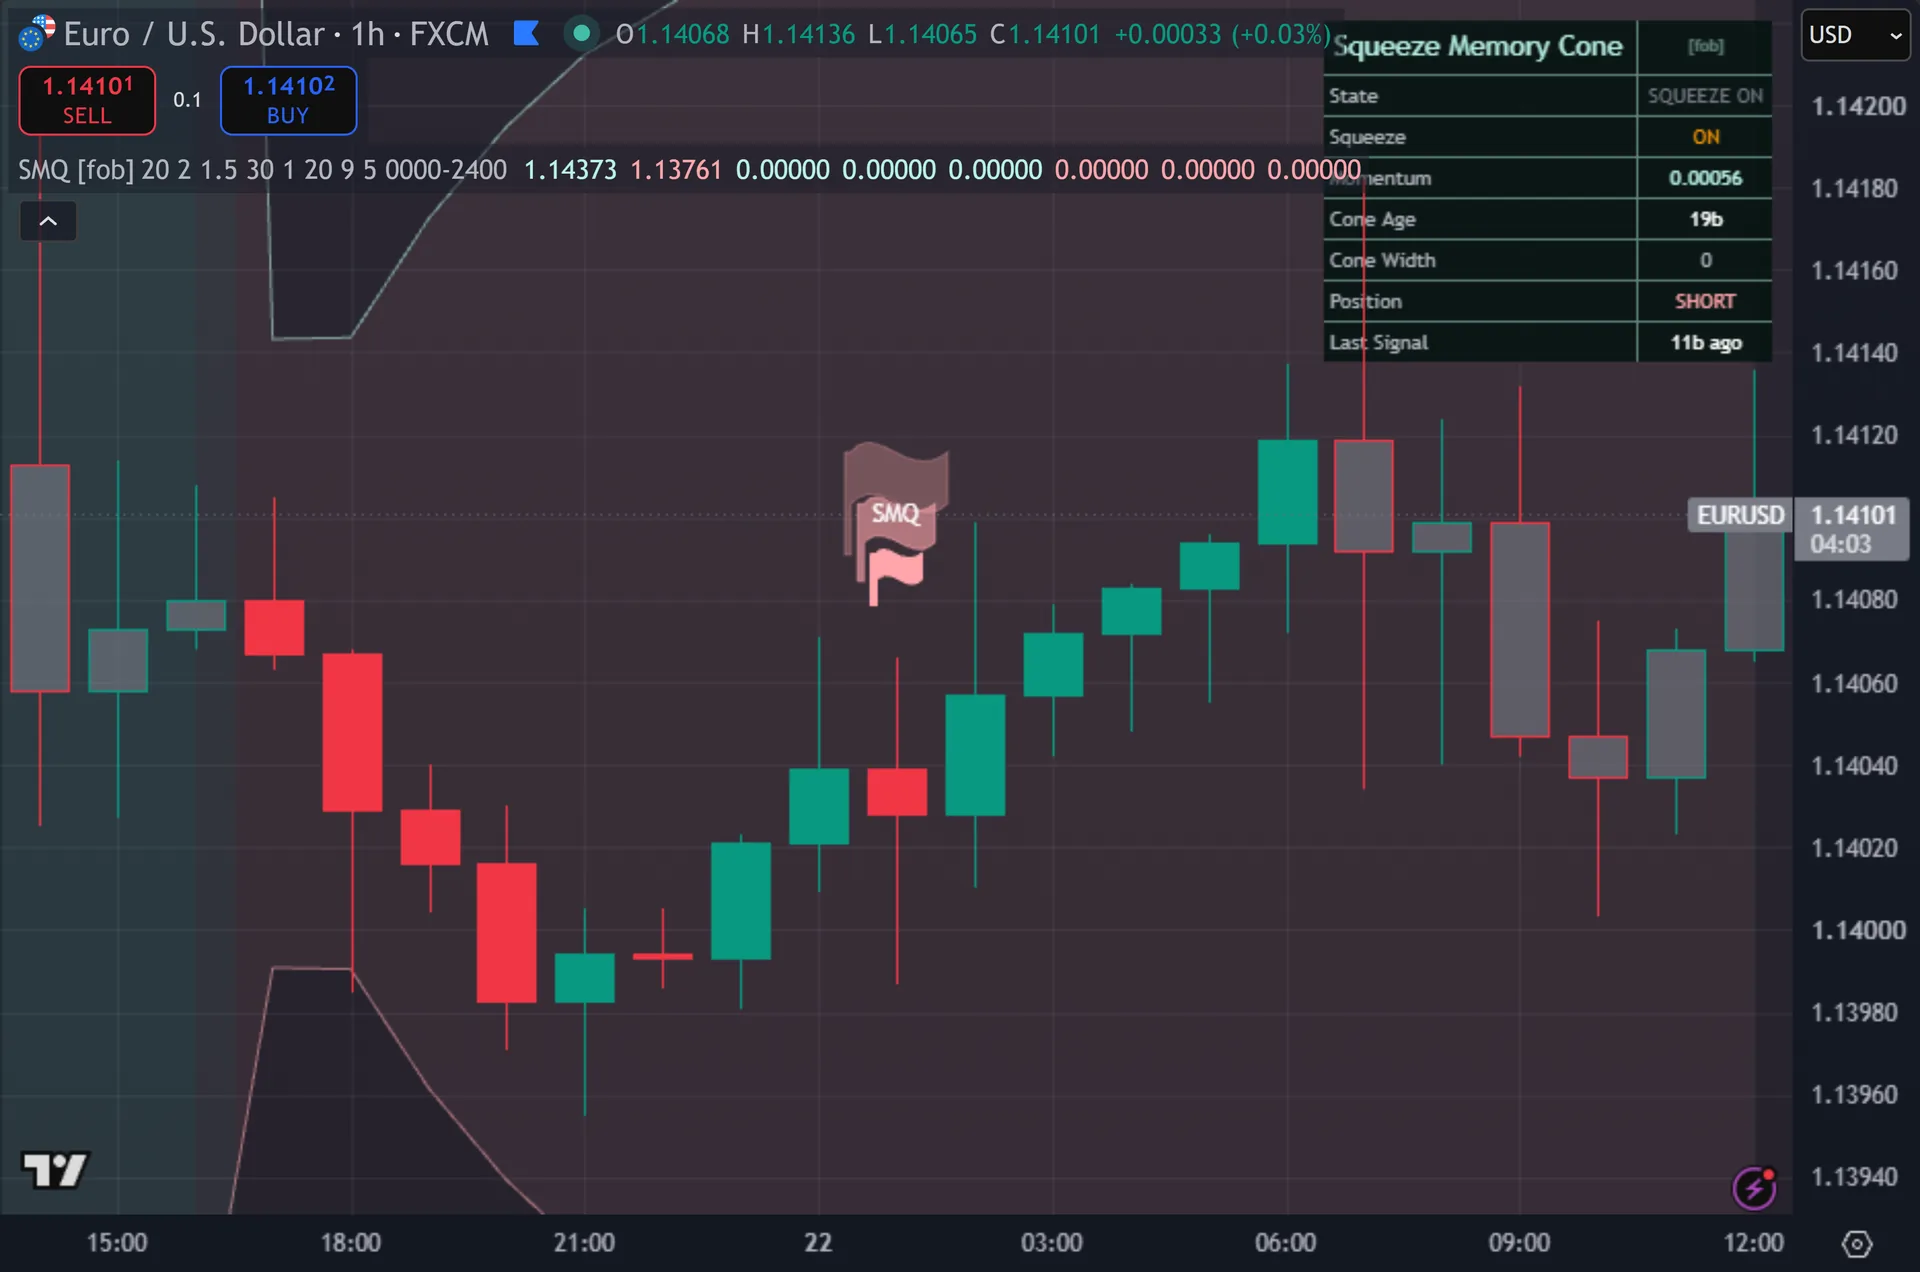
What Squeeze Memory Cone plots on the price chart
Two lines form the cone: an upper rail and a lower rail, both anchored to the release price. Thus, the fill between them takes the buy colour when the release read up and the sell colour when it read down. Bars turn grey while the squeeze holds, so compression shows without a second pane. Hence, flags mark entries above and below the bar with the text SMQ. The background tints with the active bias. Next, an eight-row dashboard reports state, squeeze on or off, the momentum value, cone age in bars, current cone width, position and bars since the last signal.

How Squeeze Memory Cone is built
Detecting the squeeze
The script builds both envelopes around the same 20-period simple moving average of close. Then, Bollinger width comes from 2.0 standard deviations. Keltner width comes from 1.5 times the 20-period average of true range. Yet, note the choice there: it averages true range with a simple mean rather than the smoothed ATR that ta.atr returns.
A squeeze exists when the upper Bollinger band sits below the upper Keltner band and the lower Bollinger band sits above the lower Keltner band. Truly, put plainly, the whole standard deviation envelope fits inside the true range envelope. That is the classic compression test.
A release fires on the first bar where the squeeze turns false after being true. On that bar the script reads direction from a 20-period linear regression of close minus its own 20-period average. Positive reads up, negative reads down. Plainly, it then stores three things: the bias, the closing price as the cone base, and the bar index.
Drawing the cone and timing entries
Cone half-width follows a fixed rule: 1.0 times ATR(20) times the square root of bars since release. Also, square root widening mirrors how a random walk spreads over time. The base price stays pinned to the release close, so both rails fan out from a single point.
The cone lives for 30 bars by default. Indeed, after that it switches off and the bias resets to zero. The rails plot bar by bar as new bars arrive rather than projecting forward into empty space, and the width uses the current ATR, so the envelope widens or narrows as volatility shifts.
Entries default to reclaim mode. Still, inside an active cone with an up bias, a close crossing over the 9-period EMA fires a buy. A close crossing under fires a sell in a down bias. Thus, switch on Release-Only Mode and the script instead fires on the release bar itself. Both paths need the five-bar cooldown, an alternating position state and barstate.isconfirmed.
How to read the signals
Grey bars are the setup, not the trade. Hence, they tell you the market has coiled. A longer grey run implies more stored compression, though nothing in the code measures that directly.
The cone answers a scale question. Next, price hugging a rail means the move expands at roughly the pace the square root rule expects. Price running outside the rail means expansion is faster than typical. Then, price drifting back to the base line means the release failed to follow through.
Watch the Cone Age row. Yet, at 30 bars the envelope closes, the bias clears and reclaim entries stop. The Momentum row shows the detrended regression value that set the bias, so you can judge how decisive the release was.
Every Squeeze Memory Cone setting explained
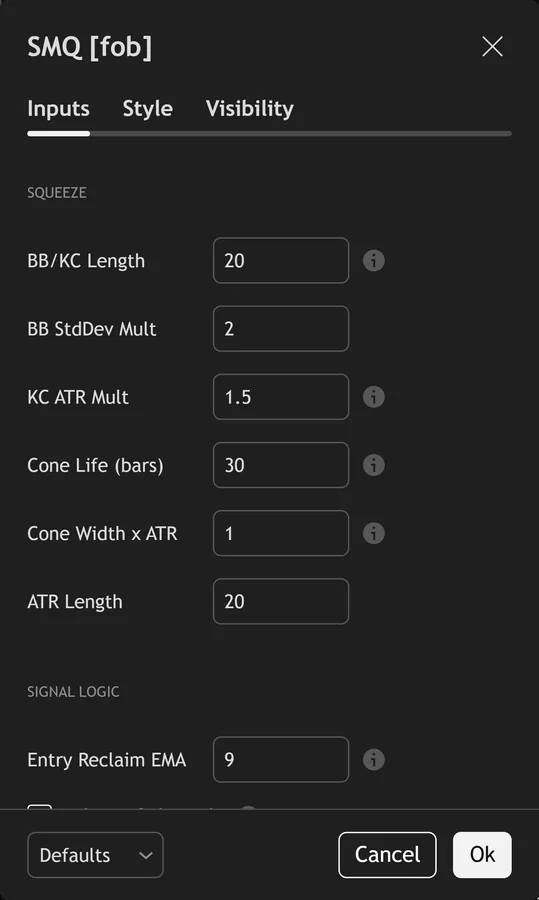
The script exposes 17 inputs, grouped in the settings panel exactly as shown below. Defaults are the published values.
Squeeze
| Setting | What it does | Default | Range |
|---|---|---|---|
| BB/KC Length | Length for both Bollinger Bands and Keltner Channel. | 20 | 5 to 100 |
| BB StdDev Mult | Sets the bb stddev mult used in the calculation. | 2.0 | 1.0 to 4.0 |
| KC ATR Mult | Squeeze = BB fully inside KC. | 1.5 | 0.5 to 4.0 |
| Cone Life (bars) | Bars the projected cone stays active after release. | 30 | 5 to 100 |
| Cone Width x ATR | Cone half-width grows as k x ATR x sqrt(bars since release). | 1.0 | 0.2 to 5.0 |
| ATR Length | Sets the atr length used in the calculation. | 20 | 5 to 50 |
Signal Logic
| Setting | What it does | Default | Range |
|---|---|---|---|
| Entry Reclaim EMA | After a release sets a bias, a close-cross of this EMA in that direction times the entry. | 9 | 2 to 50 |
| Release-Only Mode | On = fire only on the squeeze-release bar. Off = EMA reclaim inside the active cone (more signals). | off | on / off |
| Cooldown Bars | Sets the cooldown bars used in the calculation. | 5 | 1 to 40 |
Filters
| Setting | What it does | Default | Range |
|---|---|---|---|
| Restrict to Session | Toggles restrict to session on the chart. | off | on / off |
| Session Window | Controls session window. | 0000-2400 |
Visual
| Setting | What it does | Default | Range |
|---|---|---|---|
| Show Memory Cone | Toggles show memory cone on the chart. | on | on / off |
| Show Dashboard | Toggles show dashboard on the chart. | on | on / off |
| Show 3-Layer Glow | Toggles show 3-layer glow on the chart. | on | on / off |
| Buy Color | Colour used for buy color. | #b8f2e6 | |
| Sell Color | Colour used for sell color. | #ffa5ab | |
| Dashboard BG | Colour used for dashboard bg. | color.new(#04130f, 14) |
Alerts built into Squeeze Memory Cone
The script ships 15 alert conditions. Truly, open the alert dialog on the chart, pick the indicator as the condition source, then choose the event you want. Alerts fire on the close of the bar, so they follow the same confirmed-bar rule the on-chart signals use.
- SMQ Buy
- SMQ Sell
- SMQ Any Signal
- SMQ Squeeze On
- SMQ Release
- SMQ Release Up
- SMQ Release Down
- SMQ EMA Up
- SMQ EMA Down
- SMQ Cone Open
- SMQ Cone Expire
- SMQ Bias Flip
Other markets and timeframes
The script reads no volume at all, so it behaves the same on spot forex, gold, indices, crypto and equities. Plainly, every measure stays relative – standard deviation against true range, cone width against ATR – so the defaults transfer without retuning. Two settings deserve a second look per chart rather than per asset. Also, very quiet instruments hold a squeeze for long runs, so the 30-bar cone life can expire before the move matures. Fast intraday charts usually want a longer cooldown.

Limitations worth knowing
The cone describes expansion. It does not forecast it. The rails come from a fixed square root rule applied to current ATR, not from a fitted model, and no probability attaches to them.
The word memory covers one stored price and one stored bar index. Indeed, there is no learning, no record of past squeezes and no adaptation to how earlier releases behaved on the symbol.
Direction can be wrong at the release. Still, the regression reads the bar the squeeze ends, and a first push often reverses. The bias then holds for up to 30 bars, and reclaim entries keep firing that way until the cone expires.
It gives no stop, no target and no sizing. Thus, the dashboard position row simply tracks the side of the last signal.
Get Squeeze Memory Cone on TradingView
Open Squeeze Memory Cone on TradingView
If you also trade MetaTrader, the MT4 and MT5 indicator library is available below.
Get the complete indicator library
One email unlocks the full MT4 and MT5 indicator library. Hence, this TradingView script stays free on TradingView – the button above adds it to your chart.
Using it alongside MetaTrader
Adding a script on TradingView takes one click, so there is no install step here. Next, if you want the same idea on MetaTrader, the MT4 and MT5 indicator installation guide walks through copying files into the data folder and attaching them to a chart. You can also browse the full MetaTrader indicator library, the MT4 indicators section, or the other free TradingView scripts published on this profile. For related chart tools see the MT5 indicators section and the forex trading strategies guides.
External references
- Average true range on Wikipedia
- Bollinger Bands at Investopedia
- Cme Futures And Spot Prices at StockCharts ChartSchool
Frequently asked questions
Does Squeeze Memory Cone repaint?
Signals do not. Then, both booleans require barstate.isconfirmed, and the flags, glow layers and bar colouring key off the same booleans, so a flag prints only at bar close. The cone rails update on the forming bar like any plot, then fix when that bar closes.
What exactly counts as a squeeze?
Both Bollinger bands must sit inside the Keltner Channel at the same time. Yet, that means the upper band below the upper channel and the lower band above the lower channel. Defaults are a 20-bar length, 2.0 standard deviations and a 1.5 true range multiplier.
Why did a flag appear long after the squeeze ended?
Reclaim mode is the default. Truly, the release only sets the bias and opens the cone. The entry then waits for a close to cross the 9-period EMA in that direction, which can happen many bars later, up to the 30-bar cone life. Plainly, turn on Release-Only Mode to fire on the release bar instead.
Does it need volume data?
No. Also, nothing in the calculation touches volume, so instruments with a thin or missing volume feed work exactly the same. That also makes it a straightforward fit for spot forex, where volume is broker tick count rather than exchange volume.
How much should I rely on this indicator?
Treat it as one input, not a decision. Indeed, it is a chart analysis tool, not trading advice. Test it on your own markets and timeframes before relying on it. Results are not guaranteed; past performance is not indicative of future results.

About the author
Written by Dominic Walsh, a Forex trader and MT4/MT5 indicator, Expert Advisor and script developer. Every tool on forexmt4systems.com is tested on live charts before release and ships with ready-to-use compiled MT4 (.ex4) and MT5 (.ex5) files. Learn more about the trader and developer behind this site.
How we build, test and correct every tool: Editorial & Testing Policy. Trading carries risk; see the disclaimer.