
The cisd cid + bpr combined indicator runs three separate reads over the same bars and marks nothing until all three agree. Each one prints constantly on its own, which is exactly why the tool exists: it answers the narrower question of where they intersect.
This build ships as a compiled .ex4 for MT4 and .ex5 for MT5; the screenshots below come from EURUSD H1.
| Platforms | MT4 (.ex4) + MT5 (.ex5) |
|---|---|
| Chart window | Main price chart |
| Plots | 2: Confluence Buy, Confluence Sell |
| Alerts | popup, push notification, email, sound |
| Inputs | 39 |
What the CISD CID + BPR Combined Indicator shows
Confluence Buy marks a bar where all three reads line up on the long side.
Confluence Sell does the same on the short side.
Rectangle and trend line objects draw the zones each component found, so you can see what agreed.
Label and text objects name the components on the chart.
- Confluence Buy: arrow, aqua, width 3, arrow code 233
- Confluence Sell: arrow, orange red, width 3, arrow code 234
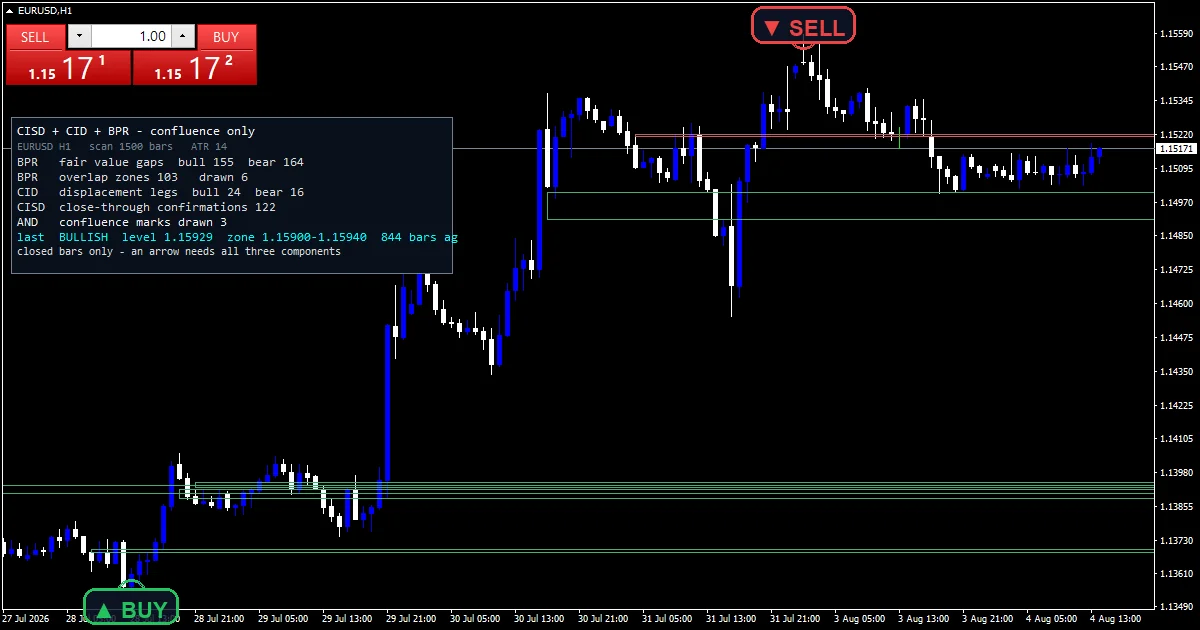
What happens on each bar
The change in state of delivery
A run is a maximal sequence of same direction candles. The open of its first candle marks the origin, meaning the price sellers began delivering from.
InpMinRun sets how many candles a run needs, two by default. InpRequireOpposite demands the run be genuinely opposite rather than merely drifting, and InpBufferPoints adds a tolerance to the level.
The second and third reads
InpRequireCid gates the second component and InpCidWindow limits how many bars it looks across. InpDispATR scales what counts as a displacement, expressed in ATR rather than points.
The third read pairs zones within InpPairWindow bars of each other. Each has to stand at least InpMinZoneATR of an ATR tall, which throws away the trivial ones.
Taking the intersection
Each component is generous by itself. Marking their overlap is what makes the output sparse enough to act on.
InpLookback caps how much history the scan covers, 1500 bars by default. The work repeats when a new bar opens rather than on every tick.
Reading it correctly
A marker means three separate reads agreed on one bar, which is much rarer than any of them alone.
The drawn zones show what agreed, so you can check a marker rather than trust it.
Every threshold works in ATR, so the same settings behave consistently across instruments.
Long gaps between markers are normal. The tool is built to be quiet.
Alert channels in this build: popup, push notification, email and sound, one message per closed bar.
Alerts cover popup, push, email and sound when all three components agree. A bar time check keeps it to one alert per closed bar.
Every CISD CID + BPR Combined Indicator input
Core settings: Scan
| Setting | What it does | Default |
|---|---|---|
InpLookback |
Bars scanned (100..20000). InpLookback caps how much history the scan covers, 1500 bars by default. | 1500 |
InpAtrPeriod |
ATR period (all size filters). InpAtrPeriod is the volatility window behind every threshold, 14 by default. | 14 |
Core settings: Component 1: CISD
| Setting | What it does | Default |
|---|---|---|
InpMinRun |
Candles required in the opposing run (1..10). InpMinRun is how many same direction candles make a run, 2 by default. Raising it demands a more deliberate move. | 2 |
InpRequireOpposite |
Confirming candle must be the opposite colour. InpRequireOpposite demands a genuinely opposite run rather than a drift. It defaults to true. | on |
InpBufferPoints |
Close must clear the CISD level by N points. | 0.0 |
Core settings: Component 2: CID
| Setting | What it does | Default |
|---|---|---|
InpRequireCid |
Require a same-side displacement leg. InpRequireCid gates the second component and also defaults to true. | on |
InpDispATR |
Displacement body size (x ATR). InpDispATR is how large a displacement has to be, in ATR, 1.00 by default. | 1.00 |
InpCidWindow |
Displacement must be within N bars of the CISD. | 5 |
Core settings: Component 3: BPR
| Setting | What it does | Default |
|---|---|---|
InpMinZoneATR |
Minimum BPR height (x ATR). InpMinZoneATR is the smallest zone height worth keeping, 0.05 of an ATR. | 0.05 |
InpPairWindow |
Max bars between the two paired gaps. InpPairWindow is how close two zones must sit in bars to pair up, 30 by default. | 30 |
InpZoneWindow |
A BPR stays live for N bars. | 60 |
InpZoneTolATR |
“at the zone” tolerance (x ATR). | 0.25 |
Core settings: Drawing
| Setting | What it does | Default |
|---|---|---|
InpMaxZones |
BPR rectangles drawn (object cap, 1..30). | 6 |
InpExtendBars |
Bars a zone / ray runs past its last bar. | 10 |
InpCooldown |
Minimum bars between same-side arrows. | 4 |
Core settings: Panel
| Setting | What it does | Default |
|---|---|---|
InpX |
Panel X offset (px). | 14 |
InpY |
Panel Y offset (px) – clears the one-click panel. | 120 |
Display settings
| Setting | What it does | Default |
|---|---|---|
InpMaxSignals |
Confluence marks drawn (object cap, 1..30). | 6 |
InpArrowATR |
Arrow distance from the bar (x ATR). | 0.90 |
InpBullColor |
Bullish confluence (lime test: red 0). | aqua |
InpBearColor |
Bearish confluence. | orange red |
InpZoneUpColor |
BPR below price (demand). | medium sea green |
InpZoneDnColor |
BPR above price (supply). | indian red |
InpShowZoneText |
Name each BPR zone. | on |
InpShowSignalText |
BUY / SELL text at the confluence bar. | on |
InpTextSize |
Chart text size. | 8 |
InpShowPanel |
Show the confluence panel. | on |
InpCorner |
Panel corner (0=UL 1=UR 2=LL 3=LR). | 0 |
InpFontSize |
Panel font size. | 9 |
InpFont |
Panel font. | Consolas |
InpPanelBg |
Panel background. | RGB 8,16,26 |
InpBorderColor |
Panel border. | slate gray |
InpTextColor |
Panel text. | gainsboro |
Alert settings
| Setting | What it does | Default |
|---|---|---|
EnableAlerts |
(see inputs panel) | on |
EnablePopup |
(see inputs panel) | on |
EnablePushNotify |
(see inputs panel) | off |
EnableEmail |
(see inputs panel) | off |
EnableSound |
(see inputs panel) | off |
SoundFile |
(see inputs panel) | alert.wav |
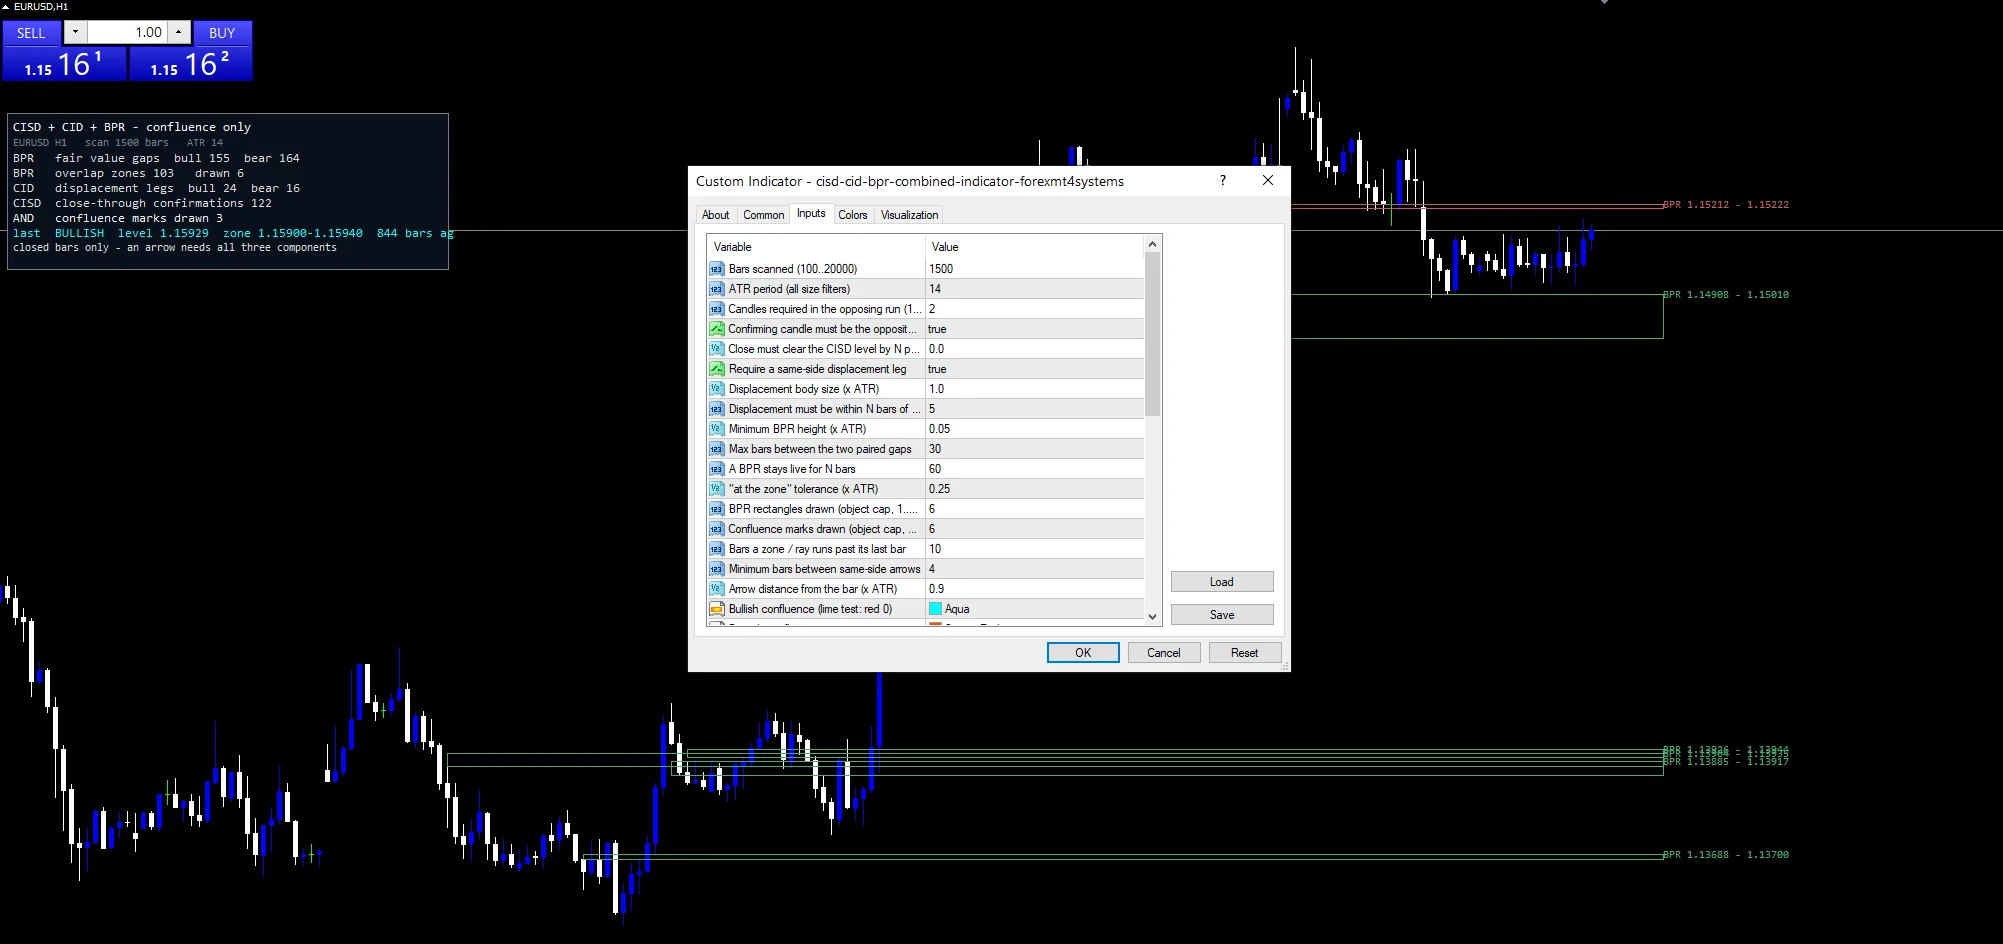
Timeframe and symbol
The screenshot uses EURUSD H1. Three components agreeing needs a chart with enough structure for each to have something to find, so H1 and H4 suit it. On M1 all three fire constantly and their overlap stops being selective. On daily charts the intersection may not occur for weeks.
Where it falls short
Three reads over the same bar stream are not three independent opinions. They share the same price data and often agree for the same underlying reason.
Requiring an intersection makes the output sparse, so a genuine setup where one component narrowly missed gets nothing.
InpLookback at 1500 bars means older structure never enters the scan, whatever it would have shown.
Every threshold is a convention rather than a fitted value. No one tested them against outcomes.
Copy the compiled CISD CID + BPR Combined Indicator file into your MQL4/Indicators folder, and the MT5 build into MQL5/Indicators, then restart the terminal and drag it onto a chart. The step-by-step guide with screenshots is at how to install MT4 and MT5 indicators.
Background reading on the method behind the CISD CID + BPR Combined Indicator: Specialized investment fund on Wikipedia, Stockcharts Ad Percent at StockCharts ChartSchool.
Download the CISD CID + BPR Combined Indicator for MT4 and MT5
The zip holds the compiled CISD CID + BPR Combined Indicator build for MT4 and MT5, plus a short README. Compiled files only, no source. Enter your email below and the download link arrives in your inbox.
Download this indicator free
Enter your email and the file is yours. You also get the full MT4 and MT5 library.
FAQ
Why does Confluence Buy need all three reads?
Each one prints constantly alone. A run origin, a displacement and a paired zone all occur regularly, and a chart marking every occurrence would be unusable. The intersection is the narrower question this tool exists to answer.
What does InpMinRun 2 define as a run?
A maximal sequence of at least two same direction candles. The open of its first candle marks the origin, the price sellers started delivering from. Raising InpMinRun demands a longer, more deliberate sequence before a run counts.
Why does InpDispATR work in ATR rather than points?
So one setting covers every instrument. A displacement worth one ATR is the same event on gold and on a currency pair. A fixed point figure would be trivial on one and unreachable on the other.
Does InpRequireCid off make the tool more useful?
It makes it less selective, which is the opposite of the design. Switching it false drops one of the three reads, so the intersection becomes an overlap of two and markers appear far more often. Most of those extra ones are the weaker cases the gate existed to remove.
Are results guaranteed?
No. Trading involves risk. Results are not guaranteed; past performance is not indicative of future results. Use the CISD CID + BPR Combined Indicator as one input. Always backtest before trading live.
External references
- The core method is documented in Specialized investment fund on Wikipedia.
- Additional market context is at Stockcharts Ad Percent at StockCharts ChartSchool.

About the author
Written by Dominic Walsh, a Forex trader and MT4/MT5 indicator, Expert Advisor and script developer. Every tool on forexmt4systems.com is tested on live charts before release and ships with ready-to-use compiled MT4 (.ex4) and MT5 (.ex5) files. Learn more about the trader and developer behind this site.
How we build, test and correct every tool: Editorial & Testing Policy. Trading carries risk; see the disclaimer.