
The debate over stop loss vs take profit misses the point that the two work as a pair. One caps what a trade can cost you, and the other books what it can pay. So they are not rivals at all, but rather the two ends of one single trade plan.
This guide walks through stop loss vs take profit with the math in plain view. You will see how each exit works, how the two set your reward-to-risk, and where new traders place them wrong. By the end you can size any trade around both lines with confidence.
Stop Loss vs Take Profit: The Two Exits
Every trade needs a plan to leave, in both directions. The stop loss handles the bad exit, and the take profit handles the good one. So before you enter, you already know where you will get out either way.
A stop loss is a resting order that closes a losing trade at a set price. It caps the damage when the market moves against you. So the stop marks the exact point where your trade idea has simply failed.
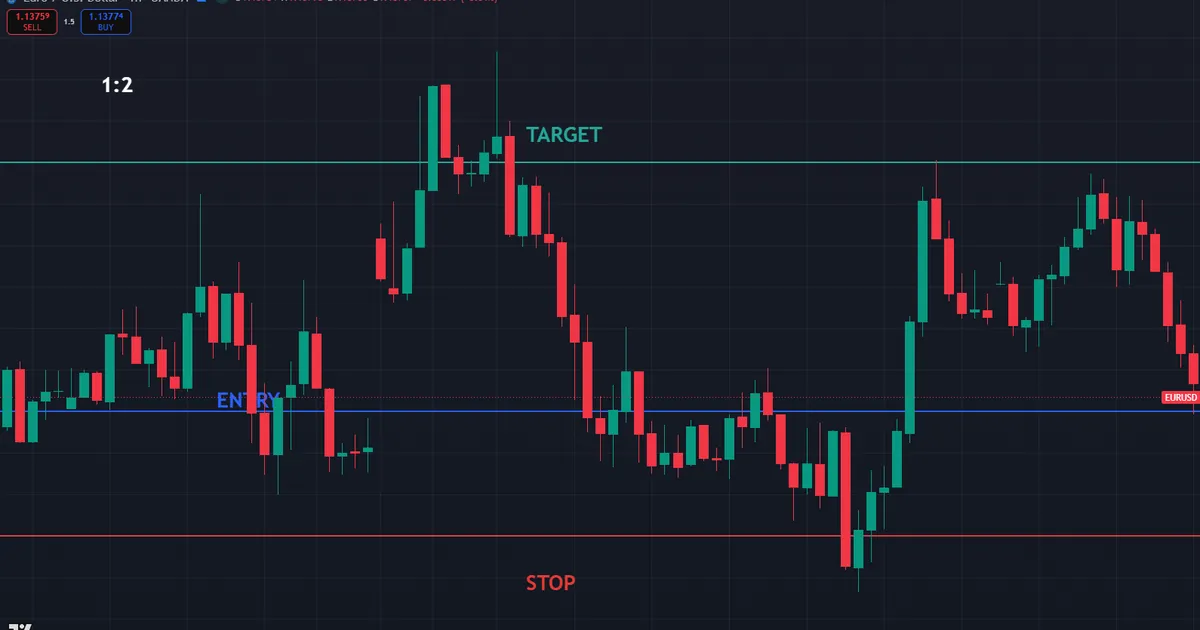
A take profit is the mirror image. It is a resting order that closes a winning trade at a set price. So the target locks in the reward once price travels far enough your way. Without it, a healthy gain can melt back to nothing while you hesitate over when to exit.
Both orders sit on the broker’s server, ready to fire without you. That matters, because the hardest moment to act well is while a trade moves fast. So the two exits turn a heated decision into a calm one made in advance.
Think of the pair as the two walls of a channel your trade travels through. The stop marks the floor you refuse to fall below. The target marks the ceiling where you happily step off. So the trade lives inside a range you defined before risking a cent.
New traders often obsess over the entry and treat the exits as an afterthought. That order of priorities is backward. A mediocre entry with two disciplined exits usually beats a perfect entry with none, since the exits control what actually lands in your account.
Why Both Beat Watching the Screen
Some traders skip the orders and plan to close by hand. In theory that offers flexibility. In practice emotion takes over, and the trader freezes on losers and bolts on winners.
Resting orders remove that flaw. The stop and target execute at your chosen levels whether you watch or not. So discipline is baked into the trade rather than summoned in the moment.
How the Broker Fills Each Order
A take profit usually rests as a limit order. It fills at your price or better once the market reaches it. So a target tends to give you the exact level you asked for, or a touch more.
A stop loss usually rests as a stop order. When price trades through your level, it turns into a market order and fills at the next available price. So a stop can slip in fast markets, filling a little worse than the line you drew.
Knowing this shapes your plan. You can lean on the target level as fairly exact, yet you treat the stop as a rough ceiling on risk. So a small buffer in size guards you against the slip a stop can bring.
How Each Exit Works
The mechanics are simple, yet the details decide everything. Walk through both exits in order, since the stop usually comes first in your thinking.
- Read the stop from structure. Find the price where your trade idea is wrong, such as below a swing low.
- Measure the risk. The distance from entry to the stop, in pips or units, is your risk.
- Set the target from structure. Find a realistic level price can reach, such as a prior high.
- Measure the reward. The distance from entry to the target is your reward.
- Compare the two. Divide reward by risk to read the ratio the trade offers.
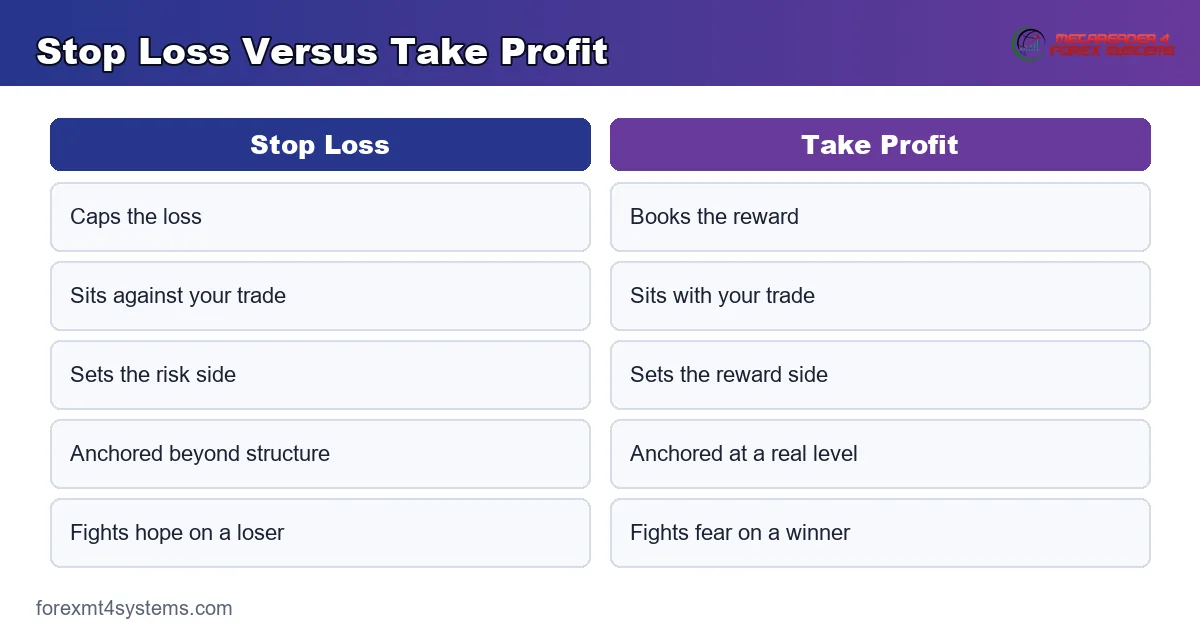
Notice the order of operations. The stop and target both come from the chart, not from a wish. So you read what the market offers, then judge whether the ratio clears your floor.
Placing the Stop Loss
A good stop sits beyond the noise, at a level that would prove you wrong. For a long, that often means below a recent swing low. So a normal wobble leaves the trade alone, while a real breakdown closes it. The distance depends on the pair and the timeframe, so a volatile pair earns a wider stop than a quiet one.
The classic error is a stop pinned too close. Price brushes it on routine noise, and the trade dies before it can work. So give the stop room to breathe, and let structure, not fear, set the distance.
Placing the Take Profit
A good target sits where price has a reason to stall. A prior high, a round number, or a clear level all qualify. So the target rests where sellers or buyers are likely to wake up.
The mirror error is a target floated in empty space. Chosen only to flatter the ratio, it rarely fills. So anchor the reward to real structure, and accept the ratio that honest level yields.
A useful habit is to place the target a shade before the obvious level rather than right at it. Price often stalls just shy of a prior high as others rush to exit there. So a target that fills a few pips early beats a greedy one that watches the reward slip away.
A Side-by-Side Comparison
The table below lines up the two exits on the features that matter. Read it once, and the pairing clicks into place.
| Feature | Stop Loss | Take Profit |
|---|---|---|
| Job | Caps the loss | Books the reward |
| Direction from entry | Against your trade | With your trade |
| Sets which side of R:R | The risk | The reward |
| Placement anchor | Below or above structure | At a realistic level |
| Common error | Too tight, stops out early | Too far, never fills |
| Emotion it fights | Hope on a loser | Fear on a winner |
How the Two Exits Set Your Risk Reward
Here is where stop loss and take profit stop being separate ideas. Together they define the reward-to-risk ratio, the single most useful number in a trade plan. So the two exits are really one measurement with two ends.
The ratio compares reward against risk. A twenty pip stop and a forty pip target give a one-to-two ratio. So the target pays twice what the stop risks, and the trade reads one to two at a glance.
Reading the Ratio
A higher ratio means the reward dwarfs the risk. Yet a bigger ratio also pushes the target farther, so price reaches it less often. So the ratio never stands alone; it pairs with how often the target actually fills.
Our risk reward calculator reads the ratio for you. Enter the stop and target distance, and it returns the reward-to-risk in a click. So you can screen a setup before you ever place the order.
Setting a Reward Floor
Most disciplined traders demand a minimum ratio. A common floor sits near one-to-1.5, and many ask for one-to-two. So a setup whose target pays too little for its stop simply gets skipped.
This floor quietly raises quality. It throws out cramped trades where the reward barely clears the spread. So you take fewer setups, and the ones you take carry a fairer payoff over time.
Why the Ratio Needs a Hit Rate
A ratio alone cannot tell you whether a method earns. You also need the share of trades that reach the target. So the two numbers work as a pair, and neither means much on its own.
Picture a one-to-two setup that fills the target half the time. Over ten trades, five winners pay two units each and five losers cost one each. So ten units of reward stack against five of risk, a clear edge before costs.
Now drop the hit rate to one in five on that same ratio. Two winners pay four units while eight losers cost eight. So the edge vanishes, even though every winner still doubled the risk. The target must fill often enough to matter.
Matching Stop and Target to Your Style
No single stop-and-target style fits everyone. A scalper and a swing trader live in different worlds, so their exits differ too. Match the pair to how you actually trade, not to a rule you read once.
Exits for Scalpers
A scalper takes many quick trades and leans on a high hit rate. The stop and target both sit close, which yields modest ratios near one-to-one. So a strong fill rate carries the small reward, and speed does the rest.
The risk for scalpers is cost. A tight target barely clears the spread, so every pip of slippage stings. So a scalper watches spreads closely and stands aside when liquidity thins.
Exits for Swing Traders
A swing trader holds for days and aims at larger moves. The target sits far out, which lifts the ratio toward one-to-three or beyond. So a lower hit rate still earns, since each winner pays generously.
The trade-off is patience. Wide targets fill slowly, and losing streaks between big wins can run long. So a swing trader sizes small enough to sit through the quiet stretches without flinching.
Let the Timeframe Guide You
The chart you trade nudges the honest pair too. Short charts offer frequent, closer targets and higher fill rates. Longer charts offer rarer, wider targets and lower fill rates, which lifts the workable ratio.
So there is no universal stop or target, only a fit between the two exits and your method. Find where your trades naturally land, then respect it. The best pair is the one your own trading actually sustains.
A Worked Stop and Target Example
Numbers make the pairing concrete, so walk a trade end to end. You spot a long on EURUSD near 1.14, with structure pointing higher.
Structure puts a swing low forty pips below entry, so the stop sits there. A prior high sits eighty pips above, so the target rests there. That gives a clean one-to-two, which clears a one-to-two floor exactly.
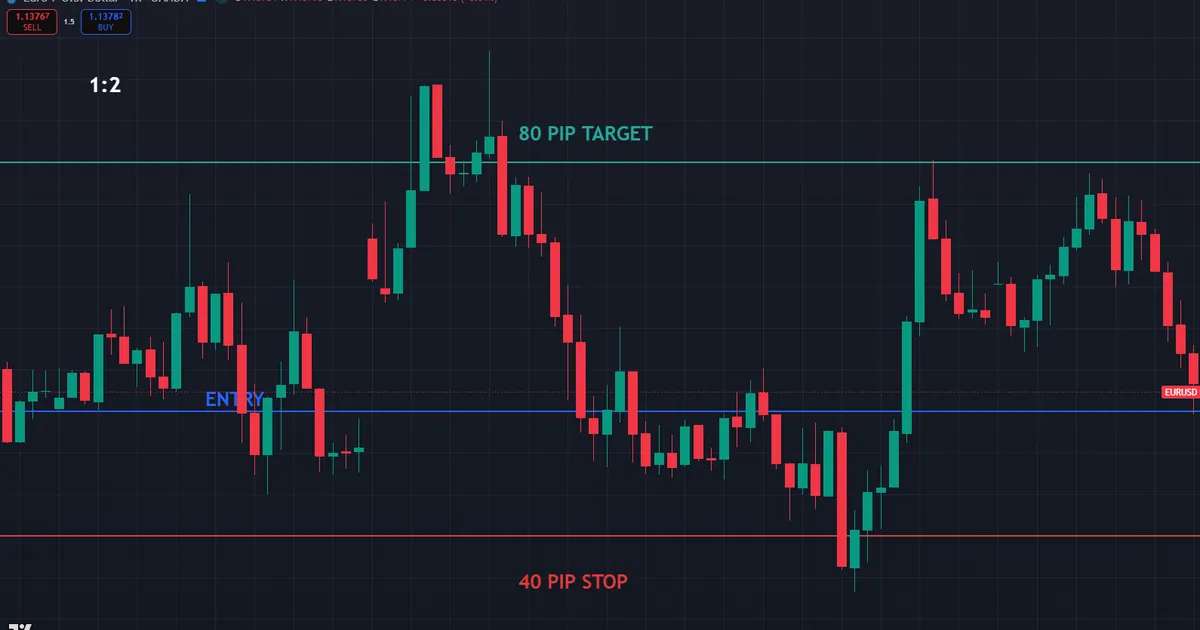
Now play it forward both ways. If the stop hits, you lose your planned risk and move on. If the target fills, you gain twice that amount, so a single winner covers two losers.
Change one input and watch the trade shift. Drag the target to only twenty pips for a quick scalp, and the ratio falls to one-to-one. So the same stop now needs a far higher hit rate to pay, which is the cost of a nearer target.
Push the target the other way instead. Stretch it to one hundred and twenty pips while the stop holds at forty, and the ratio jumps to one-to-three. Yet that distant target fills less often, so the higher ratio buys forgiveness at the price of fewer wins.
This is the core trade-off in one trade. The stop mostly guards your risk, while the target dials the reward and the fill rate together. So every choice about the target is really a choice about how often you expect to be paid.
Download the complete indicator database
Put these concepts on your charts. One email unlocks the full library of 1,380+ indicators with compiled MT4 and MT5 files, plus my TradingView scripts. No paywall, no spam, unsubscribe any time.
Get free access to my indicator database
One email unlocks 1,380+ free MT4, MT5 and TradingView indicators — the complete library. No single-tool download; you get the whole database.
How Costs Bend the Ratio
Costs bend the clean numbers a little. The spread widens your effective stop and trims your effective target. So a one-to-two on paper may land closer to one-to-1.8 in practice, which argues for a small buffer in the target.
Swap can bend them further on a multi-day hold. An overnight charge nibbles a slice of the reward each night the trade stays open. So a swing trader who holds for a week folds that cost into the target math rather than pretending it away.
Common Stop and Target Mistakes and Fixes
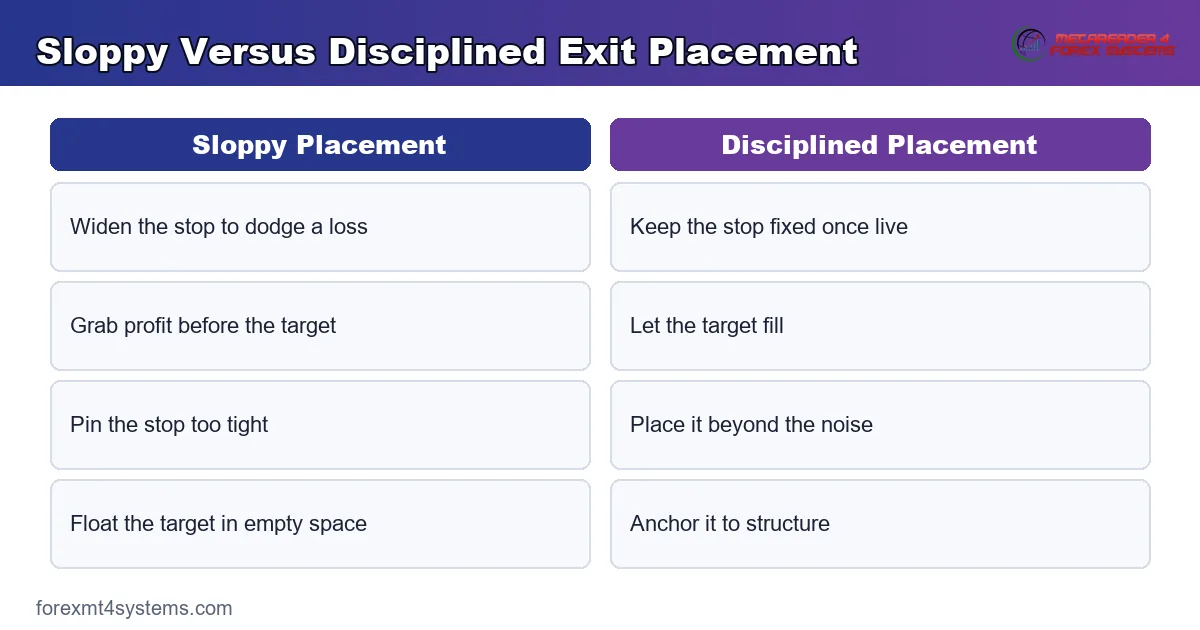
The concept is simple, yet the same errors surface on new accounts. Most come from placing an exit to soothe a feeling rather than to respect the chart. The compare graphic below sets sloppy placement against disciplined placement.
Moving the Stop to Avoid a Loss
The worst habit is widening a stop as price nears it. That move turns a small planned loss into a large surprise one. So set the stop before entry, and treat it as fixed law once the trade is live.
Taking Profit Too Early
Fear often closes a winner well before the target. That habit shrinks your real reward below the plan. So honor the target you set, and let the trade reach it rather than snatching a fraction.
A Stop Pinned Too Tight
Cramming the stop close to entry feels safe, yet it courts a needless exit. Normal noise clips the stop, and a good idea dies young. So place the stop beyond the noise, where only a real failure triggers it.
A Target Set in Empty Space
Chasing a grand ratio, some traders float the target far from any level. It rarely fills, and the flattering ratio lies. So anchor the target to structure, and take the ratio that honest level offers.
Skipping One Exit Entirely
Some traders set a target but no stop, or the reverse. Half a plan invites the full loss or a runaway winner turned loser. So place both exits on every trade, and let the pair guard the position.
Setting Exits After Entry
Placing the stop and target only after you are already in the trade lets the current price color your judgment. A move against you tempts a wider stop, and a move your way tempts an early grab. So decide both levels before you click, while your view is still cool and honest.
Quick Reference Checklist
Keep this short list beside the platform. Run through it before you place any trade.
- Read the stop from structure, beyond normal noise.
- Measure the risk from entry to the stop.
- Set the target at a realistic level price can reach.
- Measure the reward from entry to the target.
- Divide reward by risk, and reject anything under your floor.
- Place both orders before entry, and leave the stop alone.
Pitfalls and Edge Cases
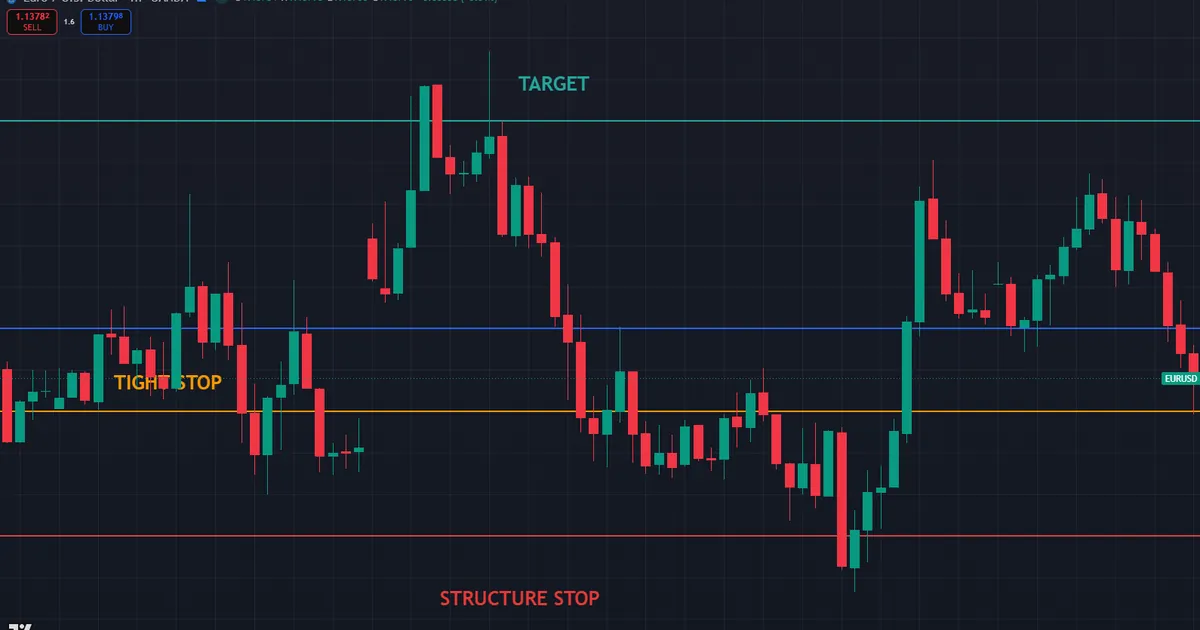
A few wrinkles bend the clean rule, so keep them in view. The chart below sets a tight stop close to entry against a structure stop further below. Both placements share the same target above. So the wider line gives the trade room the tight one never had.
Gaps Can Skip Your Stop
A stop caps risk in normal trade, not across a weekend gap. Price can leap past the level and fill worse. So trim size before major news or a Friday close, since a gap ignores the line you drew.
Slippage on Both Exits
Fast markets fill orders past their level. Your stop may cost a little more, and your target may pay a little less. So build a small buffer into the plan, and treat the drawn ratio as slightly generous.
Partial Take Profits
Some traders scale out at several targets rather than one. Each slice books a different reward, so the blended ratio differs from the headline. So track the average reward across your exits, not just the farthest target.
Trailing the Stop
A trailing stop slides up behind a winner to lock in gains. It can lift the real reward beyond the fixed target. So a trailing exit changes the ratio as the trade runs, which rewards attention rather than a fixed line.
Related Concepts to Study Next
The two exits link to a wider set of risk skills, and a few deserve your next reading hour. Stop placement rewards a closer look, since it anchors the risk side. The ratio it feeds then shapes every judgment you make.
Start with our guide on how to use a stop loss for placement in depth. Then read the risk reward ratio explained and what a good risk reward ratio is to judge the payoff well. To size the trade around your stop, study risk per trade, run the numbers on our position size calculator, and see how it fits a plan on our forex trading strategies hub.
FAQ
What is the difference between stop loss and take profit?
A stop loss closes a losing trade at a set price to cap the loss. A take profit closes a winning trade at a set price to book the reward. So the stop guards the downside while the target locks in the upside.
Should I always use both a stop loss and a take profit?
Placing both on every trade is the safer habit for most traders. The stop caps the loss, and the target frees you from watching for the exit. Together they turn a heated decision into a calm plan made in advance.
How do stop loss and take profit set the risk reward ratio?
The stop sets the risk, the distance from entry to the stop. The target sets the reward, the distance from entry to the target. Divide reward by risk, and you read the ratio the trade offers.
Where should I place my stop loss?
Place the stop beyond normal noise, at a level that would prove your idea wrong. For a long, that often sits below a recent swing low. A stop pinned too close courts a needless exit on routine wobbles.
Can I move my take profit after entering?
You can, and a trailing exit does exactly that to lock in gains. Yet dragging a target farther only to chase a bigger ratio often strands it in empty space. So change the target with a plan, not with hope.
Does using a stop loss and take profit promise a profit?
No exit plan promises a profit on any single trade or short run. The pair only caps your losses and books your rewards so an edge can play out over many trades. Size small, respect both levels, and let the numbers work with patience. Results are not guaranteed; past performance is not indicative of future results.
External references
- For background on this concept, see Take Profit at BabyPips Forexpedia.
- For broader market context, see Stop Order at Investopedia.

About the author
Written by Dominic Walsh, a Forex trader and MT4/MT5 indicator, Expert Advisor and script developer. Every tool on forexmt4systems.com is tested on live charts before release and ships with ready-to-use compiled MT4 (.ex4) and MT5 (.ex5) files. Learn more about the trader and developer behind this site.
How we build, test and correct every tool: Editorial & Testing Policy. Trading carries risk; see the disclaimer.