
Order block trading is a method, not an indicator. Also, it rests on one idea: large orders do not fill in a single candle. Banks and funds build positions in stages, and the footprint they leave is the last opposing candle before a strong move. Indeed, price often returns to that candle later, and the zone it covers can act as support or resistance. This guide teaches the full method from scratch: what a valid block looks like, how bullish and bearish blocks differ, when a block is mitigated or dead, what a breaker is, and how to assemble all of it into one repeatable entry model. Still, the tools come last, because a rectangle on a chart means nothing until you know why it is there.
What an order block really is
Strip away the jargon and an order block is simple. Thus, it is the last candle that moved against a strong impulse. Before a sharp rally, there is usually one final down candle. Hence, before a sharp drop, there is one final up candle. That candle is the block.
Why does that candle matter? Next, large players cannot buy size into a rising market without pushing price against themselves. So they buy while price still looks weak. Then, the final down candle before a rally is often where the last of that buying happened. Sellers who sold into it are now trapped. Yet, when price returns to the zone later, resting interest and trapped positions both tend to react there.
The key word is displacement. Truly, the move away from the block must be fast and decisive, ideally breaking a recent swing high or low. A small drift upward after a down candle proves nothing. Plainly, a wide-bodied candle, or a run of them, that clears structure is evidence that real orders drove the move. No displacement, no block. Also, this single filter removes most of the junk zones beginners mark. If the ICT vocabulary is new to you, the full ICT indicators guide covers how blocks connect to liquidity, fair value gaps, and kill zones.
Bullish and bearish blocks, and how to refine the zone
A bullish order block is the last bearish candle before an upward displacement. Indeed, you expect it to act as demand: price trades back down into it, buyers defend it, and price turns higher. A bearish order block is the mirror image. Still, it is the last bullish candle before a downward displacement, and you expect it to act as supply on the retest.
The raw zone runs from the candle’s high to its low. On higher timeframes that range can span many pips, which makes stops wide and entries vague. So traders refine it. Thus, the most common refinement is the mean threshold: the 50% level of the block. Price frequently trades into the upper half of a bullish block, taps the midpoint, and turns. Hence, entering at the mean instead of the top edge tightens risk considerably.
The second refinement uses the candle’s open. For a bullish block, the open of that final down candle sits near the top of its body. Many traders treat the body, open to close, as the real zone and the wick as the extreme. Next, a practical approach: set an alert at the edge, watch the reaction at the mean, and treat a clean close beyond the far side as the exit signal. The next section turns that idea into rules.
Download the complete indicator database
Every order block tool in this guide ships in one download. One email unlocks the full library of 1,380+ tools with compiled MT4 and MT5 files, plus my TradingView scripts. No paywall, no spam, unsubscribe any time.
Get free access to my indicator database
One email unlocks 1,380+ free MT4, MT5 and TradingView indicators — the complete library. No single-tool download; you get the whole database.
Mitigation and invalidation
A block has a life cycle, and you need to know which stage it is in before you trade it. Yet, an unmitigated block is one price has not yet returned to since the displacement. These are the zones worth watching, because the interest that formed them has not been tested.
Mitigation happens the first time price trades back into the zone. Two outcomes follow. Either the zone holds and price displaces away again, or price simply passes through. Truly, a block that held once can still work on a second visit, but each retest consumes some of the resting interest. First touch is the highest-quality touch. By the third visit, the zone is usually spent.
Invalidation is stricter than most beginners assume. Plainly, a wick through the block is not death; wicks hunt stops. The common rule is a full candle body closing beyond the far side of the zone on the timeframe that defined the block. Also, once that close prints, stop treating the zone as support or demand. Delete it, or better, watch it for the flip described next. Indeed, trading a dead block as if it were fresh is one of the most common ways this method loses money.
Breaker blocks: when a failed block flips
A broken order block is not garbage. Still, it often becomes the next trade. When price closes decisively through a bullish block, the buyers who defended it are now trapped in losing positions. As price rallies back up to the same zone, those trapped buyers sell to get out flat. Old demand behaves as new resistance. Thus, that flipped zone is a breaker block.
The logic mirrors on the other side. Hence, a bearish block that fails becomes potential support on the retest from above. Traders who shorted the zone cover into the return, and buyers who forced the break defend their entry area.
Two conditions make a breaker worth trading. First, the original block must have been legitimate, formed with real displacement. Second, the break itself must displace, not drift. Next, a grinding, overlapping push through a zone traps nobody. A fast break with follow-through does. Then, treat the breaker retest exactly like a normal block retest: same refinement, same confirmation, same invalidation rule, just with the direction reversed.
A complete order block trading entry model
Here is one honest way to assemble the pieces into a checklist. Yet, it is a structure for making decisions, not a promise about outcomes.
Step one: establish bias on the higher timeframe. On H4 or daily, decide which side is displacing. Truly, if the chart prints higher highs with strong bullish displacement, you only look for bullish blocks to buy. Trading blocks against the higher-timeframe flow is where most losing trades in this method come from.
Step two: mark the unmitigated blocks in the path of price. Find the last opposing candle before each qualifying displacement and mark its zone. Plainly, discard anything already mitigated twice, and refine large zones to the mean threshold.
Step three: wait for price to reach the zone, then drop to the lower timeframe. On M5 or M15, do not buy the touch blindly. Also, wait for confirmation inside the zone: a displacement in your direction, a structure shift, or a fair value gap forming as price turns.
Step four: place the stop beyond the block, not inside it. A few pips past the far edge, beyond the wick. Indeed, if the block fails, the idea is wrong, and the stop should say so. Target the next opposing zone or the liquidity above or below an obvious swing. Still, risk a fixed fraction of the account per trade and judge the model over a large sample, not over any single outcome.
Tools that mark order blocks for you
Manual marking teaches the concept, but it does not scale across pairs and sessions. Thus, these three tools from the library automate the detection while you keep the decisions. For a ranked tool comparison covering ten order block indicators, see the dedicated shortlist; the picks below are the three that map most directly onto the method taught above.
| Tool | What it marks | Best timeframes | Alerts |
|---|---|---|---|
| Order Block | Last opposing candle before an ATR-qualified displacement, with buy and sell arrows | M15–H4 | Popup + push |
| Breaker Blocks + Order Blocks | Live blocks plus broken zones recolored to breaker state, five per side | M15–H1 | Popup + push |
| Auto Order Block | Block candles behind impulses exceeding 1.5x ATR(14), fully automatic | M15–H1 | Popup + push |
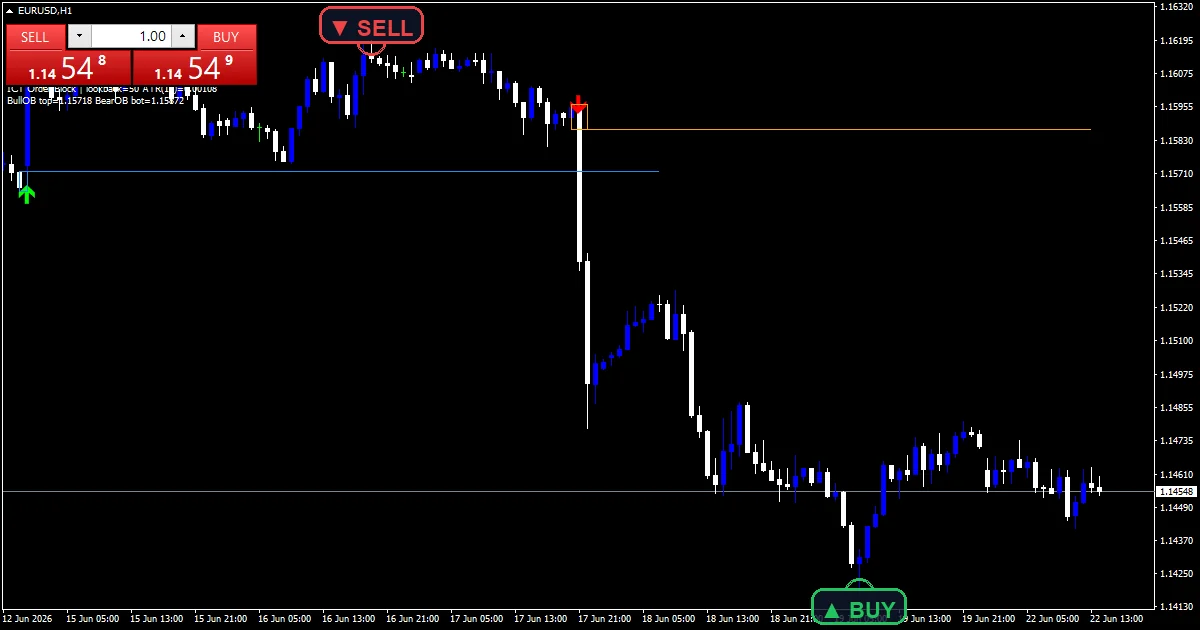
Order Block
The base detector. Hence, it finds the last opposing candle before a displacement that clears an ATR-based threshold, marks the zone, and prints an arrow on the qualifying bar. Verdict: the cleanest match for the method in this guide, because every zone it draws traces back to the displacement rule from the first section. Limitation: it detects location only. Confirmation, bias, and the stop remain entirely your job, exactly as the entry model requires.
Breaker Blocks + Order Blocks
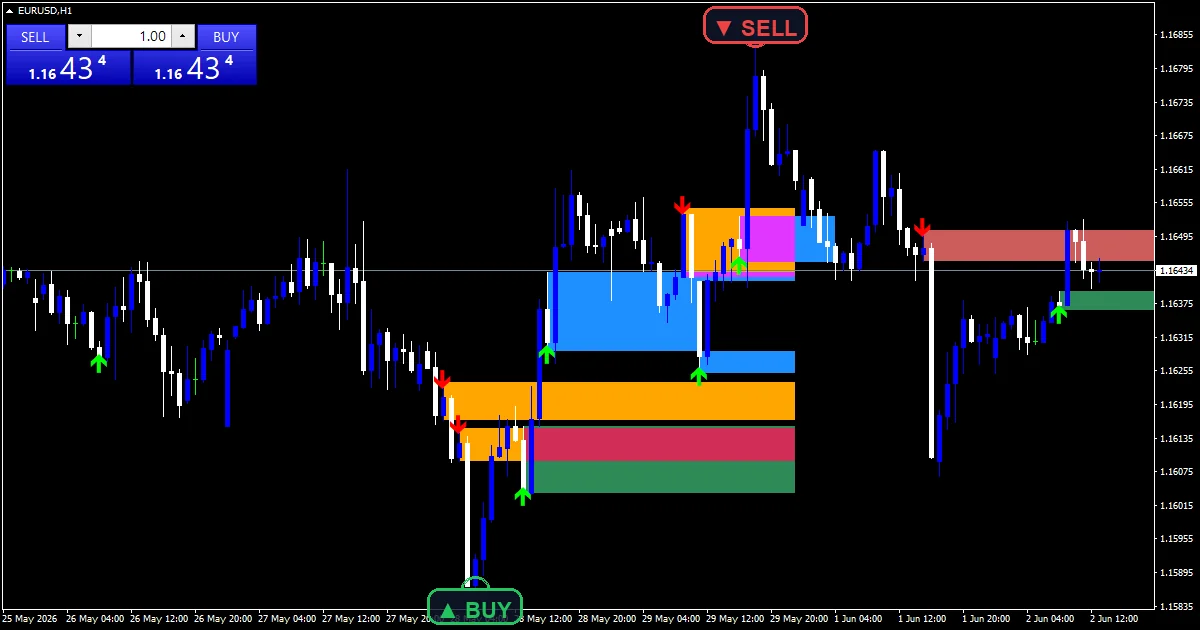
This tool tracks the full life cycle. Next, it qualifies blocks with a 1.0x ATR(21) impulse gate, caps display at five zones per side, and recolors any zone price closes through into its breaker state. Verdict: the right pick once you trade the flip as well as the first retest, since chart state stays readable at a glance. Then, limitation: the five-per-side cap rotates the oldest zones off the chart, so a still-valid higher-timeframe block can disappear on a fast trending day.
Auto Order Block
The teaching tool. Yet, it checks every closed bar against a 1.5x ATR(14) impulse test and marks the block plus a buy or sell arrow when the test passes. Almost nothing to configure. Truly, verdict: run it while you learn, and compare its zones against the ones you mark by hand; the gaps between the two are where your understanding grows. Limitation: the permissive threshold marks plenty of blocks on choppy low timeframes, so it needs the higher-timeframe bias filter to be usable.
Honest limitations of the method
Order blocks are a lens, not a law. Plainly, plenty of textbook zones fail, and they fail most often in exactly the conditions that produce the best-looking charts elsewhere. Strong trends mitigate blocks without a pause. Also, news candles displace through three zones in a minute. Quiet Asian-session ranges print blocks that mean nothing because no institution was active.
Be honest about hindsight bias too. Indeed, scroll back on any chart and the blocks that held are obvious, while the ones that failed have faded from the story. Forward, in real time, you face every zone before knowing its outcome. Still, that is why the entry model insists on higher-timeframe bias and lower-timeframe confirmation: each filter throws away some winners to avoid a larger set of losers.
Finally, the concept is discretionary at the edges. Thus, two experienced traders will mark slightly different zones from the same chart. Indicators make the marking consistent, which is their real value, but consistency of marking is not the same thing as an edge. Hence, only your own testing across a meaningful sample can tell you whether the model suits your pairs and your sessions.
Testing and installation
Every tool above passed the same release gate: both builds compile clean in MetaEditor, then run on a live EURUSD H1 chart through fresh bars. For order block tools, the critical check is zone persistence. A zone drawn at bar close must stay anchored to the same candles on every later tick, and may only change state after a genuine close-through. Next, the full checklist is in the Editorial and Testing Policy. Installation takes about five minutes per tool on either platform; the step-by-step MT4/MT5 installation guide walks through both with screenshots.
Want the full ICT toolkit? Get the complete database.
FAQ
What is the difference between an order block and a supply and demand zone?
They overlap heavily. Then, supply and demand marks any base before a strong move. An order block is stricter: the last opposing candle before a displacement that breaks structure. Yet, every order block is a supply or demand zone; not every zone qualifies as a block.
How do I know whether a block is still valid?
Check two things: has price returned since the displacement, and has any candle body closed beyond the far side? Untouched and unbroken means valid. Mitigated once means weaker. Truly, a body close through means dead, and possibly a future breaker.
Which timeframes work best for order block trading?
Mark blocks on H4 and H1, where displacement reflects sustained participation, and confirm entries on M15 or M5. Plainly, blocks drawn on very low timeframes get run through constantly because spread and noise dominate there.
Do the order block tools repaint?
No. Also, zones are confirmed on closed bars and stay anchored to their candles. They do update on mitigation: once price closes through a block, the tool recolors it to a breaker or retires it. Indeed, that is the life cycle at work, not repainting.
What results should I expect from this method?
Treat it as a framework for locating and filtering trades, not a signal service. Still, your bias reading, confirmation discipline, and risk sizing shape outcomes more than the zones do. Results are not guaranteed; past performance is not indicative of future results.
External references
- The core method is documented in Domestic market on Wikipedia.
- Additional market context is at Highest High Value at StockCharts ChartSchool.
Background reading: how much to risk per trade.

About the author
Written by Dominic Walsh, a Forex trader and MT4/MT5 indicator, Expert Advisor and script developer. Every tool on forexmt4systems.com is tested on live charts before release and ships with ready-to-use compiled MT4 (.ex4) and MT5 (.ex5) files. Learn more about the trader and developer behind this site.
How we build, test and correct every tool: Editorial & Testing Policy. Trading carries risk; see the disclaimer.