
What is hedging in forex? At its core, it is the act of opening an offsetting position to protect an existing trade from loss. You hold your original position and add a second one that gains when the first one falls.
So a hedge works like an umbrella you open when the weather turns. Learning what is hedging in forex helps you see when that umbrella earns its keep and when it just costs you money. This guide covers direct and correlated hedges, the costs they carry, and the times when simply closing beats hedging at all.
What Is Hedging in Forex
A hedge is a trade taken to reduce the risk of another trade. You do not close the first position. Instead, you place a second one that moves the opposite way, so a loss on one side meets a gain on the other.
The whole goal here is protection, not profit. A pure hedge does not aim to make money by itself. Rather, it aims to cap the damage while you decide what to do next.
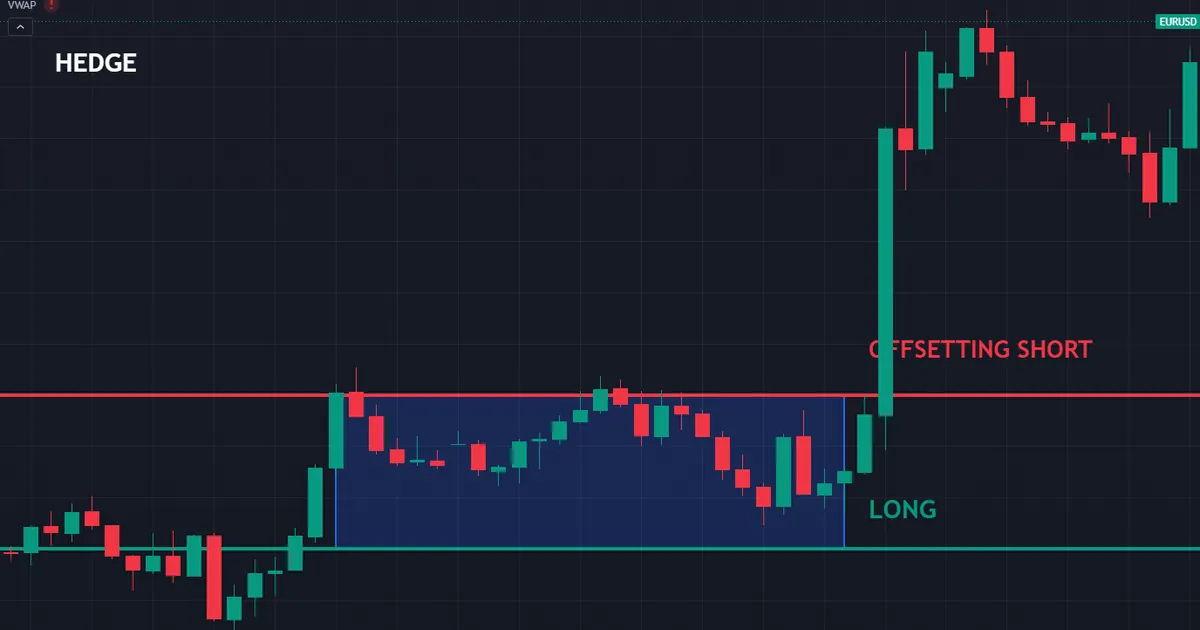
Say you hold a long EURUSD position and news worries you. You could sell an equal EURUSD position to freeze your result. So whatever the pair does next, your net exposure sits near zero until you lift one leg.
That frozen state is the essence of a hedge. It buys you time and calm. Because the two positions cancel, a scary move no longer threatens the account while the hedge stays on.
The Core Idea of Offsetting
Offsetting means one position rises exactly as the other falls. A long and an equal short on the same pair form a matched pair. So their combined profit and loss holds steady near the level where you set the hedge.
This is why a hedge feels like a pause button. The market keeps moving, yet your net position does not react. Then you can wait out a storm or a data release without watching every tick with dread.
Hedging Versus Closing
A hedge and a close both remove your exposure, but they are not the same. Closing ends the trade and frees the margin. Hedging keeps both trades open, ties up margin on both, and leaves you two positions to manage.
So why not just close? Sometimes a trader wants to keep the original position for tax, timing, or a longer plan. Still, for most retail traders, closing is simpler and cheaper, a point worth remembering before you reach for a hedge.
How a Forex Hedge Works
Building a hedge follows a short, clear routine. Each step leans on the one before it, so the order matters.
- Identify the exposure. Note the position and the risk you want to cover.
- Choose the hedge type. Use a direct hedge on the same pair, or a correlated one on a related pair.
- Match the size. Set the hedge size so it offsets the exposure you want to neutralize.
- Place the offsetting trade. Open the second position and lock the net result.
- Plan the exit. Decide in advance when you will lift one leg or both.
So the hedge freezes your position, and the exit plan unfreezes it. Never open a hedge without knowing how it ends. The diagram below lays out the same flow in one view.
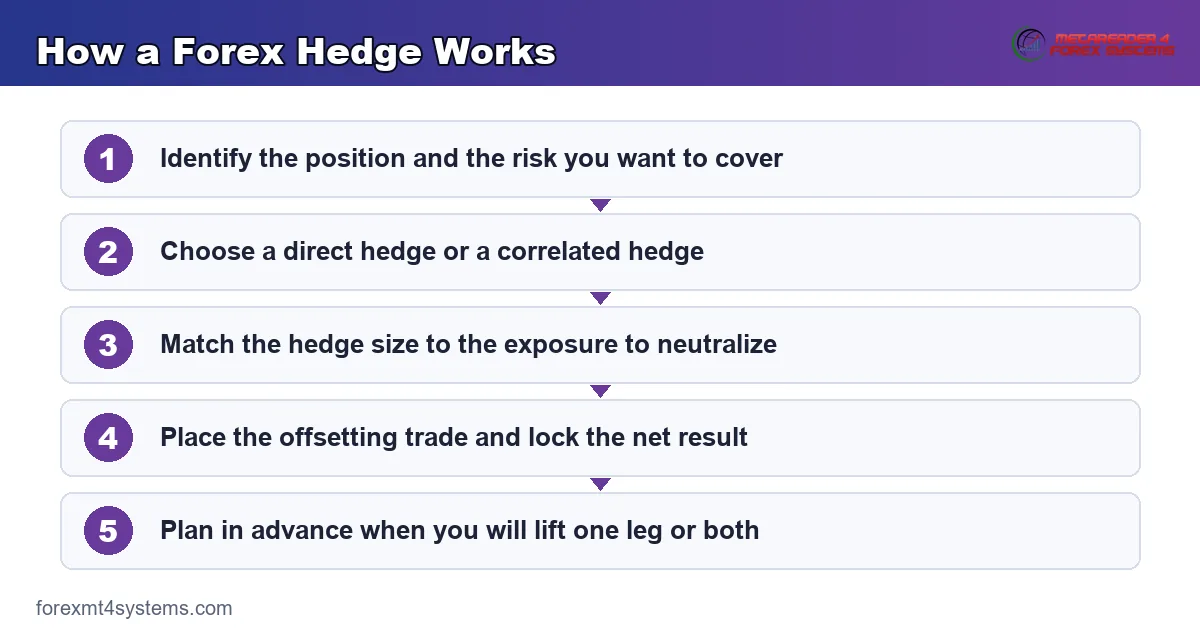
This routine keeps a hedge from becoming a tangle. Because you plan the exit first, you avoid holding two fighting trades forever. Then the hedge stays a tool rather than a trap.
What Happens to Your Profit and Loss
Once a full hedge is on, your open result stops changing. A gain on the long meets an equal loss on the short, and the reverse. So the net sits still at the level where you matched the two sizes.
This frozen result is the point. You have locked in the current profit or loss, minus the costs. Then you can step away, sleep, or wait for clarity without the number drifting against you.
Lifting the Hedge
A hedge is temporary by nature. At some point you lift one leg to rejoin the market. So if you think the danger has passed, you close the short and let the long run again.
Timing that lift is the hard part. Get it right, and the hedge saved you from a scary move. Get it wrong, and you may lift the wrong leg at the wrong time, which is why a plan beats a guess.
Direct Versus Correlated Hedges
Hedges come in two broad styles. A direct hedge uses the same pair, while a correlated hedge uses a related one. Each has its place, and each carries its own quirks.
The direct hedge is the cleaner of the two. It matches the exact pair, so the offset is near perfect. The correlated hedge is looser, since two different pairs rarely move in perfect step.
The Direct Hedge
A direct hedge opens an equal and opposite trade on the same pair. Long EURUSD meets short EURUSD of the same size. So the two cancel almost exactly, apart from the spread and any swap.
Not every broker allows this, and some net the two into a flat position. So check your broker’s policy first. Where it is allowed, the direct hedge gives the tightest offset you can build.
The Correlated Hedge
A correlated hedge uses a pair that tends to move with the first. You might short GBPUSD to hedge a long EURUSD, since the two often travel together. So a fall in one is partly offset by a gain in the other.
The catch is that the link is never exact. The two pairs can drift apart at any time. So a correlated hedge protects only in part, and the gap between the pairs becomes a risk of its own.
A Hedging Worked Example
Walk through a live case to see the mechanics. You hold a long EURUSD position near 1.14, and a major release looms. You fear a sharp drop but want to keep the long for the week ahead.
So you open an equal short on EURUSD just before the news. The two positions now cancel, and your open result freezes. Whatever the release does, your net exposure sits near zero for the moment.
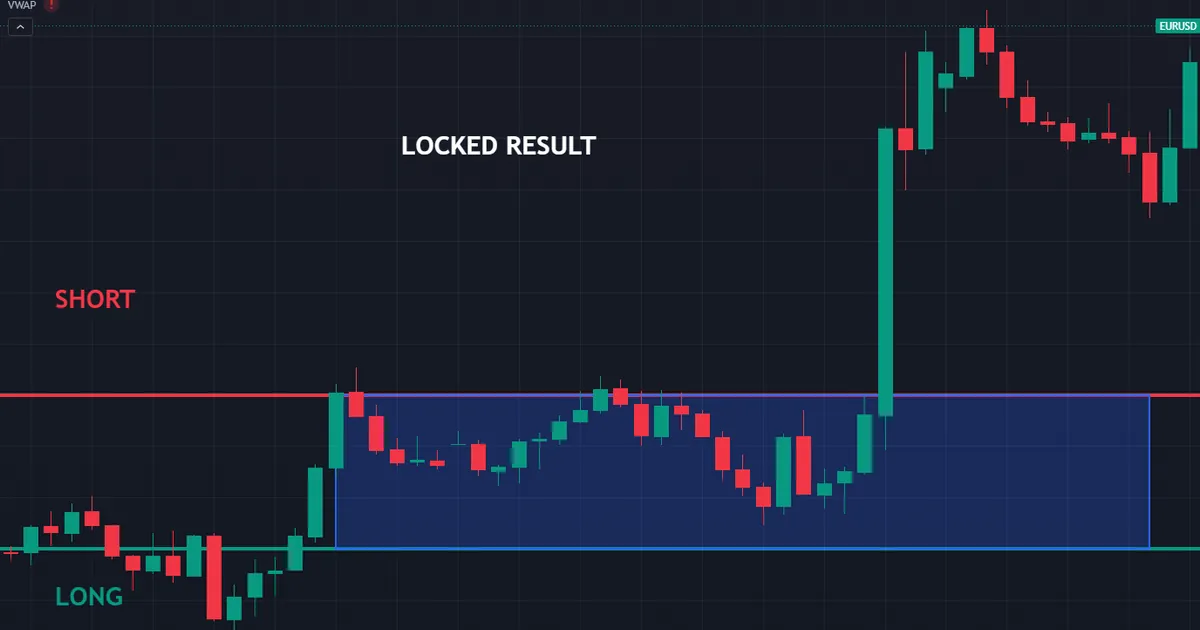
The news hits, and the pair drops sixty pips. Your long loses on that move, yet your short gains almost the same amount. So the net change is tiny, limited mainly to the spread you paid twice.
Once the dust settles, you judge the trend intact. You close the short and free the long to run again. So the hedge carried you through the shock without forcing you out of the position you believed in.
What the Hedge Cost You
The protection was not free. You paid the spread to open the short and again to close it. If you had held overnight, swap would have added to the bill on both legs.
So the hedge behaved like insurance with a premium. It capped the scary move, but it charged a fee for the calm. Whether that fee was worth paying depends on how much the shock would have cost unhedged.
Download the complete indicator database
Put these concepts on your charts. One email unlocks the full library of 1,380+ indicators with compiled MT4 and MT5 files, plus my TradingView scripts. No paywall, no spam, unsubscribe any time.
Get free access to my indicator database
One email unlocks 1,380+ free MT4, MT5 and TradingView indicators — the complete library. No single-tool download; you get the whole database.
The Costs of Hedging
Every hedge carries a price, and the price is easy to overlook. You pay to open and close each extra position. Over many hedges, those charges quietly add up.
The two main costs are the spread and the swap. Both are small on a single trade. But a hedge doubles your positions, so it doubles the exposure to these drains.
The Spread on Both Legs
Every position crosses the spread to open and to close. A hedge adds a second position, so you pay the spread more times. On a wide-spread pair, that extra cost can eat a real slice of the account.
So favor tight-spread pairs when you hedge. A major near 1.14 costs less to hedge than an exotic. Because the spread repeats on every leg, keeping it small keeps the whole hedge affordable.
The Swap on Held Positions
Holding a position overnight incurs a swap charge or credit. A hedge holds two positions, so both accrue swap. Often the two swaps do not cancel, and the net leans against you.
So a hedge held for days can bleed through swap even while the price sits still. Because of that, hedging suits short shocks better than long waits. For a long hold, closing and reopening may cost less than carrying a hedge.
When Hedging Helps and When to Just Close
Hedging is not always the right answer. Often the simplest move is to close the trade and step aside. So the real skill is knowing which tool fits the moment.
A hedge shines when you want to keep the original position for a good reason. It stumbles when you are only avoiding a decision you should just make. Then the hedge becomes a way to dodge a loss rather than manage one.
When a Hedge Earns Its Keep
A hedge helps when a short, sharp risk sits between you and a plan you still believe in. A data release or a weekend gap fits that mold. So you freeze the position through the event, then lift the hedge and carry on.
It also helps when closing is costly or awkward for other reasons. Some traders hedge to hold a position for timing while neutralizing risk. In those narrow cases, the hedge does a job a simple close cannot.
When Closing Is the Better Move
If your reason for the trade has broken, close it. A hedge on a bad idea only pays to keep a mistake alive. So when the setup fails, take the loss and free the margin for a better trade.
Closing is also better when the hedge costs more than the risk it covers. If the spread and swap outweigh the danger, the hedge makes no sense. So weigh the premium against the protection before you commit.
Hedging Styles Traders Use
Traders build hedges in a few common shapes. Each suits a different worry, and each carries its own trade-offs. Knowing the main styles helps you pick the one that fits the moment.
The simplest is the full hedge that freezes a position completely. Beyond it sit partial hedges and event hedges. So the tool bends to the size of the risk you want to cover, and the right shape depends on how sure you feel.
The Full Hedge
A full hedge matches the entire exposure with an equal opposite trade. It freezes the whole result at the level you set. So a long lot met by a short lot leaves you flat until you lift one leg.
This style suits a sharp, near-term fear. You expect a shock and want zero exposure through it. Then you unwind the hedge once the danger clears and rejoin the market with your original view, none the worse for the storm.
The Partial Hedge
A partial hedge covers only a slice of the position. You might hedge half a lot against a long full lot. So you keep some exposure to your view while softening the blow of a move against you.
This middle path fits a trader who is merely unsure rather than truly fearful of a move. It trims the risk without giving up all the upside. Because you stay partly exposed, a partial hedge costs less protection but keeps more of the trade alive. It is a compromise, and like most compromises it asks you to accept a bit of both worlds.
The Event Hedge
An event hedge goes on just before a known risk and comes off soon after. A central bank decision or a jobs report fits the mold. So you neutralize the position through the release, then lift the hedge once the number lands and the first spike settles.
This style keeps the hedge short and the costs contained. You pay the spread for a brief window rather than many nights of swap. Because the window stays short, the event hedge is often the cleanest and cheapest way to survive a scheduled shock.
Common Hedging Mistakes and Fixes
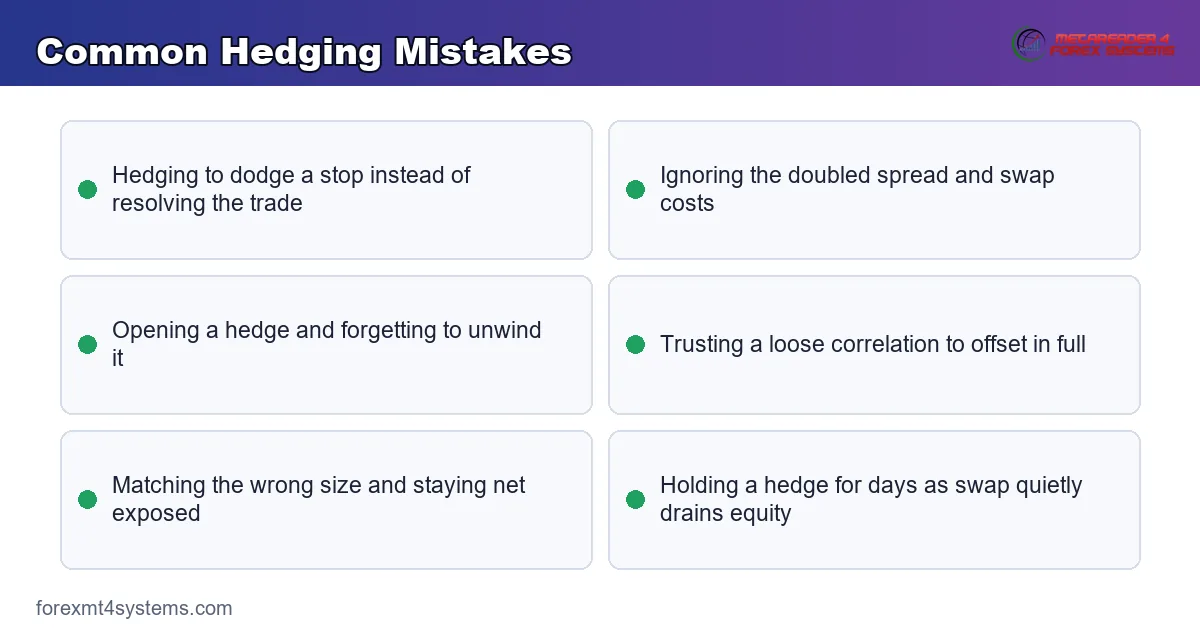
Hedging trips up traders in a few familiar ways. Most errors come from using a hedge to avoid a decision. The graphic below gathers the slip-ups worth memorizing.
Hedging Instead of Using a Stop
Some traders hedge to dodge a stop-out. That only freezes a loss without resolving it. So use a stop to cap risk on most trades, and save the hedge for a specific short-term shock.
Ignoring the Double Costs
A hedge doubles your spread and swap exposure. Traders who forget this watch the fees erode their account. So price the hedge before you open it, and skip it when the cost outweighs the risk.
Forgetting to Unwind the Hedge
A hedge left on forever is just a flat position paying fees. Some traders open one and never lift it. So plan the exit up front, and set a reminder to unwind the hedge once the risk has passed.
Trusting a Loose Correlation
A correlated hedge assumes two pairs move together. When they drift apart, the protection fails. So treat a correlated hedge as partial cover, and never assume it offsets the exposure in full.
Over-Hedging With Uneven Sizes
Matching the wrong size leaves you net long or short by accident. Then the hedge fails to freeze the result you meant to lock. So size the hedge to the exposure carefully, and check the net before you walk away.
Hedging Quick Reference
Keep this short checklist beside the platform. Run through it before you place any hedge.
- Name the exposure and the exact risk you want to cover.
- Ask first whether a simple close would serve better.
- Choose a direct hedge for a tight offset, or a correlated one when needed.
- Match the hedge size to the exposure you want to neutralize.
- Price the spread and swap on both legs before opening.
- Write down when and how you will lift the hedge.
- Check your net position after placing the second trade.
Pitfalls and Edge Cases
A few situations bend the clean method, so keep them in view. The chart below marks a correlated hedge drifting as the two pairs stop moving together, the weakness you must watch.
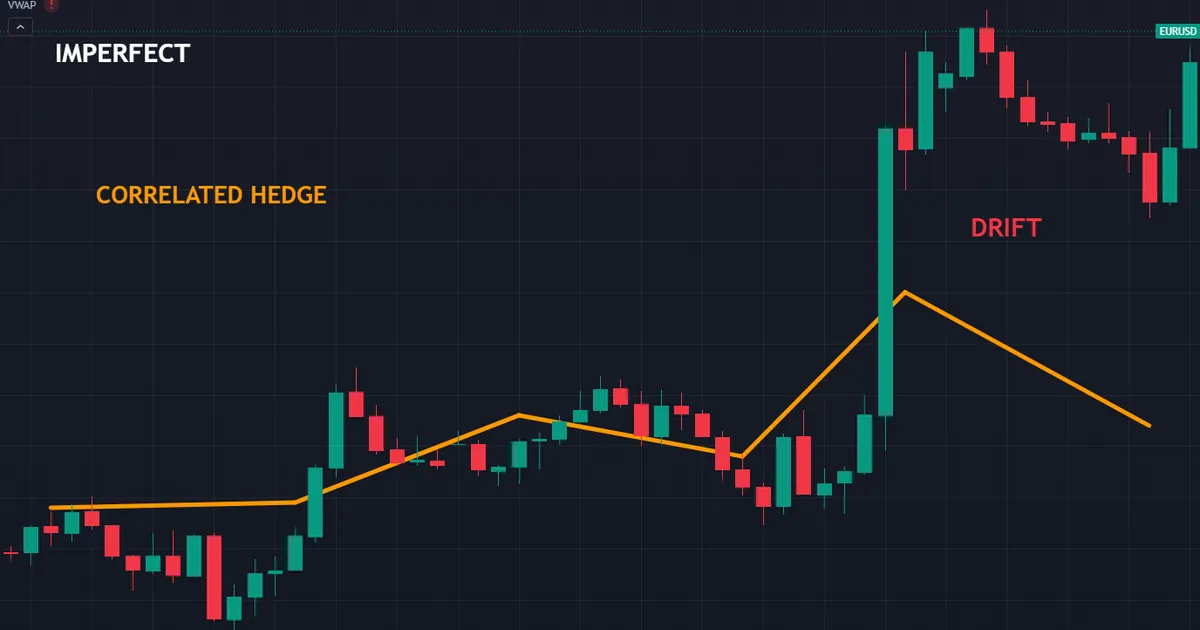
Picture a long EURUSD hedged with a short GBPUSD. For a while the two offset nicely. Then the pound moves on its own news, and the hedge no longer covers the euro exposure as planned.
Broker Netting Can Cancel a Direct Hedge
Some brokers net opposite trades into one flat position. Then a direct hedge simply closes your exposure instead of freezing it. So read your broker’s policy before you rely on a same-pair hedge.
Correlations Shift Over Time
Two pairs that move together this month may not next month. A correlation is a tendency, never a promise. So recheck the link before each correlated hedge, and lean on it lightly rather than fully.
Swap Can Turn a Hedge Costly
On some pairs the two overnight swaps lean hard against you. Then a held hedge bleeds faster than you expect. So check both swap rates first, and avoid holding a hedge through many nights.
A Hedge Is Not a Trading Edge
A hedge manages risk, yet it cannot pick winning trades. It only pauses your exposure at a cost. So pair every hedge with a sound plan for the underlying position, and never mistake the pause for profit.
Related Concepts to Study Next
Hedging sits within the wider craft of managing risk across an account. A few ideas deserve your next reading hour. The exposure a hedge covers and the leverage behind it both shape how much protection you truly need.
Start with our guide to leverage risk, since heavier leverage raises the exposure a hedge must cover. Then read the broad overview of risk management in forex, watch total exposure with portfolio heat, and study how losses compound in drawdown in trading. To size a hedge to your exposure, use our free hedging calculator, then check the base trade with the position size calculator.
FAQ
What is hedging in forex in simple terms?
Hedging is opening an offsetting position to protect an existing trade from loss. You keep the first position and add a second that moves the opposite way. So a loss on one side is met by a gain on the other while the hedge stays on.
What is the difference between a direct and a correlated hedge?
A direct hedge opens an equal and opposite trade on the same pair, giving a near-perfect offset. A correlated hedge uses a related pair that tends to move with the first. The correlated version protects only in part, since two pairs rarely move in perfect step.
Does hedging cost money?
Yes, a hedge carries real costs on both legs. You pay the spread to open and close each position, and swap accrues on any held overnight. Over time those charges add up, so a hedge behaves like insurance with a premium.
Is hedging better than closing a trade?
Not usually, since closing is simpler and frees the margin. A hedge helps when you want to keep the original position through a short, sharp risk. If your reason for the trade has broken, closing is almost always the better move.
Can I always hedge on the same pair?
Not always, because some brokers net opposite trades into one flat position. Then a same-pair hedge simply closes your exposure instead of freezing it. So check your broker’s policy before you rely on a direct hedge.
When should I lift a hedge?
Lift the hedge once the risk you feared has passed and clarity returns. You close the offsetting leg and let the original position run again. Plan that exit before you open the hedge, since timing the lift is the hardest part. Results are not guaranteed; past performance is not indicative of future results.
External references
- For background on this concept, see Currency Risk on Wikipedia.
- For broader market context, see Hedging at Corporate Finance Institute.

About the author
Written by Dominic Walsh, a Forex trader and MT4/MT5 indicator, Expert Advisor and script developer. Every tool on forexmt4systems.com is tested on live charts before release and ships with ready-to-use compiled MT4 (.ex4) and MT5 (.ex5) files. Learn more about the trader and developer behind this site.
How we build, test and correct every tool: Editorial & Testing Policy. Trading carries risk; see the disclaimer.