
A single candle order block is the tightest order block you can mark. It uses just one candle’s range instead of a wide cluster of bars. That precision gives you a smaller zone, a nearer stop, and a cleaner entry. After this guide you will spot the exact candle that matters. You will draw its zone correctly. Then you will trade the retrace with risk measured in a handful of pips.
The idea grew out of order block theory taught by Michael Huddleston, the Inner Circle Trader (ICT). A standard order block can span several candles, which often means a painful stop. A single candle order block, or SCOB, refines that zone down to the one bar that actually moved the market. So you keep the logic of an order block while cutting the risk it usually carries. That trade-off is the whole appeal, and it rewards patience over frequency. Fewer trades, but sharper ones, is the honest promise the refinement makes to a patient trader.
What a Single Candle Order Block Looks Like on the Chart
Picture the last down candle before a sharp move higher. Now zoom in until only that candle and its neighbours fill the screen. Its body and wick form a small box, and price often returns to that box before continuing. The chart below marks one such candle on a major pair, with the zone drawn tight to its range.
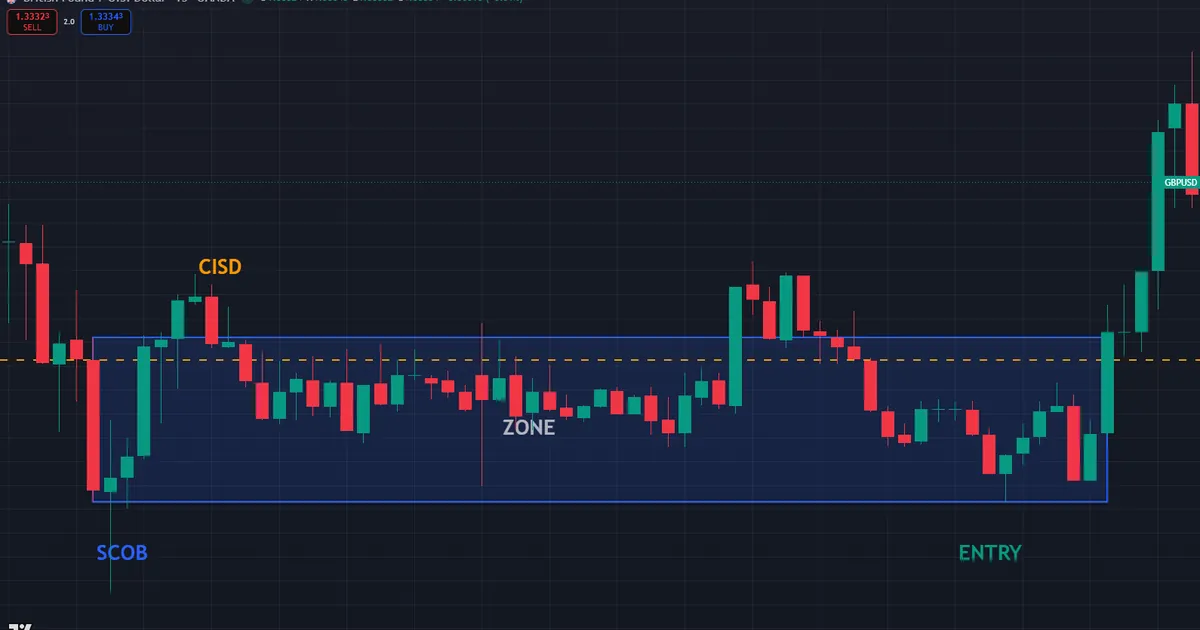
Reading the SCOB Zone
Start with the candle that caused the shift. Its open, close, and wick define the whole zone, so nothing outside that bar belongs in the box. The wick often marks the deepest point institutions accepted before driving price away. So the extreme of that wick becomes the edge of your zone, and the candle body marks the shallower half.
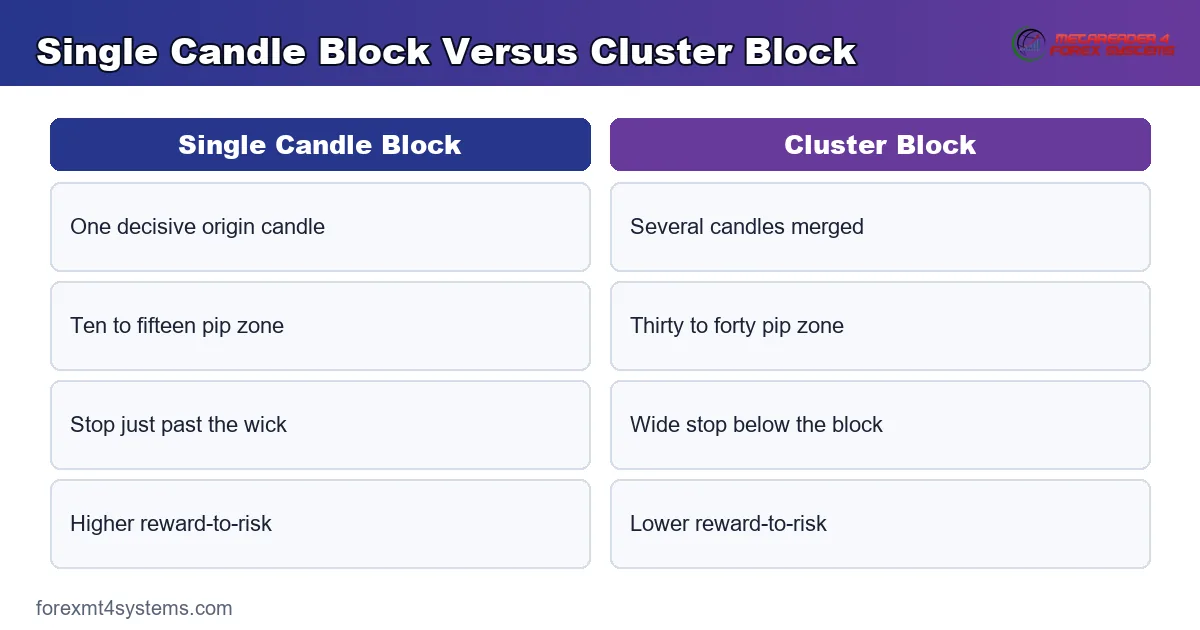
Notice how small the box is. A multi-candle order block might span forty pips, while a single candle order block often measures ten or fifteen. That tighter zone lets you place a stop just beyond the wick, which lifts the reward-to-risk ratio on every trade you take from it.
Precision comes with a trade-off, so weigh it early. A smaller zone means price may miss your fill by a pip and run without you. A wider zone fills more often but pays less per trade. Neither choice is wrong, yet the SCOB leans toward precision, and that suits traders who prefer fewer, sharper entries over many loose ones.
Why One Candle Beats a Cluster
A cluster hides the real level. When several candles form an order block, you cannot tell which bar the market truly cared about. So you end up drawing a wide box to be safe, and a wide box means a wide stop. A single candle order block removes that guesswork by pointing at one decisive bar.
Hold the idea to an honest standard, though. Not every candle qualifies, and forcing a SCOB onto a messy move only invents a level that price ignores. The next section shows exactly which candle earns the zone and which candles you should leave alone.
Think of the single candle as a compression of intent. All the buying or selling that flipped the market sits inside that one bar. So when price returns, it revisits the exact spot where order flow last changed hands. That is why a well-chosen SCOB reacts so cleanly, and why a poorly chosen one does nothing at all.
How to Mark a Single Candle Order Block Step by Step
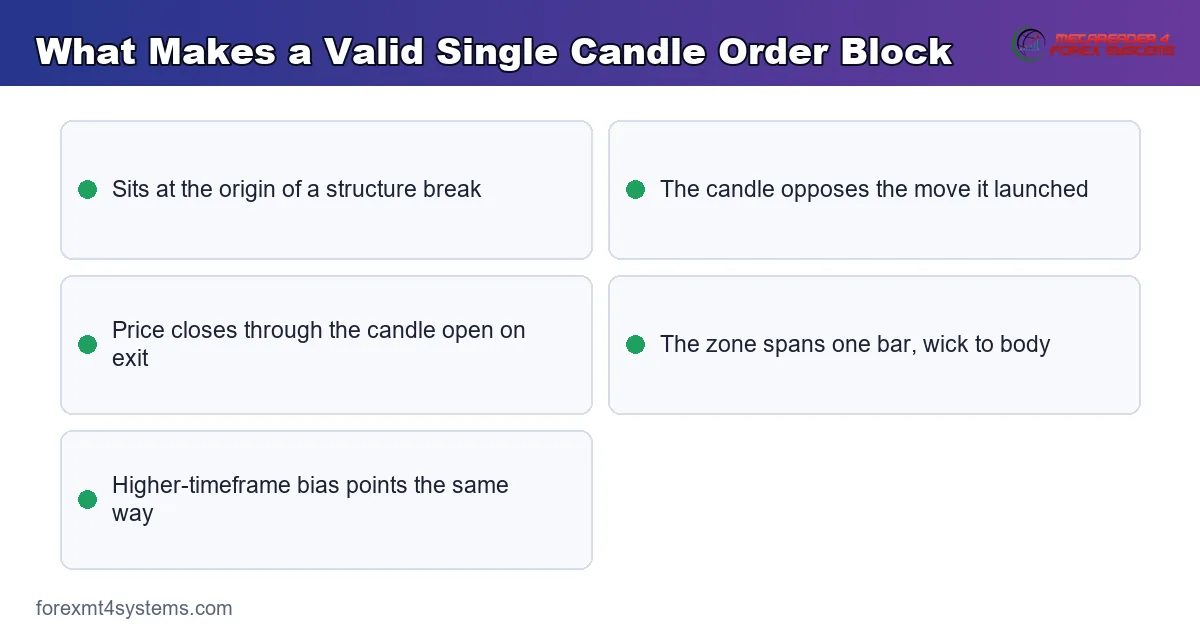
The zone only helps when the candle behind it is valid. So selection comes first, and most beginners rush it. A real single candle order block sits at the origin of a strong move, right where order flow flipped. Random bars inside a drift never qualify.
- First, find a sharp move that broke short-term structure, up or down.
- Next, walk back to the last opposite-colour candle before that move began.
- Then confirm that price closed through the open of that candle, a change in state of delivery.
- Now draw the zone across that single candle, from its wick to its body.
- Last, wait for price to return to the zone before you plan any entry.
Read the steps as a filter, not a checklist to rush. Each line removes a weak candidate, so the candle that survives all five usually holds real weight. On charts, the wider set of order block trading tools and guidance can highlight these origin candles for you and keep the drawing honest.
Which Candle Actually Qualifies
The winning candle sits at the base of the displacement. For a bullish SCOB, it is the last down candle before price ran up and broke structure. For a bearish SCOB, it is the last up candle before price dropped and broke structure. So colour matters, and the candle should oppose the move it launched.
One extra test filters most fakes. Price must close through that candle’s open on the way out, which signals a change in state of delivery. Without that close, the move is weak and the zone rarely holds. With it, the candle carries the fingerprint of real order flow.
Wick Zone Versus Body Zone
Traders split on how much of the candle to use, so pick a rule and keep it. Some draw the zone from the wick tip to the body, which gives a slightly larger box and a deeper fill. Others use only the body, which gives the tightest possible entry. Test both on your instrument, since volatile pairs often need the wick included to avoid missing the retrace by a pip.
Consistency beats cleverness here. Switching rules mid-week makes your journal useless, because two different zone methods produce two different results. So lock one method for a full month and record every trade the same way. Only then can you judge whether the wick-inclusive zone or the body-only zone suits your pair and your patience.
How the SCOB Connects to Displacement and CISD
A single candle order block never appears alone. It marks the base of a displacement, which is the sharp, one-sided move that breaks structure. So the candle and the move belong to the same event, and reading one without the other misses the point.
Change in state of delivery, or CISD, ties the two together. When price closes through the origin candle’s open, order flow has flipped from one side to the other. That close is the market showing its hand, and it turns an ordinary candle into a zone worth trading. Without it, the candle is just noise inside a range.
Displacement Gives the Zone Its Power
Strength matters more than shape. A weak, overlapping push out of a candle rarely produces a zone that holds. A sharp displacement, by contrast, leaves an imbalance behind it and a clean origin candle at its base. So judge the move first, then trust the candle. The stronger the displacement, the more respect the SCOB tends to earn on the retrace.
Reading the Close Through the Open
Keep the CISD test simple. On a bullish setup, price must close above the last down candle’s open before the zone counts. On a bearish setup, price must close below the last up candle’s open. That single close separates a real order block from a hopeful line, and it costs nothing to check.
Where the SCOB Fits the SMC Workflow
A single candle order block is an entry tool, not a whole system. It answers one question: where exactly do I get in. First you read the higher timeframe for bias and a draw on liquidity. Then you mark a point of interest inside the correct half of the range. Only then does the SCOB refine the entry down to one candle.
Sequence keeps the trade honest. The difference between a fair value gap and an order block matters here, because the two arrays often print together at the origin of a move. When a SCOB and a gap overlap, the zone gains weight, and the entry gets even more precise.
The tool sits near the end of the routine on purpose. First comes bias, then the zone, then the sweep, and only then the single candle that triggers the fill. Reverse that order and you will find SCOBs everywhere, most of them meaningless. The broader library of smart money concept indicators can plot bias and structure alongside the candle so the sequence stays visible at a glance.
Session Timing in New York Hours
Timing sharpens the plan. Mark the higher-timeframe zones before the London kill zone opens near 2:00 AM New York time. Then look for the SCOB retrace during London or the New York morning window from 8:30 to 11:00 New York time. The Asian range from 8:00 PM to midnight usually drifts, so treat any SCOB there with extra caution.
Pairing the SCOB With Higher-Timeframe Bias
A tight zone still needs a reason. Picture a four-hour bias pointing up toward an old high. Price drops into discount, and a single candle order block prints on the fifteen-minute chart at the base of a fresh push higher. Because the bias already leaned long, that SCOB becomes a clean trigger rather than a lone guess. Bias supplies the why, and the candle supplies the where.
Worked Example: A Bullish SCOB Entry
Rules feel abstract until you price a real setup. The chart below walks a fifteen-minute bullish sequence, and it goes long off a single candle order block inside discount. Follow the numbers as a story, since each step depends on the one before it.
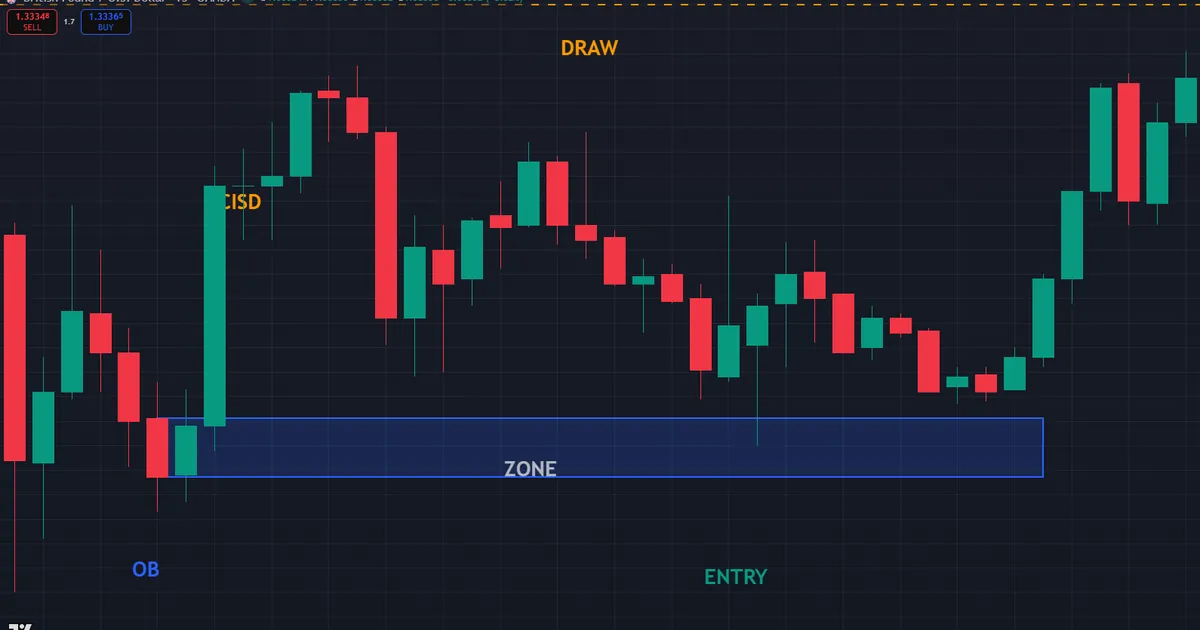
- First, the bias: the four-hour chart broke higher, so buy-side liquidity above an old high near 1.3390 stood as the draw.
- Next, the location: price drifted into discount during London, near 1.3372.
- Then the origin: one down candle printed near 1.3372, right before a sharp push up.
- The confirmation: price closed above that candle’s open, a clear change in state of delivery.
- The zone: the SCOB ran from the wick at 1.33707 to the body near 1.33731.
- Last, the trade: buy the retrace into the zone, stop below 1.33700, first target the old high at 1.3390.
Why the Tight Zone Pays
Price paid does the quiet work again. A long filled near 1.3372 risks only about three pips to the stop, yet the draw at 1.3390 sits roughly eighteen pips away. So the reward still stacks well over the risk, and that ratio comes straight from the tight single candle zone. A wide multi-candle block on the same move would have forced a stop several times larger.
Notice the discipline the zone enforces. The same push higher without a clean origin candle would offer no precise entry at all. So you would either chase the move or size too wide. The SCOB gives you a small, defined box instead, which is exactly what a tight stop needs.
Managing the SCOB Trade
Manage the position with the same map that framed it. Many traders bank a partial at the halfway point of the higher-timeframe range, then trail the rest toward the old high. Others exit fully at the first clear resistance on quiet days. Choose one plan before entry and write it down, because a tight entry still needs a calm exit to pay off.
Size the trade before you click, not after. A tight stop of a few pips lets you risk a fixed slice of the account while keeping the lot sensible. The free position size calculator turns your stop distance and risk percentage into an exact lot in seconds. So the tight zone and a fixed risk work together, and one bad trade never dents the account.
Download the complete indicator database
Put these concepts on your charts. One email unlocks the full library of 1,380+ indicators with compiled MT4 and MT5 files, plus my TradingView scripts. No paywall, no spam, unsubscribe any time.
Get free access to my indicator database
One email unlocks 1,380+ free MT4, MT5 and TradingView indicators — the complete library. No single-tool download; you get the whole database.
Common Single Candle Order Block Mistakes and Their Fixes
Selection errors sink more SCOB trades than entry errors, and a few dominate beginner journals. Each mistake below carries a plain fix you can apply on the very next chart.
- Marking a random candle inside a drift. Fix: only the origin candle of a structure break qualifies.
- Skipping the close-through-open test. Fix: demand a change in state of delivery before you draw the zone.
- Using the wrong candle colour. Fix: the candle should oppose the move it launched.
- Drawing the box too wide. Fix: keep the zone inside one candle, wick to body.
- Trading the SCOB against the higher-timeframe bias. Fix: the bias chart must agree first.
- Placing the stop far beyond the wick. Fix: the stop sits just past the candle extreme, not pips away.
The second graphic pairs each mistake with its fix for a fast pre-session review.
A Single Candle Order Block Pre-Trade Checklist
Run these six lines before any entry that leans on a SCOB. A single failure sends the trade back to the watchlist.
- Higher-timeframe bias set, with a clear draw on liquidity marked.
- Price sits in the half of the range that matches the bias.
- A sharp move broke short-term structure in the bias direction.
- The origin candle opposes that move and printed a close through its open.
- The zone spans only that single candle, wick to body.
- The stop sits just past the wick, and the draw offers at least double the risk.
Also score a month of trades against this list. The line you skip most often is your real leak, and fixing one leak beats learning three new setups. Keep the list short so you can run it in seconds while price sits in the zone.
Related SMC Concepts to Study Next
The single candle order block connects to several ideas worth learning together. A breaker block forms when an order block fails and flips, so it pairs naturally with a refined SCOB entry. The rejection block takes the opposite view of the same candle, building its zone from the wicks at a sweep. For the deepest fills, the optimal trade entry pocket refines where inside the zone to buy. Read all three and your entries tighten fast.
When a Single Candle Order Block Fails
Tight zones cut both ways. A ten-pip box gives a small stop, yet it also fills and fails faster when the read is wrong. In a strong trend against you, price can slice straight through a SCOB without pausing. So the same precision that lifts the reward can also produce a quick, clean loss.
Candle selection is the other failure point. Mark the wrong bar and the zone points at empty air, where price never reacts. The chart below shows exactly that trap, with a SCOB drawn on a candle that never launched a real move.
News breaks even valid zones. A surprise release can gap price straight past a clean SCOB before any retrace prints, so the entry you waited for never arrives. That is a real cost the method accepts in exchange for tight risk. So check the calendar before you lean on a single candle, and stand aside when a high-impact print looms.
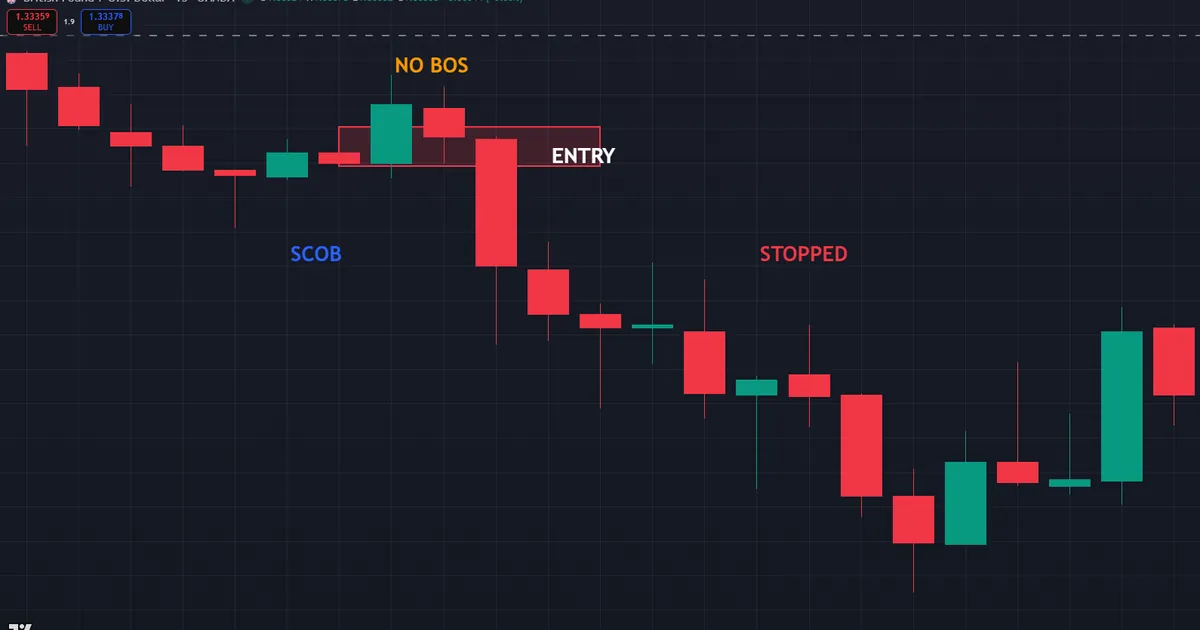
A Failure Walkthrough
One failure repeats more than the rest. A trader spots a down candle inside a slow drift, calls it a single candle order block, and buys the retrace. Yet no structure break followed that candle, and no close through its open ever confirmed it. So the zone had no order flow behind it, and price drifted right through the stop. The lesson stays simple: without a structure break and a change in state of delivery, a candle is just a candle. Demand both before you draw a single line.
There is a subtler trap too. Sometimes the SCOB is valid, the entry is clean, and price still fails to reach the draw. Liquidity can rest closer than you mapped, so the market taps a nearer pool and turns. That outcome is not a broken tool. It is why you bank a partial at the near target and never bet the whole trade on the far one.
FAQ
What is a single candle order block?
A single candle order block is an order block refined down to one candle’s range. It sits at the origin of a strong move, on the last opposite-colour candle before price broke structure. Traders use its tight zone for precise entries with a small, defined stop.
How is a SCOB different from a normal order block?
A normal order block can span several candles, which often forces a wide stop. A single candle order block uses just one bar, so the zone is far tighter. That tighter zone usually lifts the reward-to-risk ratio, though it can also fill and fail more quickly.
Which candle do I mark for a bullish SCOB?
Mark the last down candle before price ran up and broke short-term structure. Price should also close through that candle’s open on the way out, which signals a change in state of delivery. That close confirms the order flow behind the zone.
Should I use the wick or the body?
Both rules work, so pick one and stay consistent. The wick-to-body zone gives a deeper fill and suits volatile pairs. The body-only zone gives the tightest entry and suits calmer markets. Test each on your instrument before you commit real risk.
Do I still need higher-timeframe bias?
Yes, the bias comes first every time. A SCOB is only an entry tool, so it needs a direction and a draw to point toward. Trading one against the higher-timeframe bias is among the most common ways the setup fails. Set the bias early, then let the candle confirm your plan rather than replace it.
Does a single candle order block work on any market?
The logic applies to any liquid market with clear structure, so traders use it on indices, metals, and crypto. Still, volatility differs across markets, so test the zone on your instrument first. A fast index may need the wick included where a calmer pair would not, and a wider stop often follows. Keep the single candle principle fixed while you tune the zone to the instrument, and let your own journal supply the numbers that matter. Results are not guaranteed; past performance is not indicative of future results.
External references
- For background on this concept, see Order Flow Trading at Corporate Finance Institute.
- For broader market context, see Accumulation at Investopedia.

About the author
Written by Dominic Walsh, a Forex trader and MT4/MT5 indicator, Expert Advisor and script developer. Every tool on forexmt4systems.com is tested on live charts before release and ships with ready-to-use compiled MT4 (.ex4) and MT5 (.ex5) files. Learn more about the trader and developer behind this site.
How we build, test and correct every tool: Editorial & Testing Policy. Trading carries risk; see the disclaimer.