
The all in one divergence indicator watches two oscillators at once. It marks a confirmed swing pivot on price, samples RSI and the MACD main line at that same bar, then reports the disagreement between them. `OscMode` decides whether RSI alone, MACD alone, or either one may raise the signal.
This build ships as a compiled .ex4 for MT4 and .ex5 for MT5; the screenshots below come from EURUSD H1.
| Platforms | MT4 (.ex4) + MT5 (.ex5) |
|---|---|
| Chart window | Main price chart |
| Plots | 2: BUY (bullish divergence), SELL (bearish divergence) |
| Alerts | popup, push notification, email, sound |
| Inputs | 21 |
What the All In One Divergence Indicator renders
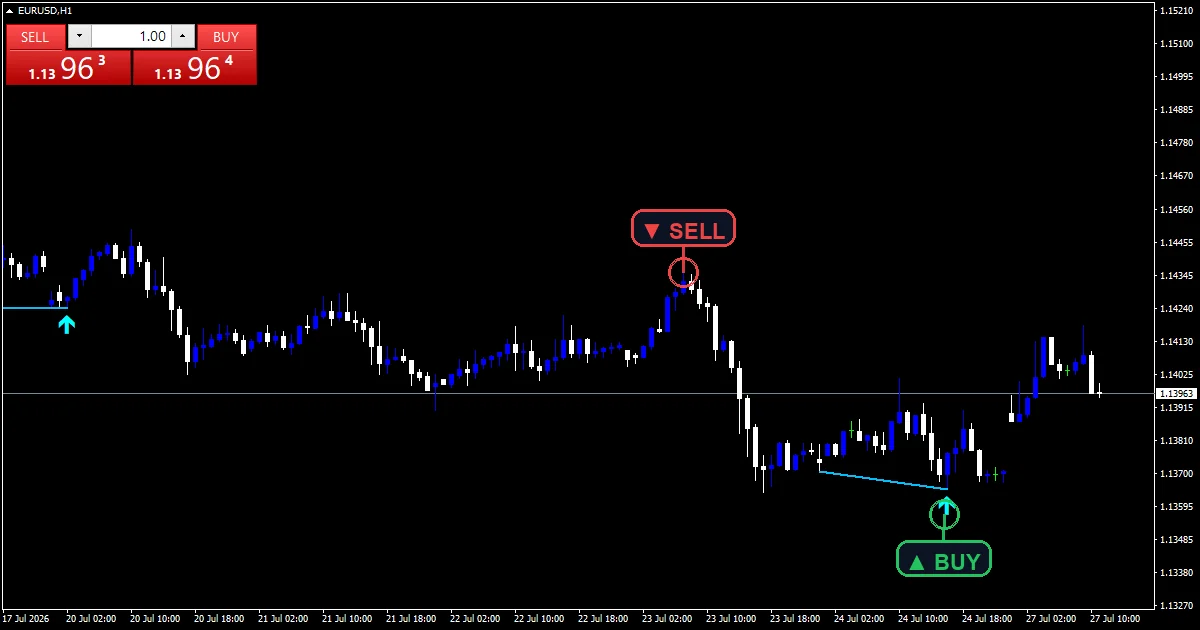
A BUY (bullish divergence) arrow sits under the confirmed swing low in aqua.
A SELL (bearish divergence) arrow sits above the confirmed swing high in magenta.
An OBJ_TREND line joins the two price pivots behind each signal, deep sky blue for bullish and magenta for bearish.
Each mark keeps a gap of `ArrowOffsetPts` points from the bar, which defaults to `45`.
- BUY (bullish divergence): arrow, aqua, width 2, arrow code 233
- SELL (bearish divergence): arrow, magenta, width 2, arrow code 234
Behind the plots
Finding pivots that cannot repaint
A pivot high needs `LeftBars` older bars and `RightBars` newer bars below it. Both default to `5`. The code tests a bar only once those five newer bars have closed, so a confirmed pivot never moves again. That delay buys you a fixed signal.
Sampling RSI and MACD at the pivot
iRSI runs at `RsiPeriod` `14` on the close. iMACD supplies the main line from `MacdFast` `12`, `MacdSlow` `26` and `MacdSignal` `9`. The code reads both oscillators at the exact pivot bar rather than at the current bar. Reading them there keeps the comparison honest.
Comparing the new pivot with the previous one
Bearish divergence needs a higher high on price and a lower high on the chosen oscillator. Bullish divergence needs a lower low on price and a higher low on the oscillator. The bar gap between the two pivots must fall inside `MinGap` `3` and `MaxGap` `60`. Anything outside that band the code skips.
How to take it
A mark appears `RightBars` bars after the pivot itself, so treat it as late but settled.
The joining line shows which two swings disagreed with the oscillator.
Set `OscMode` to RSI only or MACD only when you want fewer, stricter signals.
Divergence near the end of a long trend often marks a pause instead of a turn.
Alert channels in this build: popup, push notification, email and sound, one message per closed bar.
`EnableAlerts` ships on and `EnablePopup` carries the message. Push, email and sound sit behind `EnablePushNotify`, `EnableEmail` and `EnableSound`, all off by default, with `SoundFile` naming the clip. The guard allows one message per closed bar.
Every All In One Divergence Indicator input
Core settings
| Setting | What it does | Default |
|---|---|---|
OscMode |
Oscillator used for divergence. Picks the oscillator, default `OSC_EITHER`. Either mode fires when RSI or MACD disagrees, so it gives the most signals. | OSC_EITHER |
LeftBars |
Bars to the left of a pivot. Older bars a pivot must beat, default `5`. Raise it to keep only the larger swings. | 5 |
RightBars |
Bars to the right (confirm delay). Newer bars needed to confirm a pivot, default `5`. Raising it delays every mark by the same amount. | 5 |
MinGap |
Min bars between paired pivots. Smallest bar gap between paired pivots, default `3`. It blocks two swings sitting almost on top of each other. | 3 |
MaxGap |
Max bars between paired pivots. Largest bar gap between paired pivots, default `60`. Beyond that the two swings have little to do with one another. | 60 |
RsiPeriod |
RSI period. RSI length behind the oscillator reading, default `14`. | 14 |
MacdFast |
MACD fast EMA. MACD fast EMA, default `12`. | 12 |
MacdSlow |
MACD slow EMA. MACD slow EMA, default `26`. | 26 |
MacdSignal |
MACD signal SMA. MACD signal SMA, default `9`. | 9 |
SignalOnClosedBarsOnly |
Confirm on closed bars only. Keeps the test on completed bars, default `true`. Leave it on unless you enjoy flickering marks. | on |
Display settings
| Setting | What it does | Default |
|---|---|---|
ArrowOffsetPts |
Arrow offset from the bar (points). Distance from the bar in points, default `45`. | 45 |
BullLineColor |
Bullish divergence trendline. | deep sky blue |
BearLineColor |
Bearish divergence trendline. | magenta |
LineWidth |
Divergence trendline width. | 2 |
Alert settings
| Setting | What it does | Default |
|---|---|---|
MaxBars |
History bars to scan (0 = all). History bars to scan, default `2000`. Lower it on a slow machine. | 2000 |
EnableAlerts |
Master alert switch. | on |
EnablePopup |
Popup alert. | on |
EnablePushNotify |
Push notification to mobile. | off |
EnableEmail |
Email alert. | off |
EnableSound |
Sound alert. | off |
SoundFile |
Sound file. | alert.wav |
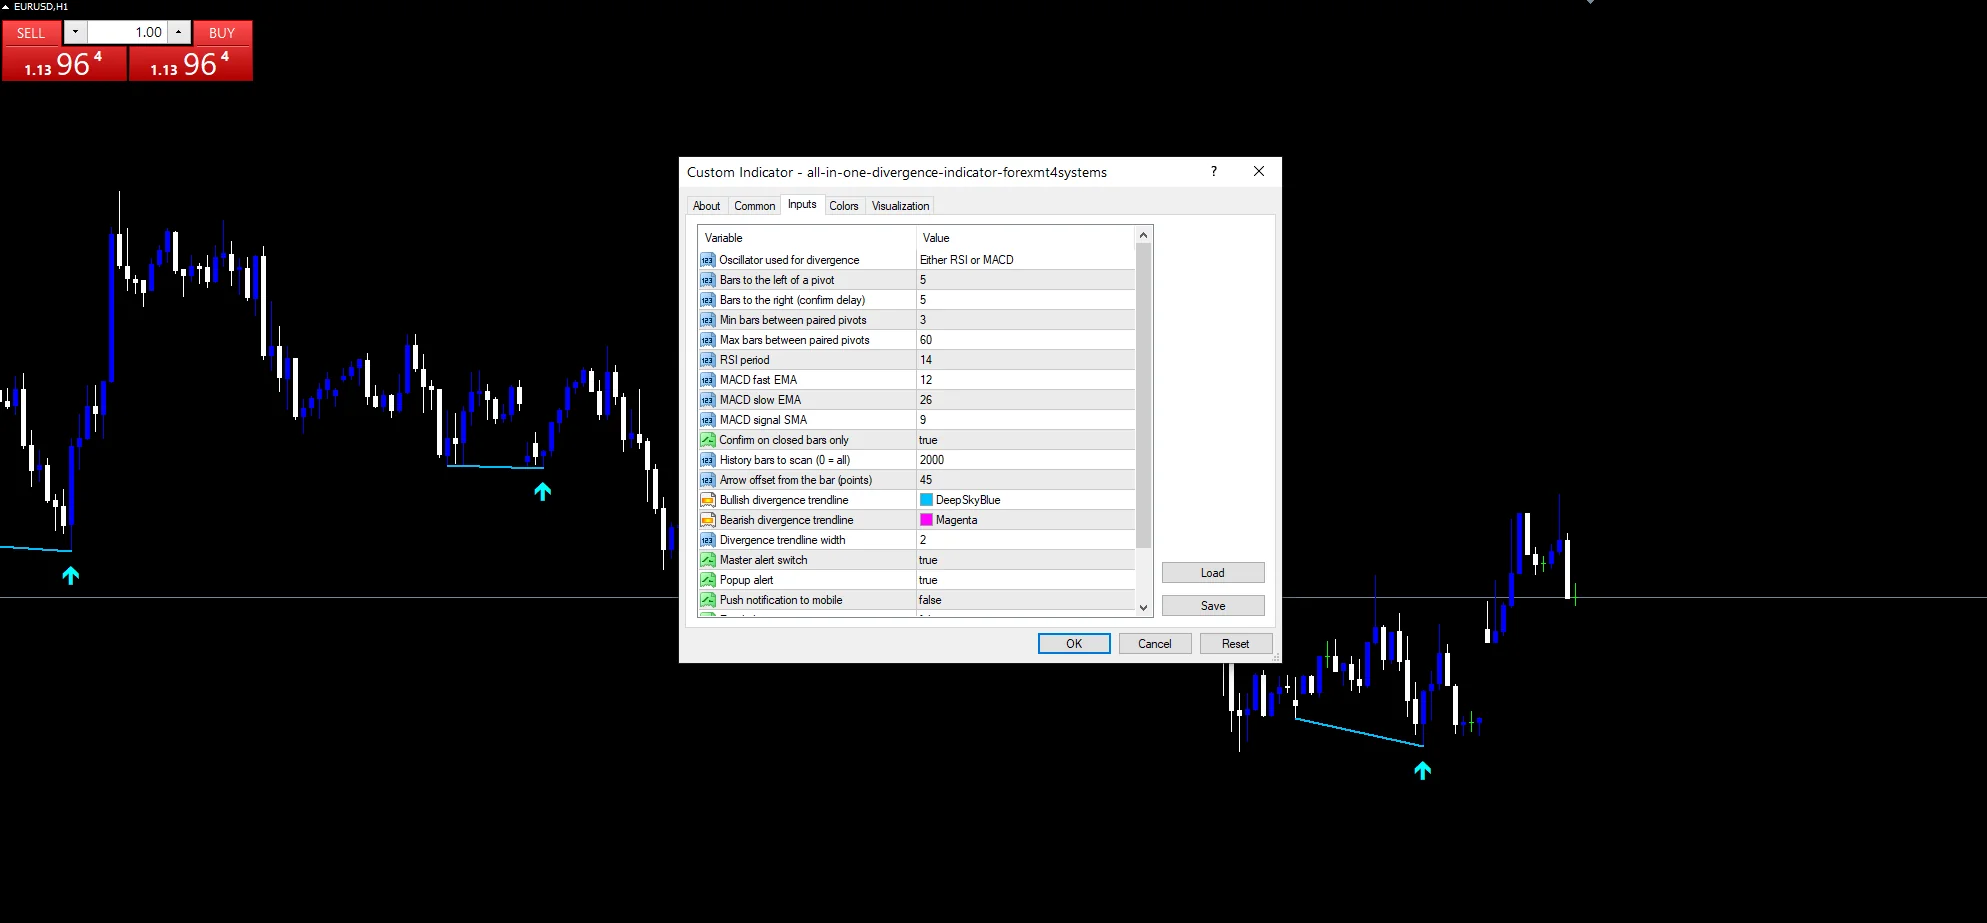
Where it works best
Divergence needs swings to compare, so it reads best where the market actually swings. EURUSD H1 is the reference chart, and `MaxGap` at `60` covers roughly two and a half days there. On M5 the pivots come thick and fast, and most pairings mean very little. Move to H4 or daily and the signals turn rare, with each one covering a lot of ground.
Where it comes unstuck
Divergence records disagreement, not a turn. A strong trend can print three of them and carry on.
The `RightBars` delay means the mark always lands after the extreme, never on it.
OSC_EITHER doubles the chances of disagreement, so it also doubles the false marks.
Copy the compiled All In One Divergence Indicator file into your MQL4/Indicators folder, and the MT5 build into MQL5/Indicators, then restart the terminal and drag it onto a chart. The step-by-step guide with screenshots is at how to install MT4 and MT5 indicators.
Download the All In One Divergence Indicator for MT4 and MT5
The zip holds the compiled All In One Divergence Indicator build for MT4 and MT5, plus a short README. Compiled files only, no source. Enter your email below and the download link arrives in your inbox.
Download this indicator free
Enter your email and the file is yours. You also get the full MT4 and MT5 library.
FAQ
What does OscMode change?
It picks which oscillator has to agree. RSI only reads iRSI at the pivot, MACD only reads the MACD main line, and OSC_EITHER accepts a signal when either one disagrees with price. Either mode gives the most marks. The two single modes give fewer and stricter ones.
Why does RightBars delay every mark by five bars?
Because `RightBars` defaults to `5`. A pivot counts only once five newer bars have closed on the correct side of it. That delay is deliberate. It is what stops a mark appearing, vanishing and reappearing while the current bar moves around.
What do MinGap and MaxGap control?
The bar distance between the two pivots each signal compares. `MinGap` at `3` blocks near neighbours that carry no information. `MaxGap` at `60` stops the code pairing swings from different market phases. Widen `MaxGap` on higher timeframes if you want longer divergences.
Does the SELL (bearish divergence) plot suit any pair?
Yes. The logic reads high, low and close only, so it runs on EURUSD, gold or an index alike. EURUSD H1 is the reference chart here. Thin instruments give ragged pivots, so `LeftBars` and `RightBars` usually need raising on them.
Are results guaranteed?
No. Trading involves risk. Results are not guaranteed; past performance is not indicative of future results. Use the All In One Divergence Indicator as one input. Always backtest before trading live.
External references
- The core method is documented in Financial integration on Wikipedia.
- Additional market context is at Decisionpoint Trend Model at StockCharts ChartSchool.

About the author
Written by Dominic Walsh, a Forex trader and MT4/MT5 indicator, Expert Advisor and script developer. Every tool on forexmt4systems.com is tested on live charts before release and ships with ready-to-use compiled MT4 (.ex4) and MT5 (.ex5) files. Learn more about the trader and developer behind this site.
How we build, test and correct every tool: Editorial & Testing Policy. Trading carries risk; see the disclaimer.