
The London kill zone is the 02:00 to 05:00 New York time window when the London session opens and institutional volume surges into the market. Michael Huddleston, the Inner Circle Trader (ICT), named it as the day’s first high-probability dealing window. So this guide shows you how to read the Asian range, spot the London sweep, and time an entry into the expansion that follows.
You will learn the exact clock window, a five-step routine, two worked walkthroughs, and the honest ways a London kill zone traps late entries. By the end, you can plan the session before 02:00 and trade inside it without guessing.
What the London Kill Zone Is
The London kill zone is a fixed three-hour window, not a signal. It marks the hours when London desks come online and add real volume to whatever the Asian session left behind. Price often builds a quiet range overnight, then London arrives and expands it hard in one direction. That expansion is the move you want.
Two ideas sit at the center. First, the Asian range from 20:00 to 00:00 New York time acts as a reference box of resting liquidity. Second, London frequently sweeps one edge of that box before the real move begins. Hence the sweep is a feature of the window, not an accident.
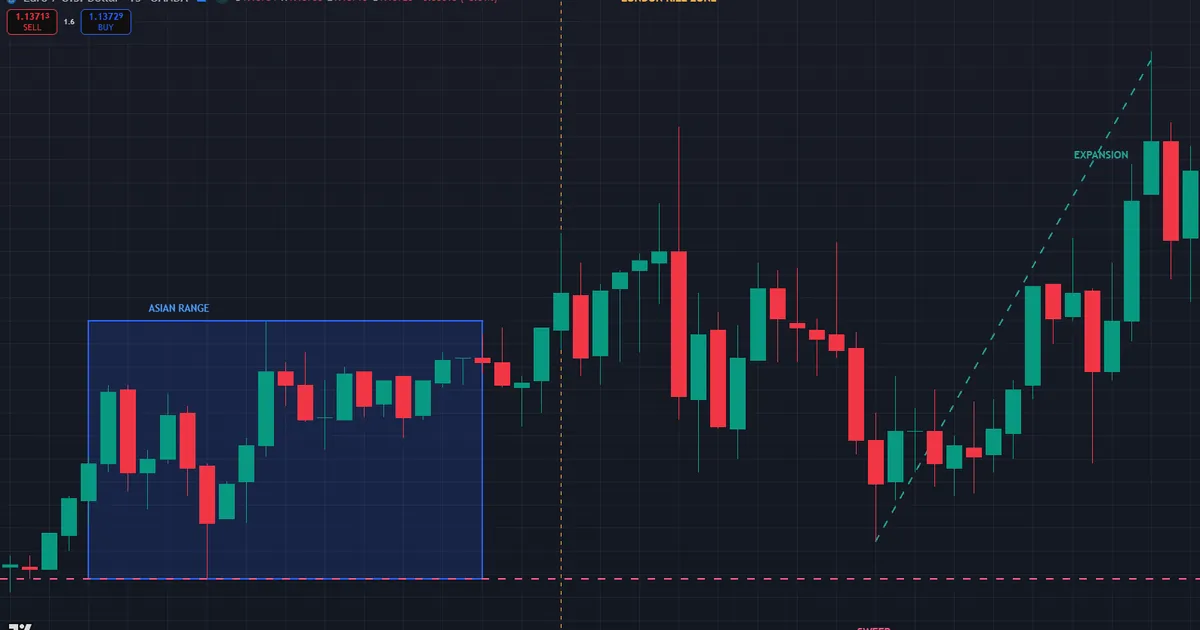
The chart below shows a EURUSD 15-minute chart. The Asian range printed a high near 1.14100 and a low near 1.13988, a tight box of about 11 pips. London then dipped toward 1.14004, testing the Asian low without quite sweeping it, before displacing up through 1.14100 and expanding to 1.14217.
Reading the EURUSD 15-minute chart
Notice the sequence, because it repeats often. The early London candles pressed down toward the Asian low and probed the sell stops resting beneath it. That dip reversed within two candles. Then a full-bodied bullish candle broke the Asian high and confirmed the expansion leg.
The false dip is the trap ICT calls a Judas swing. It baits breakout sellers below the box, fills institutional buy orders cheaply, and leaves a clean low behind. Truly, the low of that dip became the invalidation point for every long that followed.
Also, weigh what the chart never sold you. It gave a discount entry and a direction, yet it never promised the size of the run. The 20-pip expansion could as easily have stalled at the prior day high, so targets always ride on structure, not hope.
The Asian range as a liquidity box
Treat the Asian range as engineered liquidity, not random noise. Overnight, price drifts between a high and a low while volume stays thin. Breakout traders place stops just beyond each edge, and those clustered stops become fuel. So the box is a map of where orders rest, drawn for you by the market itself.
Draw the box with two horizontal lines from 20:00 to 00:00 New York time. Keep it clean and avoid stretching the window, since a wider box blurs the exact edge London targets. The tighter and clearer the range, the sharper the sweep reads when it arrives.
Watch which edge sits closer to the daily draw. When the bias points up, the algorithm often runs the lower edge first to buy in discount, then reverses. Hence the sweep direction usually opposes the day’s true direction, which is precisely why it fools so many traders.
Why the London open moves markets
London is the largest forex trading center on the planet. When its banks open, spreads tighten and order flow thickens across every major pair. So the window carries the volume needed to break a range and hold the break.
The Asian session, by contrast, stays thin and slow. Price coils, ranges, and rarely commits. That coil builds the very liquidity London later hunts, which is why the two sessions work as a pair rather than in isolation.
Volume also explains the window’s reliability. A move born on real participation tends to hold, while a move born on thin overnight flow tends to fade. Thus London expansions carry follow-through that Asian breakouts almost never earn.
How the London Kill Zone Forms Step by Step
Run this routine in order, ideally from the daily close through the London open. Now walk each step, and treat any missing piece as a reason to stand aside.
- Mark the Asian range. Box the high and low from 20:00 to 00:00 New York time.
- Set the higher-timeframe bias. Decide whether the daily draw points up or down before London opens.
- Wait for the sweep. Let London run one edge of the Asian box against the bias.
- Demand displacement. Require a fast, full-bodied candle back through the box in the bias direction.
- Enter on the retrace. Trade the pullback into the fair value gap the displacement left behind.
Each step guards the next. A sweep without displacement is just a breakout, and a displacement without a prior sweep often lacks fuel. Thus the pairing of the two events, in that order, is what separates a London expansion from ordinary noise.
The first graphic below compresses these five steps into a single pre-session card.

What a valid sweep looks like
A clean sweep pokes past the Asian edge by a few pips and snaps back fast. It leaves a wick, not a body, beyond the level. Meanwhile a genuine breakout closes candles past the edge and keeps going, so the two must never blur together.
Read the reaction, not the poke. Price can trade a pip beyond the Asian low and mean nothing until it reverses with intent. Hence the displacement candle, not the wick, is the event that confirms the session.
Timing your entry inside the window
Patience inside the window matters as much as the setup. The sweep often lands in the first hour, near 02:00 to 03:00 New York time, while the retrace entry follows minutes later. So the sequence rarely completes in a single candle.
Let the displacement candle close before you act. Then mark the fair value gap it leaves and wait for price to trade back into it. A limit order at the gap keeps you disciplined, since chasing the expansion candle usually buys the high of the move.
Where the London Kill Zone Sits in the SMC Workflow
The kill zone supplies timing, not a full trade. Smart Money Concepts (SMC) traders layer four things in fixed order: higher-timeframe context, a point of interest, lower-timeframe confirmation, and the entry itself. The London window governs only when that last layer is allowed to fire.
Start on the daily and 4-hour charts. They set the bias and the draw on liquidity for the day. Next, an H1 chart marks the point of interest, often an order block or gap sitting in the path of that draw. Then the M5 or M15 chart times the trigger inside the 02:00 to 05:00 window.
Timeframe pairing and session timing
Split the work deliberately across charts. The 4-hour names the destination pool, the H1 frames the zone, and the M5 or M15 catches the sweep and displacement. So each chart answers one question, and no chart does two jobs.
The clock filters everything else. A textbook setup at 09:00 New York time belongs to a different window, not to London. Plainly, the same pattern carries less weight outside its kill zone, because the volume that powers it has moved on.
Session timing and the forex clock
Get the clock right before anything else. The London kill zone shifts by an hour when daylight-saving rules diverge between regions, so a fixed local time can drift out of sync. Our free forex market hours tool converts the 02:00 to 05:00 New York window to your own clock and flags the session overlaps.
The last hour of London overlaps the New York open. That overlap, roughly 08:00 to noon New York time, carries the day’s heaviest volume. So a London move that starts late often extends straight into the New York session rather than dying at the London close.
Confirming the London Judas Swing in Real Time
The hardest part of the window is trusting the sweep while it happens. In the moment, a London push through the Asian low looks exactly like a breakdown. So you need a checklist that separates the trap from a real trend before you commit.
Three signs the sweep is real
First, watch the speed of the return. A genuine sweep snaps back within one or two candles, while a real breakout keeps pressing lower. Second, check the wick. A sweep leaves a long wick beyond the Asian edge, not a run of closing bodies. Third, confirm the displacement closes back inside the box with force, not a timid drift.
All three signs together raise the odds sharply. Any one alone proves little, since a fast wick can still fail and a slow return can still reverse later. Hence the routine waits for the cluster, not the first hint.
When to skip the setup entirely
Some sweeps deserve no trade at all. A push that stalls without any snap back is not a sweep yet, only a probe. Likewise, a sweep that forms against a strong daily trend fights the higher-timeframe draw and rarely pays. Now add the news filter: a scheduled release inside the window can override every technical read, so a red-news morning is often a stand-aside by default.
Worked Example: A Bearish London Session on GBPUSD
Bearish sessions mirror the routine exactly, only the sweep runs the top of the box. The chart below walks one from levels to target, step by numbered step.
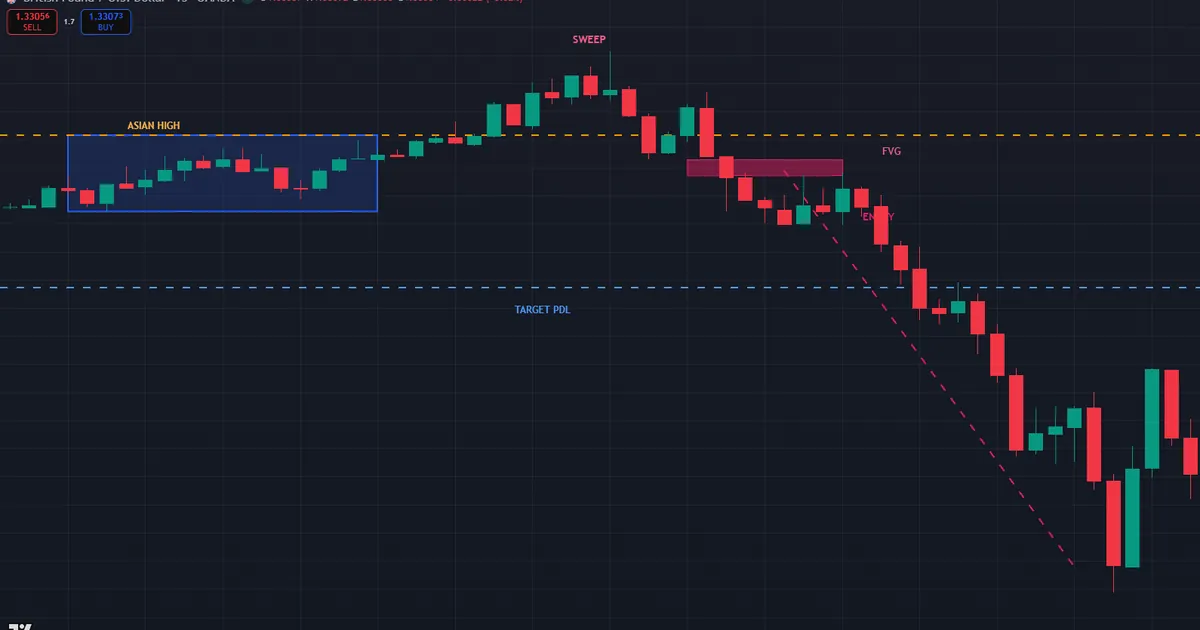
- First, the box: the Asian range on GBPUSD held a high at 1.34408 and a low at 1.34290.
- Next, the bias: the daily chart had displaced lower two days earlier, so the draw sat below at the previous day low.
- The trap: London pushed up to 1.34557, sweeping the Asian high at 1.34408 and grabbing buy stops.
- The trigger: a fast candle broke lower, leaving a bearish fair value gap between 1.34336 and 1.34365.
- The trade: short the retrace into that gap near 1.34350, stop above the sweep at 1.34580, first target the previous day low at 1.34136.
The raid is the setup, not a flaw. A bearish London day frequently opens with a push above the Asian high, because those buy stops fund the institutional selling that follows. So the checklist insists on displacement before any entry.
Manage the trade along the marked levels. The short near 1.34350 risks about 23 pips to a stop above the sweep, while the previous day low waits roughly 21 pips below near 1.34136, close to a one-to-one first target. Many traders bank a partial there and trail the rest toward the next sell-side pool.
Also, note the counterfactual. Had the daily draw pointed up instead, the same Asian high sweep would carry no weight, and the clean setup would wait for a run on the Asian low. So the box gives two possible sweeps, yet the bias decides which one you trade.
Download the complete indicator database
Put these concepts on your charts. One email unlocks the full library of 1,380+ indicators with compiled MT4 and MT5 files, plus my TradingView scripts. No paywall, no spam, unsubscribe any time.
Get free access to my indicator database
One email unlocks 1,380+ free MT4, MT5 and TradingView indicators — the complete library. No single-tool download; you get the whole database.
Common London Kill Zone Mistakes
Five errors show up in almost every London journal, and each has a plain fix.
- Trading the sweep before it reverses. Fix: wait for the displacement candle, then enter on the retrace.
- Chasing the breakout of the Asian box. Fix: the first break is usually the Judas swing, so let it snap back first.
- Ignoring the daily bias. Fix: take only the London move that agrees with the higher-timeframe draw.
- Widening the window past 05:00. Fix: after the London close approaches, hand the day to the New York session instead.
- Trading straight into red news. Fix: check the calendar first, since a data release can void the technical read.
- Sizing every session the same. Fix: scale risk to how clean the sweep and displacement look.
None of these errors are exotic. Still, each one quietly turns a structured window into a coin flip, and only a written record makes them visible.
The deepest trap is impatience. A London session can sit flat for two hours before it moves, and that silence tempts traders into forcing a setup that has not formed. So the discipline to wait, then strike, is the edge the window actually rewards.
The second graphic pairs the five mistakes with their fixes for a fast pre-session review.

London Kill Zone Pre-Session Checklist
Run these lines before 02:00 New York time, in order and without exceptions. Any failed line downgrades the session or removes it entirely.
- Asian range high and low boxed from 20:00 to 00:00 New York time.
- Daily draw on liquidity named as either up or down.
- Point of interest marked in the path of that draw.
- Red-news times checked before the plan is set.
- Sweep of one Asian edge observed, not assumed.
- Displacement candle confirmed in the bias direction.
- Entry, stop, and first target written before the fill.
Also, keep the completed cards. A month of them shows which line you skip under pressure, and that line is usually the next thing to fix.
Grade each session before you trade it. Score the sweep, the displacement, and the bias agreement, then reserve full risk for the A-grade windows only. Over a quarter, those grades reveal whether your best reads truly cluster where you thought they did. So the scorecard turns a vague sense of quality into evidence you can act on.
Limitations and a Failed London Session
The London kill zone fails in specific, predictable ways. Some mornings never sweep the Asian range at all, and price simply drifts sideways until New York. Other mornings gap on news and skip the setup entirely. So a blank London session is a valid outcome, not a missed trade.
The window is also discretionary. Two traders can draw the Asian box differently and reach opposite reads, and hindsight makes every finished session look obvious. Meanwhile, purpose-built ICT indicators for MT4 and MT5 can standardize the box you draw, which removes one source of noise.
Keep expectations honest and qualitative. No public dataset measures how often a London sweep resolves into a clean expansion, and any precise figure you meet online is a guess. What your own journal can show is a pattern over a month: whether the cleanest sweeps outperform the messy ones in your hands. That private evidence is the only statistic this window can offer.
A failure walkthrough: the sweep that kept going
The chart below shows the loss that teaches London discipline fastest. Picture EURUSD on the 1-hour chart with a bullish plan: the Asian low near 1.14265 marked, daily draw up, price dipping into the box edge. Price runs the Asian low as expected. Then, instead of reversing, it closes three candles straight through the level and slides to 1.13982.

That pattern is a real breakout wearing a sweep’s costume. The clue is the close: a valid sweep leaves a wick, while this move printed bodies below the level. Hence the invalidation rule is strict. Once price closes past the level your entry leaned on, the London long is wrong and the stop belongs right above the sweep low.
Log the session as a structure failure, not bad luck. Record how many candles closed past the Asian low, whether news drove the break, and what a re-entry would have required. Indeed, one honest failure entry teaches more than a week of clean expansions.
There is a quiet upside to this loss too. A London break that runs straight through the Asian range often becomes the day’s true direction. So the failed long can hand you tomorrow’s read, provided your journal captured the shape while the details stayed fresh. Yesterday’s trap becomes today’s bias, and the same Asian box you drew now frames a fresh sweep in the opposite direction the very next morning.
Related Concepts for London Traders
Three companion reads deepen the routine. The New York kill zone guide covers the session that often completes a London move later in the day. Then the ICT Asian range strategy details the box London hunts, and the ICT daily bias routine sets the direction every session should respect. For the wider timing framework, the full guide to ICT kill zones maps all four windows, while displacement is the exact candle that confirms each one.
FAQ
What time is the London kill zone in New York time?
The London kill zone runs from 02:00 to 05:00 New York time. That window covers the London open and the first hours of European volume. Some traders extend it slightly to catch a late setup, yet the core three hours hold the highest probability.
Do I need the Asian range to trade the London kill zone?
Yes, because the Asian range supplies the liquidity London hunts. Box the high and low from 20:00 to 00:00 New York time, then watch for a sweep of one edge. Without that reference box, you lose the clearest read on where the session’s trap sits.
What is the London Judas swing?
The Judas swing is the false move that opens the London session. Price pushes one way to grab stops, then reverses into the true direction. So the swing baits breakout traders before the real expansion begins.
Which pairs work best in the London kill zone?
The euro and pound pairs react most cleanly, since London is their home session. GBPUSD and EURUSD show the sharpest sweeps and expansions. Still, test any instrument on a demo first, because session behavior differs by pair.
Can I trade the London kill zone with a full-time job?
Yes, with planning. Mark the Asian range and bias the night before, then set alerts near the box edges. Thus you only need to watch the screen when price approaches a level, not for the whole three hours.
Does the London kill zone work every day?
No. Some sessions never sweep the range, and news days can void the setup entirely. Treat a blank London window as a valid outcome and wait for the next clean sweep and displacement. Results are not guaranteed; past performance is not indicative of future results.
External references
- For background on this concept, see Forex Trading Schedule at Investopedia.
- For broader market context, see London Stock Exchange on Wikipedia.

About the author
Written by Dominic Walsh, a Forex trader and MT4/MT5 indicator, Expert Advisor and script developer. Every tool on forexmt4systems.com is tested on live charts before release and ships with ready-to-use compiled MT4 (.ex4) and MT5 (.ex5) files. Learn more about the trader and developer behind this site.
How we build, test and correct every tool: Editorial & Testing Policy. Trading carries risk; see the disclaimer.