
A falling wedge pattern gives you three things a chart rarely offers together: a defined entry level, a defined stop and a defined invalidation. Both boundaries slope down, and the range between them narrows as the shape develops.
This guide covers execution rather than theory. You get the validity checks, the entry rule, the stop, the projection, and an honest look at what happens when the shape breaks the wrong way.
What Makes a Falling Wedge Pattern Valid
Draw the two lines first. One runs across the swing highs, the other across the swing lows, and both need at least two touches to count.
Both lines must point downward. That shared direction separates a wedge from every triangle, where one boundary stays flat or leans the other way.
The gap between them must also shrink. Two parallel falling lines make a channel, and a channel carries none of the wedge reading.

Above sits a falling wedge on the GBPCHF hourly chart. Both boundaries sloped down through the structure, the range tightened to well under a pip, and price then closed above the upper line near 1.08716.
Both Lines Must Fall
Check the slopes before anything else. A falling wedge needs lower highs and lower lows, with the upper line dropping faster than the lower one.
That relationship creates the narrowing. Rallies get sold quickly while declines struggle, so the shape squeezes from above rather than from below.
Miss this and you have mislabelled the chart. Our guide to the wedge pattern meaning covers the wider family, including the rising version that reads the opposite way.
The Range Must Narrow
Measure the vertical distance at the left edge of the shape. Then measure it again near the right edge, and compare the two figures.
A genuine wedge shows a clear reduction. On the GBPCHF example the two lines had closed to a fraction of a pip by the break, which counts as extreme compression.
So measure rather than trust the eye. Sloped lines fool almost everyone, and a channel labelled as a wedge produces a confirmation price that means nothing.
Touches and Time
Two touches per line make the minimum. Three or more give you a boundary you can actually defend, though each extra touch consumes more of the shape’s remaining space.
Duration decides how much the structure records. A wedge built from four bars records a quiet hour, while one spanning weeks records a genuine loss of selling pressure.
Both hourly examples in this guide formed across a day or so. That timescale suits an intraday trader, and a position trader would need the same shape on a daily or weekly chart.
Continuation or Reversal
The same drawing plays two roles. A falling wedge inside an established uptrend marks a pause before the advance resumes.
Place that identical shape at the end of a long decline and it becomes a reversal candidate instead. There it marks the point where selling ran out of energy rather than the point where a rally caught its breath.
Neither role changes the drawing rules. Both boundaries still fall, the range still narrows, and the close above the upper line still triggers the trade.
What changes is the projection and the risk. A continuation wedge has the larger trend behind it, while a reversal wedge asks the market to change direction, so treat the second version as the harder trade.
Where It Has to Form
Location decides whether the shape earns capital. A falling wedge that ends at an old support shelf carries two independent reasons to turn.
The same drawing floating in the middle of a range carries one reason, and a weak one. Check whether price reacted at the lower boundary before the wedge started forming.
Our guide to support and resistance covers how to mark those levels before the shape tempts you into inventing one.
How to Trade a Falling Wedge, Step by Step
Run the same seven steps every time. The order protects you, because steps one to three reject most of the candidates that merely look right.
- Draw both boundaries. Two touches minimum on each line.
- Confirm both slope down. Reject anything with a flat boundary.
- Confirm the range narrows. Measure at both ends and compare.
- Check the location. Look for a level, trend or session extreme that already mattered.
- Write the confirmation price. Fix the level a close must clear, before the break.
- Set the stop. Place it beyond the lower boundary, then size from that distance.
- Mark the projection and the obstacles. Note every swing and round number in between.
Step five carries the most weight. A confirmation price chosen after the break tends to land wherever the trader already wanted it.
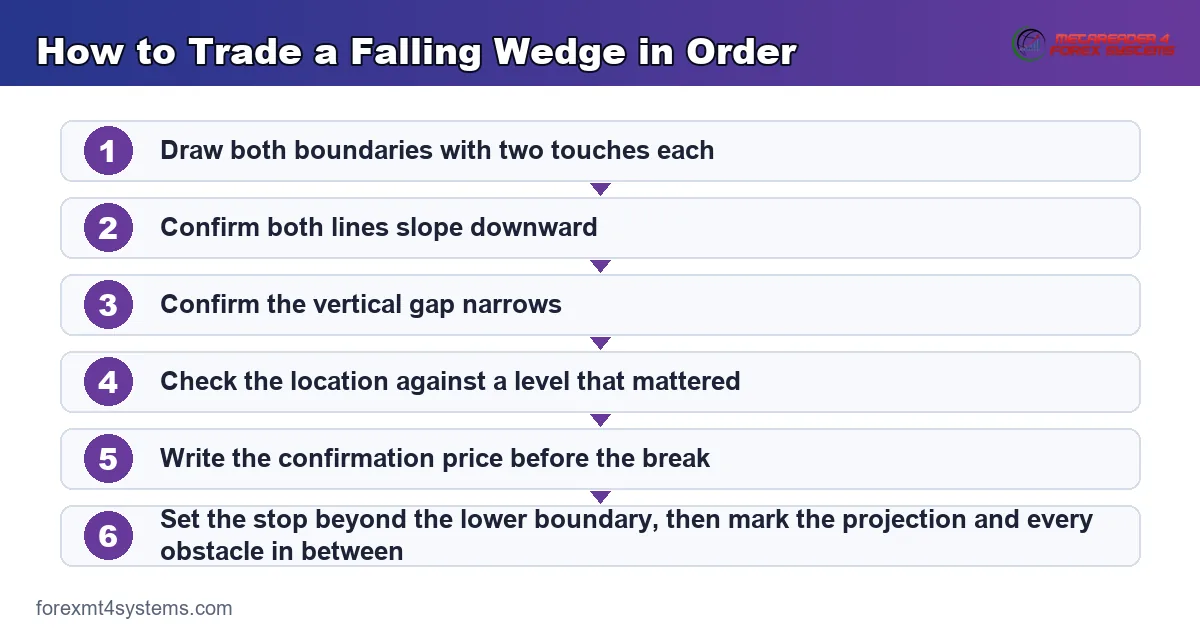
Fix both lines once the second touch confirms them. A boundary you nudge afterwards has stopped describing the market.
Entry on the Close Beyond the Upper Line
One rule triggers the trade. Price must close above the upper boundary, and anything less leaves the shape incomplete.
Why the Close and Not the Wick
Sloped boundaries get pierced constantly. A spike through the upper line reverses within the hour often enough to ruin anyone trading the touch.
A settled close changes the balance. Traders who sold inside the wedge now sit underwater, and their exits add to the buying.
So write the rule down and hold yourself to it. Most false triggers never reach your account once the close becomes non-negotiable.
Which Timeframe’s Close Counts
Use the timeframe that drew the shape. A wedge visible on the hourly chart deserves an hourly close, not a one-minute one.
Dropping to a faster chart for the trigger costs consistency. It also invites a dozen false breaks in the same session.
The Retest Entry
Price often returns to the broken upper line. That old resistance then acts as support, and many traders prefer the tighter stop it allows.
Waiting carries a cost. A fair share of these breaks run without any retest, so patience sometimes means watching the whole move from the sidelines.
Splitting the order removes the choice. Half enters on the close, half rests as a limit at the boundary, and both halves share one stop.
Stop Placement and Position Size
Entry solves the easy half. Where the stop sits, and how much you commit behind it, decides most of what lands in the account.
Where the Stop Belongs
Put the stop below the lower boundary rather than a few pips under the entry. A stop inside the wedge sits exactly where ordinary noise reaches.
Some traders use the wedge low instead. That placement survives almost any shakeout, and it demands a much smaller position for the same risk.
Either choice works. Pick one, write it into the plan, and apply it the same way to every wedge you trade.
The Apex Trap
Late in a wedge the two lines almost touch. On the GBPCHF example that gap had fallen well under a pip, which makes the natural stop look tiny.
Tiny stops tempt oversized positions. The distance looks cheap, so traders lift size until a single ordinary candle can take the whole trade out.
Size from volatility instead. Our position size calculator ties the position to the amount you accept losing rather than to whatever the boundary happens to allow.
Judging the Trade Before You Take It
Compare the stop distance against the nearest sensible target. If the two numbers sit close together, the trade stops making sense whatever the shape looks like.
Our risk reward calculator turns those distances into a ratio in seconds. Reject anything that fails your own threshold, and do it before the emotion of a live break arrives.
The Measured Move as a Projection
The classic target uses the shape’s own dimensions. Measure the height at the widest part, then apply that distance from the break point.
How to Measure It
Take the vertical distance between the two lines at the left edge of the wedge. That figure represents the shape at its fullest, before the compression started.
Add it to the confirmation price and mark the level. Some traders aim for the origin of the wedge instead, which usually gives a larger number.
Pick one convention and record it. Mixing methods across trades makes your own results impossible to compare later.
What the Projection Is Not
A measured move describes the shape, not the future. It tells you how tall the wedge was, and nothing more than that.
Published testing of classical chart shapes has produced modest and inconsistent results. Outcomes shift with the instrument, the period, the transaction costs and the exact drawing rules applied, so no single figure describes how these structures behave.
That honesty improves the trading rather than spoiling it. Once you stop expecting the projection to arrive, you start planning the partial exits that make the shape usable.
Why Price Often Stops Short
A measured move gives a projection, never a promise. Price frequently stalls well before the level, and partial exits exist precisely because of that.
Obstacles explain most of it. Old swing highs, round numbers and session extremes all sit in the way and attract profit taking.
So map the ground between entry and projection first. Then decide which obstacle deserves a partial exit rather than holding for the full measure by default.
A Worked Example on CADJPY
Now take a second real structure. The chart below shows a falling wedge on the CADJPY hourly chart formed across two sessions in July.

Both boundaries sloped down and converged, with the lines roughly a pip apart late in the shape. Price then closed above the upper line near 115.40729.
Notice how little room a structure that tight leaves. The stop, the spread and the first obstacle all sit within a small distance, so execution quality matters more here than on a weekly shape.
Download the complete indicator database
Put these concepts on your charts. One email unlocks the full library of 1,380+ indicators with compiled MT4 and MT5 files, plus my TradingView scripts. No paywall, no spam, unsubscribe any time.
Get free access to my indicator database
One email unlocks 1,380+ free MT4, MT5 and TradingView indicators — the complete library. No single-tool download; you get the whole database.
Invalidation and the Mistakes That Cause It
Knowing when to abandon the read matters as much as knowing when to act. The panel below collects what invalidates a falling wedge, before and after the break.

A Close Back Inside the Shape
Price that re-enters the wedge after breaking out has undone the completion. Treat that close as the signal to leave, rather than waiting for the stop to do it for you.
The Lower Boundary Gives Way First
A close below the lower line ends the setup outright. Marking that level in advance costs nothing, and holding a long position through it costs plenty.
Boundaries That Never Narrowed
Parallel falling lines make a channel. Measure the gap at both ends, and drop the wedge label when the second reading matches the first.
Price Reached the Apex
Wedges lose meaning once the boundaries converge fully. Most traders stop taking breaks beyond roughly three quarters of the way along the structure.
The Break Came on a Wick
Acting on a spike takes a trade the pattern never offered. Wait for the settled close, and most of these failures never reach your account.
News Overrode the Structure
A rate decision erases any chart shape. Check the calendar before planning around a boundary that sits near a scheduled release.
Managing the Trade After the Break
What you do over the following sessions matters more than the entry price. Three habits cover most of it.
Moving the Stop
Leave the stop alone until price gives you something. A first higher low above the broken boundary offers a natural place to tighten.
Then trail behind structure rather than by a fixed distance. Each new higher low supplies a fresh reference, and the market sets the pace.
Avoid moving to breakeven too early. A routine retest of the upper line would stop you out at the exact moment the shape behaves as expected.
Scaling Out
Mark the obstacles before the trade starts. An old swing, a round number and the session extreme all deserve a note on the chart.
Then book a slice at the first of them. Taking part of the position early makes holding the remainder through a normal pullback far easier.
Keeping the Record
Log the shape, the confirmation price, the stop and the outcome. Include the wedges you skipped, because the skipped ones tell you as much as the traded ones.
That record beats any general article about your own pairs. It also shows you quickly whether your drawing rules produce anything usable.
Falling Wedge Quick Reference
Keep this table beside the chart while the shape becomes familiar. Each row states a condition rather than an outcome.
| Element | What to check | Common practice |
|---|---|---|
| Upper line | Falls, and falls faster | Two touches minimum |
| Lower line | Falls more gently | Two touches minimum |
| Range | Measurably narrower late than early | Compare both ends before labelling |
| Location | A level, trend or session extreme that mattered | Reaction there before the wedge formed |
| Trigger | Close above the upper boundary | Close on the timeframe that drew the shape |
| Stop | Below the lower boundary | Or below the wedge low for more room |
| Target | Widest height from the break point | Partial exits at obstacles along the way |
Then run these six checks before any entry.
- Both boundaries sloping downward
- A vertical gap that measurably shrinks
- At least two touches on each line
- A confirmation price written before the break
- A stop distance that still allows a sensible ratio
- A first target at the nearest obstacle, not the full projection
Notice what the list leaves out. Nothing here suggests how often the shape follows through, because that figure shifts with the market, the period and the exact definition applied.
When the Falling Wedge Fails
Failed shapes move quickly, and traders who trusted the bullish label feel it hardest. The chart below shows a falling wedge on the NZDJPY hourly chart that broke upward exactly as the bullish reading expects, and then went nowhere.
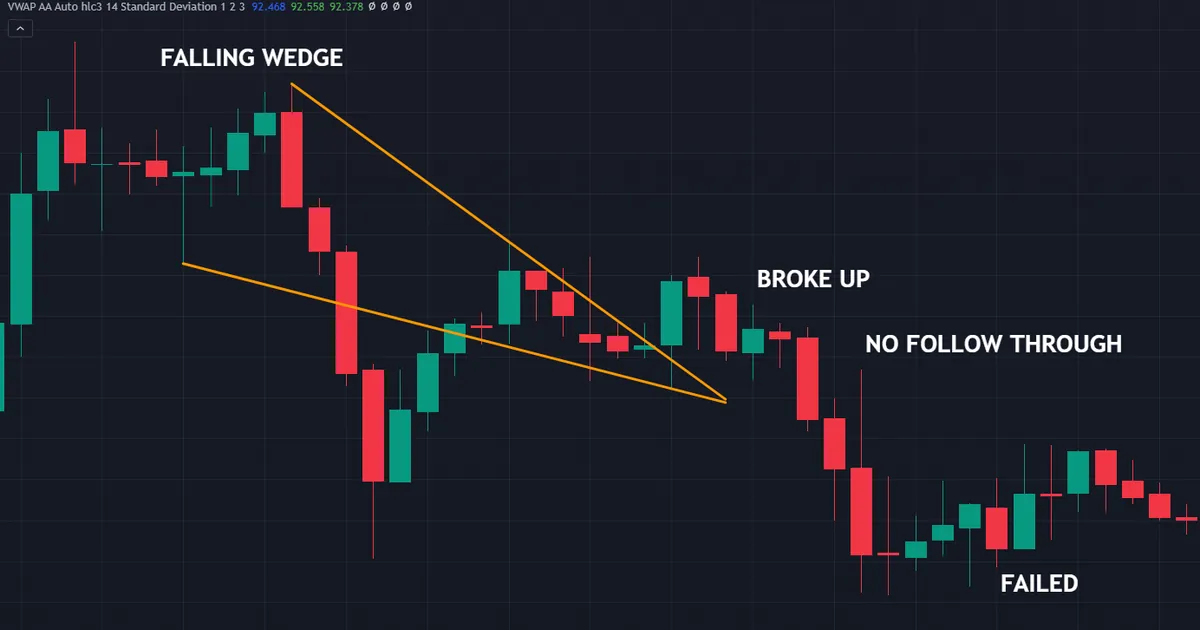
The Break Went Nowhere
Both lines fell and converged toward roughly 95.011 and 95.04625, so the drawing itself was sound. Price closed above the upper line, which is the signal the shape is supposed to give, and then stalled and traded back inside.
A long taken on that close was right briefly and then underwater. The break arriving on cue is not the same as the break going anywhere, and that gap is where most of the damage happens.
Selling Pressure Had Not Actually Faded
The narrowing range suggested supply was thinning. Price disagreed, which happens often enough that the bullish reading deserves treating as a convention rather than a rule.
The Structure Was Too Tight
The two lines sat only a few pips apart late in the shape. Structures that narrow leave almost no room between entry and stop, so ordinary noise decides the trade.
The Larger Trend Never Agreed
A bullish shape inside a firm decline asks a lot. Check the higher timeframe before committing, and treat any conflict as a reason to trade smaller or skip.
Thin Liquidity Carried the Break
Breaks during quiet hours stall more often than breaks into London or New York. Note which session produced the closing bar, then adjust what you expect from the hours that follow.
Hindsight Flattered the Shape
Scroll back through any chart and clean wedges appear everywhere. The eye picks the tidy examples and skips the messy ones, which makes the structure look far more dependable than it proves in real time.
Our piece on why chart patterns fail collects those reasons across every shape in this library.
Related Shapes Worth Studying
The rising wedge mirrors everything above. Both lines climb, buying pressure fades, and the conventional reading turns bearish instead.
Flags and pennants solve a similar problem in a different way. They pause a move rather than exhaust one, and they need a sharp pole in front of them before the drawing means anything.
One comparison causes more mislabelling than any other. Our note on the rising wedge versus the ascending triangle turns entirely on whether the upper boundary stays flat or climbs.
Triangles sit in the neighbouring family. Our guide to the types of triangle patterns covers the three converging variants and what separates each from a wedge.
Levels underpin all of it. A falling wedge earns attention when its lower boundary lands somewhere the market already cared about, so time spent on level drawing pays back faster than time spent memorising outlines.
For tooling, our pattern recognition indicators archive collects the scanners that mark these structures, and our support and resistance indicators archive covers the level tools that pair with them.
FAQ
What is a falling wedge pattern?
Two converging trend lines that both slope downward, with the upper line falling faster than the lower one. The shape completes only when price closes above the upper boundary.
Is a falling wedge always bullish?
No. The conventional reading looks upward because selling pressure fades as the range narrows, and plenty of these structures break downward instead. Treat the label as a convention and let the close decide.
Where do I enter a falling wedge trade?
On the close above the upper boundary, or on a retest of that line afterwards. Splitting the order across both removes the need to choose between the wider stop and the missed entry.
Where does the stop go?
Below the lower boundary, or below the wedge low if you want more room. Near the apex that distance shrinks to almost nothing, so size from the amount you accept losing rather than from the shape.
How do I calculate the target?
Measure the height at the widest part of the wedge and apply it from the break point. Treat the number as a projection, and book partial profit at the obstacles in between.
What invalidates a falling wedge?
A close back inside the shape after the break, or a close below the lower boundary before it. Either outcome tells you the read no longer stands.
Does the falling wedge pattern work in forex?
It appears regularly on currency pairs across every timeframe. No chart shape offers a dependable edge on its own, so pair it with a level that already mattered, a written confirmation price and sensible sizing. Keep a log of every one you trade, because your own record teaches you more about your pairs than any general article can. Results are not guaranteed; past performance is not indicative of future results.
External references
- For background on this concept, see Falling Wedge at StockCharts ChartSchool.
- For broader market context, see Falling Wedge at BabyPips Forexpedia.

About the author
Written by Dominic Walsh, a Forex trader and MT4/MT5 indicator, Expert Advisor and script developer. Every tool on forexmt4systems.com is tested on live charts before release and ships with ready-to-use compiled MT4 (.ex4) and MT5 (.ex5) files. Learn more about the trader and developer behind this site.
How we build, test and correct every tool: Editorial & Testing Policy. Trading carries risk; see the disclaimer.