
Understanding what is position sizing turns a vague sense of risk into an exact number you type on the platform. It is the step that decides how large each trade should be, given your account and your stop.
This guide explains what is position sizing in forex, step by step, for a complete beginner. You will meet the three inputs the math needs, follow full worked examples, and size any trade on any pair with a short, repeatable recipe. By the end, the number on the order ticket will feel like a decision, not a guess.
What Is Position Sizing in Forex, Defined
Position sizing is the process of choosing how many lots to trade based on your risk and your stop. It answers a single question: how big can this trade be without risking more than you planned?
The size is never a guess or a gut feeling. It is the result of a small calculation that starts with the loss you accept and ends with a lot you can place. So the number falls out of the math, not out of your mood.
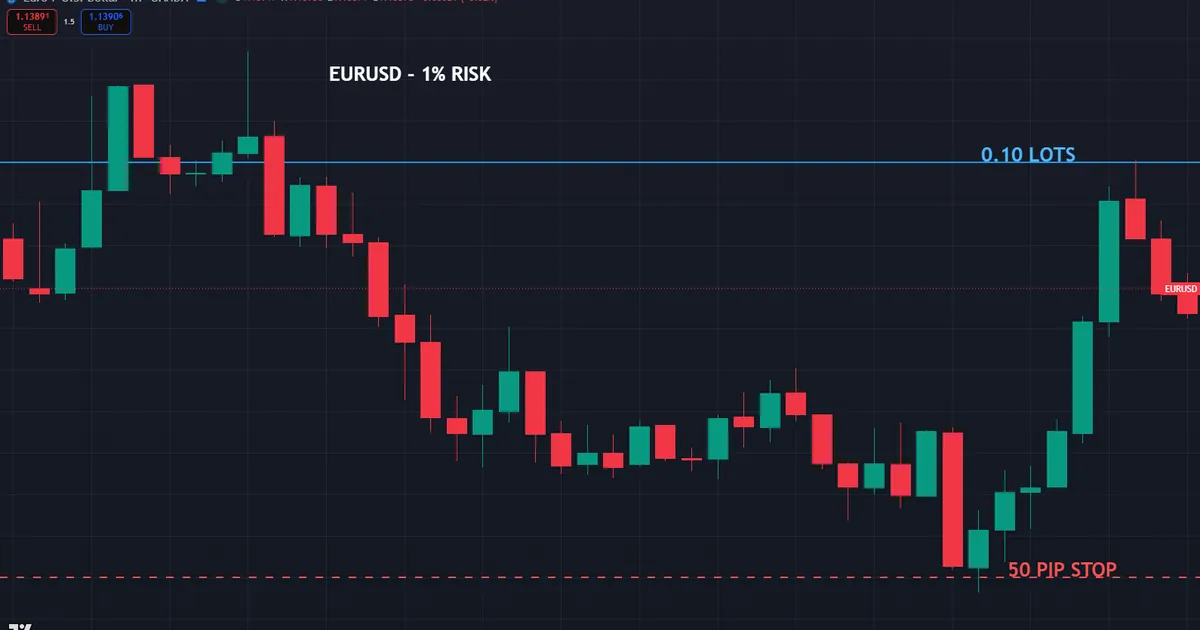
This backward approach is the heart of the skill. You fix the loss first, then find the size that keeps a losing trade inside that limit. Because the loss leads, the position always fits the account instead of stretching it.
Contrast that with a fixed lot on every trade. A fixed lot ignores the stop and the balance, so the real risk drifts from trade to trade. A sized lot holds the risk steady, whatever distance the chart asks of your stop.
Why Sizing Beats Picking Entries
Beginners pour energy into entries and almost none into size. Yet a great entry on a reckless lot still blows up, while a modest entry on a careful lot endures. So the size you choose often matters more than the signal that got you in.
The reason lies in losing streaks, which reach every trader. A run of five or six losses is normal, not rare. When each loss stays small, the account absorbs the streak; when each runs large, the same streak can end it.
Sizing as a Form of Defense
Position sizing is really a quiet form of defense. It caps the damage from any single trade before you ever click buy. Because the cap holds on every trade, no one loss and no short streak can undo months of steady work.
The cap also frees your mind while a trade runs. When the worst case is known and small, a loss stops feeling like a threat. So careful sizing does more than protect money; it protects the calm that good decisions need.
The Three Inputs Behind Every Size
The calculation needs only three numbers, and you already control all of them. Each one comes from a different place, yet they slot together in a single step.
- Account risk in money. Decide how much you will lose if the trade fails, usually a small percent of the balance.
- Stop distance in pips. Measure how far the stop sits from the entry, read straight off the chart.
- Pip value per lot. Know what one pip is worth on a standard lot for the pair you trade.
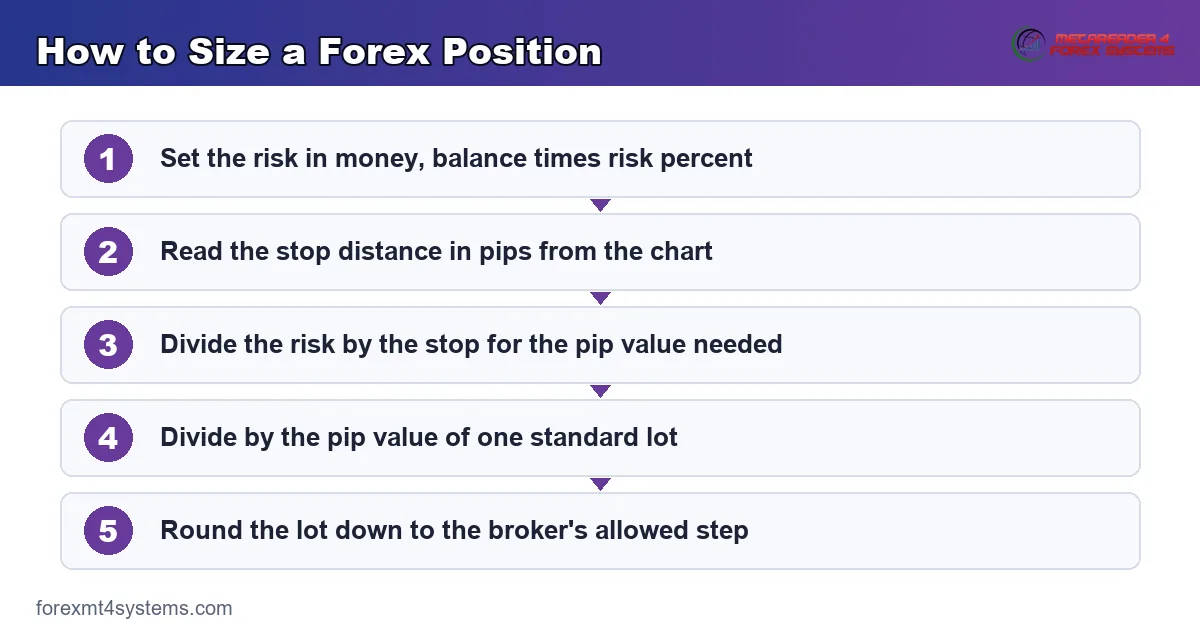
Gather those three, and the lot follows in one move. The first comes from your risk rule, the second from the chart, and the third from the pair. So sizing is really just the act of combining numbers you already have.
How the Inputs Connect
The three inputs are not independent; they pull on each other. Your risk in money sets the ceiling, the stop spreads that ceiling across pips, and the pip value converts the result into lots. Because each feeds the next, dropping one breaks the chain.
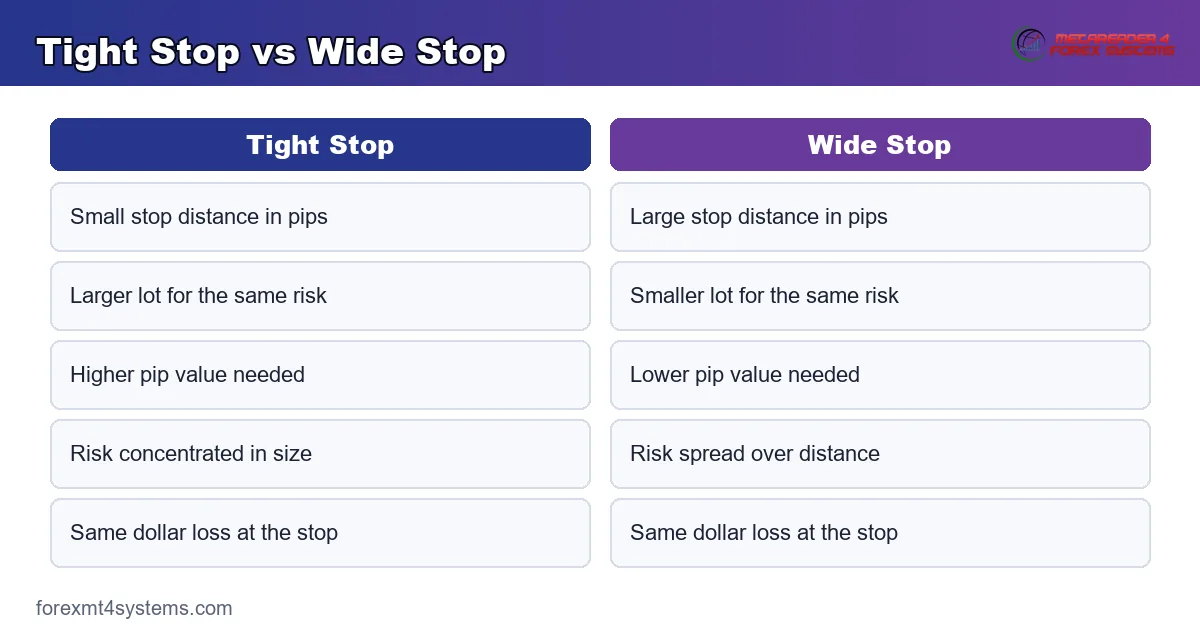
The stop deserves special attention here. A wider stop forces a smaller lot to hold the same risk, while a tighter stop allows a larger one. So you cannot size a trade sensibly until the stop has a home on the chart.
How to Calculate Position Size
Numbers make the recipe stick, so walk through a full trade. You hold a five thousand dollar account, and you risk one percent on the idea.
First, set the risk in money. One percent of five thousand is fifty dollars, so a losing trade may cost fifty. That figure is the ceiling the whole calculation protects.
Next, read the stop. Your chart places a sensible stop fifty pips from the entry on EURUSD near 1.14. So the trade risks fifty dollars spread across a fifty pip move against you.
From Pip Value to Lot
Now find the pip value you need. Divide the fifty dollar risk by the fifty pip stop, and you need one dollar a pip. That is the pip value that spends exactly fifty dollars over fifty pips.
Finish with the lot. Divide one dollar a pip by the ten dollars a standard lot is worth, and you get 0.10 lots. So the correct size here is 0.10, and a fifty pip loss costs the planned fifty dollars, no more.
Checking Your Work
Run a quick reverse check before you trade. At 0.10 lots the pip value is one dollar, and fifty pips at one dollar is fifty dollars. The numbers close the loop, which tells you the size is right.
This habit catches most sizing slips early. A single missed division shows up at once when the loop fails to close. So the reverse check costs a few seconds and saves the occasional costly mistake.
The Same Setup at Two Sizes
The clearest lesson comes from one setup priced at two stops. Keep the fifty dollar risk fixed, and watch the lot change as the stop moves.
Take a tight stop first. A twenty-five pip stop needs two dollars a pip, which points to a 0.20 lot. So the tighter stop makes room for a larger position at the same risk.
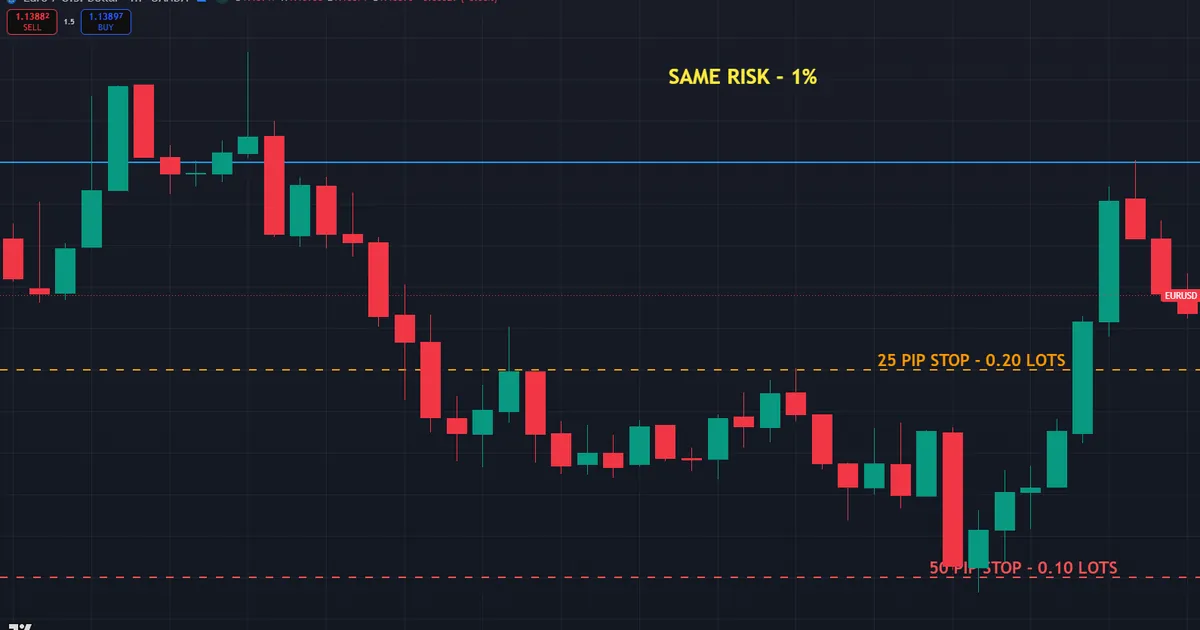
Now widen the stop. A fifty pip stop needs only one dollar a pip, which halves the lot to 0.10. The risk held steady while the size shrank, which is the whole point of sizing.
Read the two side by side, and the rule stands out. The stop and the lot always move in opposite directions for the same risk. Because they trade off cleanly, the dollar loss stays fixed no matter which stop the chart demands.
Download the complete indicator database
Put these concepts on your charts. One email unlocks the full library of 1,380+ indicators with compiled MT4 and MT5 files, plus my TradingView scripts. No paywall, no spam, unsubscribe any time.
Get free access to my indicator database
One email unlocks 1,380+ free MT4, MT5 and TradingView indicators — the complete library. No single-tool download; you get the whole database.
Position Sizing on Non-Dollar Pairs
The recipe holds on every pair, yet the third input shifts away from ten dollars. On a yen pair or a cross, one pip on a standard lot is not worth ten dollars, so the final division changes.
Only the pip value per lot moves; the first two steps stay identical. So find the pair’s pip value first, then divide by it instead of by ten. The structure of the calculation never bends.
A Yen Pair Worked Example
Try USDJPY near 162.00 on a five thousand dollar account at one percent risk. Your risk in money is fifty dollars, and your stop sits twenty-five pips away. Divide fifty by twenty-five, and you need two dollars a pip.
Here the pip value per standard lot is about six dollars, not ten. Divide the two dollars you need by six, and you land near 0.33 lots. So the yen pip value bent the size, while the recipe carried through unchanged. Our pip value calculator supplies that third input in a click.
Position Sizing for Different Accounts
The same recipe fits a tiny account and a large one, because it works in percentages. One percent means five dollars on a five hundred dollar account and five hundred on a fifty thousand dollar one. So the method scales without any change.
What changes is the lot you can actually trade. A very small account may need a micro lot to keep the risk in bounds, while a large one reaches for standard lots. Because the broker sets a minimum size, a small balance sometimes cannot risk as little as it would like.
Sizing a Small Starter Account
On a two hundred dollar account, one percent is only two dollars of risk. A fifty pip stop then needs four cents a pip, which sits below one micro lot. So the smallest tradable size may already risk more than one percent.
The honest fix is to accept a slightly higher percent or grow the balance. Chasing sizes below the broker floor only invites errors. So many traders wait until the account can support a micro lot at their chosen risk before trading live.
Sizing a Larger Account
On a fifty thousand dollar account, one percent is five hundred dollars of risk. A fifty pip stop then supports ten dollars a pip, a full standard lot. So the same recipe now points at a much larger position.
Here the danger flips toward oversizing. A standard lot swings the balance fast, so stop discipline matters even more. Because the numbers feel large, a calm, calculated size guards against the pull to trade bigger than the plan allows.
Position Sizing Beyond One Trade
A single trade is easy to size, yet a full book needs a wider view. When several positions run at once, their sizes add up into a combined risk that matters more than any one lot.
Add the money at risk across every open trade to see the total. Four trades sized at one percent each put four percent on the line at the same moment. So a book of small trades can quietly carry a large combined risk.
Correlation sharpens the point. Two longs on euro pairs tend to rise and fall together, so they act like one bigger position. Because they share a driver, sizing each alone understates the true exposure you hold.
Sizing Within a Total Budget
The fix is to size trades against a total risk budget, not just a per-trade limit. Many traders cap the combined risk near five or six percent of the balance. So once the open risk reaches that line, they size no new trade until one closes.
This budget also improves your selection. When two setups overlap, you size the stronger one and skip the other. Because the budget is finite, it nudges you toward your best trades instead of every trade you see.
Position Sizing and Reward
Sizing fixes the risk, yet the reward deserves a glance too. A lot that risks fifty dollars should aim to earn more than that if the trade works. So pair every sized trade with a target worth the risk.
Think in terms of reward against risk. A fifty pip stop paired with a one hundred pip target risks one to earn two. At 0.10 lots that means risking fifty dollars to make one hundred, before costs.
The lot ties the two ends together. It sets the money at risk, while the target sets the money in reward, both in the same pip value. Because they share that pip value, a clean size makes the whole reward plan easy to read.
A steady reward against risk also lets a modest hit rate pay off. Risk one to make two, and you can lose more often than you win and still grow. So sizing and targets work as partners, and neither one carries the account alone.
Common Position Sizing Mistakes
The math is short, yet the same errors repeat across new accounts. Most come from skipping an input or reusing a stale number, and the fixes sit under the graphic below.
Sizing Before Placing the Stop
The classic slip is choosing a lot before the stop has a place. Without the stop distance, the risk is unknowable. So mark the stop on the chart first, and only then size the trade to fit it.
Reusing One Fixed Lot
Many beginners set a favorite lot and reuse it everywhere. That habit lets the risk swing wildly, since a tight stop and a wide stop then cost very different amounts. So let the lot follow the stop on every trade instead.
Assuming Ten Dollars a Pip
The ten dollar pip value fits dollar-quoted pairs only. Borrowing it for a yen pair oversizes the trade by more than a third. So confirm the pair’s pip value first, and divide by that figure, not ten by default.
Ignoring the Account Currency
A euro or pound account adds a conversion to every pair. Running the math in dollars then misstates the risk. So calculate in your real account currency, and adjust the pip value before the final step.
Rounding the Lot Up
Brokers trade in fixed lot steps, so your exact figure may not fit. Rounding up nudges the risk above your limit. So round the lot down to the nearest allowed step, and keep the loss inside the plan.
Sizing and the Path of Drawdown
Position sizing also shapes how deep a drawdown can run. Small lots keep each dip shallow, while large lots dig the account into steep holes. So the size you pick today sets the worst case you may face tomorrow.
Recall that recoveries are not symmetric. A shallow drawdown needs a small gain to mend, but a deep one needs a large one. Because modest sizing keeps every dip shallow, it keeps every recovery within comfortable reach.
So the size you choose on a single trade echoes far beyond that one position. Each careful lot is a small vote for a smoother equity curve. Over many trades, those small votes add up to an account that bends under real pressure instead of breaking.
Position Sizing Quick Reference
Keep this short list beside the platform. Run through it before you size any new trade.
- Risk in money equals balance times your risk percent.
- Pip value needed equals risk divided by the stop in pips.
- Lot equals that pip value divided by one lot’s pip value.
- Use ten dollars per standard lot on dollar-quoted pairs.
- Use the pair’s own pip value on yen pairs and crosses.
- Round the lot down to the broker’s nearest allowed step.
Pitfalls and Edge Cases
A few situations bend the clean recipe, so keep them in view. The chart below shows the trap of a fixed lot that ignores the stop entirely.
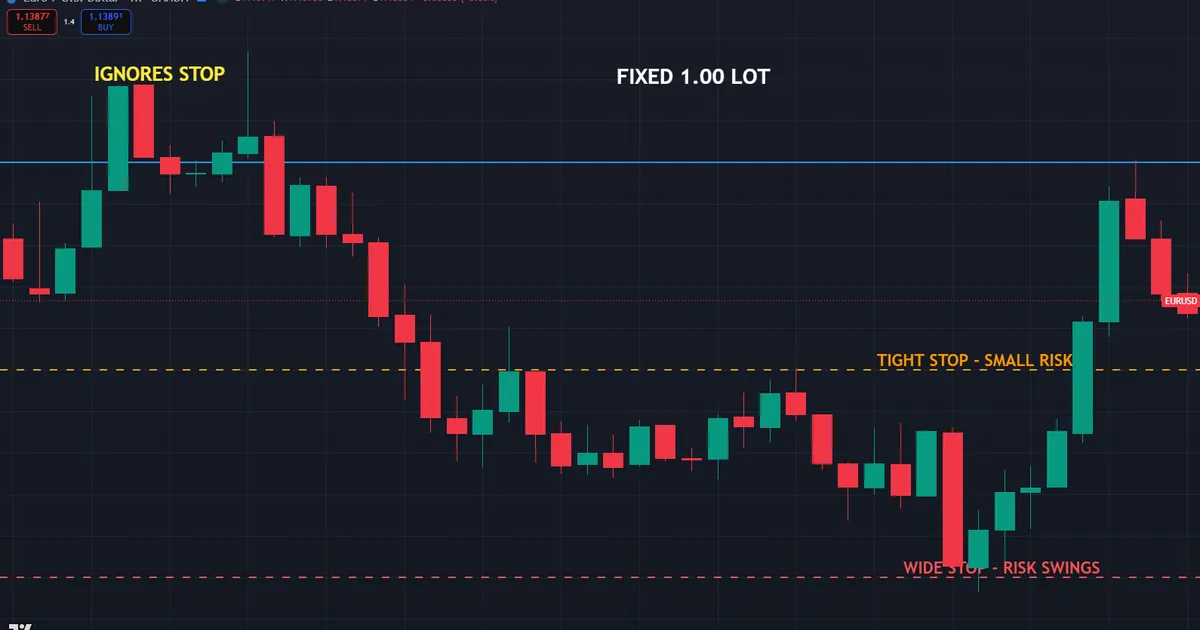
Picture one lot reused on a tight stop and a wide stop. The tight-stop trade risks little, while the wide-stop trade risks many times more. That single image is the case for sizing every trade from its own stop.
Spread and Slippage Eat the Stop
Your stop may fill a little past its level in fast markets. So the real loss can edge above the plan. Leave a small buffer in the risk, and treat the calculated figure as a floor rather than a hard ceiling.
Correlated Trades Stack the Risk
Two trades on linked pairs can double a single bet. Sizing each alone then understates the real exposure. So when trades share a driver, count them together, and split the risk budget across both.
Scaling Into a Position
Some traders add to a trade in parts rather than all at once. Each add carries its own pip value, so the risk grows with every piece. So size the full plan first, then split that lot across the entries.
Very Tight Stops Push the Lot Up
A ten pip stop calls for a large lot to spend the same risk. That size can grow uncomfortable on a big account. So respect the broker’s maximum, and remember that a tight stop concentrates risk into a bigger position.
Related Concepts to Study Next
Position sizing sits at the center of the risk toolkit, and a few nearby ideas make it whole. The percent you risk sets the first input, the broader framework of risk management gives it context, and the raw lot units underpin the final number.
Start with our guide on how much to risk per trade for the first input. Then read risk management in forex for the full framework, and study how to calculate lot size for the units behind each size. To anchor every trade, see how to use a stop loss, and size any live position with our position size calculator.
FAQ
What is position sizing in simple terms?
Position sizing is choosing how many lots to trade so a losing trade costs only what you planned. It divides the money you will risk by the stop distance and the pip value. So the lot fits your account and your stop every time.
How do I calculate my position size?
Multiply your balance by your risk percent to set the risk in money. Divide that by the stop distance in pips to find the pip value you need. Then divide the pip value by the value of one pip on a standard lot.
Why does the stop distance change the lot?
The stop and the lot move in opposite directions for the same risk. A wider stop needs a smaller lot, and a tighter stop allows a larger one. So always place the stop before you size the trade.
Do I use ten dollars a pip on every pair?
No, ten dollars a pip fits only dollar-quoted pairs at a standard lot. Yen pairs and crosses carry a different pip value you must find first. Divide by that pair’s real figure, not by ten, on those markets.
Should I round my position up or down?
Round the lot down to the broker’s nearest allowed step. Rounding up would push the risk above your planned limit. A slightly smaller lot keeps the loss inside the figure you set out to protect.
Can a calculator size my trades for me?
Yes, a position size calculator runs the same three steps in one entry. Learning the math first lets you sanity-check its answer and understand the number. Size every trade from your own risk plan, and manage each position with care. Results are not guaranteed; past performance is not indicative of future results.
External references
- For background on this concept, see Money Management at BabyPips.
- For broader market context, see Money Management at Investopedia.

About the author
Written by Dominic Walsh, a Forex trader and MT4/MT5 indicator, Expert Advisor and script developer. Every tool on forexmt4systems.com is tested on live charts before release and ships with ready-to-use compiled MT4 (.ex4) and MT5 (.ex5) files. Learn more about the trader and developer behind this site.
How we build, test and correct every tool: Editorial & Testing Policy. Trading carries risk; see the disclaimer.