
Two orders, one direction, and endless confusion. Buy limit vs buy stop is the pair that catches almost every new trader, because both instructions buy and both sit on the chart as a horizontal line.
The difference is placement, and placement is everything. A buy limit rests below the current price, while a buy stop rests above it.
Buy Limit vs Buy Stop: The One Difference That Matters
Write this on a sticky note. Below the market means limit, above the market means stop, and no exception exists in either direction.
So both orders open the same long position. Only your expectation about how price gets there changes, and that expectation decides which side of the market your line belongs on.
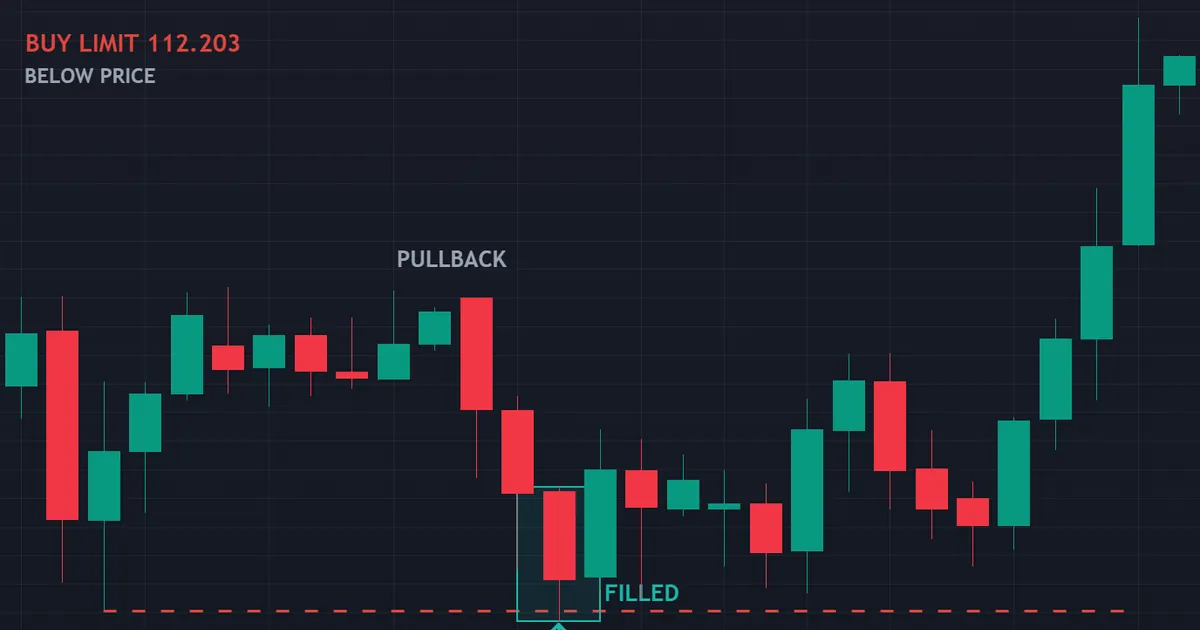
Above sits a buy limit on AUDJPY four-hour bars, resting at 112.203 from 09:00 on 8 July 2026. Price came down into the level on 10 July, dipped to 112.185, then closed the bar back at 112.258.
Adverse movement after the fill measured 0.06 ATR, which is almost nothing. Favourable movement reached 5.24 ATR, so the patient placement paid for itself.
Below Means Pullback
You place a buy limit when you think price will dip before it rises. The order waits underneath, ready to buy the discount.
That view suits support levels, retracements into a trend, and any plan built around value. If price simply runs higher without you, the order sits untouched and you keep your money.
So the buy limit trades patience for participation. It gets a better price whenever it works, and it gets nothing whenever price refuses to come back.
Above Means Breakout
You place a buy stop when you want proof before you commit. The order waits overhead, and it activates only once price proves it can reach that level.
That view suits range breaks, momentum continuation and any plan that waits for confirmation. You deliberately pay a worse price than the market shows right now.
So the buy stop trades price for evidence. It never enters a move that fails to start, though it also never gets the cheapest entry available.
Same Direction, Opposite Expectation
Here is the sentence worth memorising. Both orders buy, yet one expects a fall first and the other expects a rise first.
Because of that, the identical price level can hold either instruction. A line at 113.00 with price at 112.50 must be a buy stop; the same line with price at 113.50 must be a buy limit.
Get that backwards and your platform simply refuses the order. Most terminals return an invalid-price error rather than guessing what you meant.
How Each Order Executes
Placement decides the entry, and execution decides the fill. The two work differently once price arrives.
- You set the level and the size. The order rests on the broker’s server, not on your chart.
- Price approaches from the expected side. A buy limit waits for a fall, a buy stop waits for a rise.
- The buy limit fills at your price or better. A gap through the level can hand you an even cheaper entry.
- The buy stop becomes a market order. Once price touches your level, the instruction converts and takes what the book offers.
- Confirmation reaches your platform. Only then do you see the real entry price, which may differ from the level you typed.
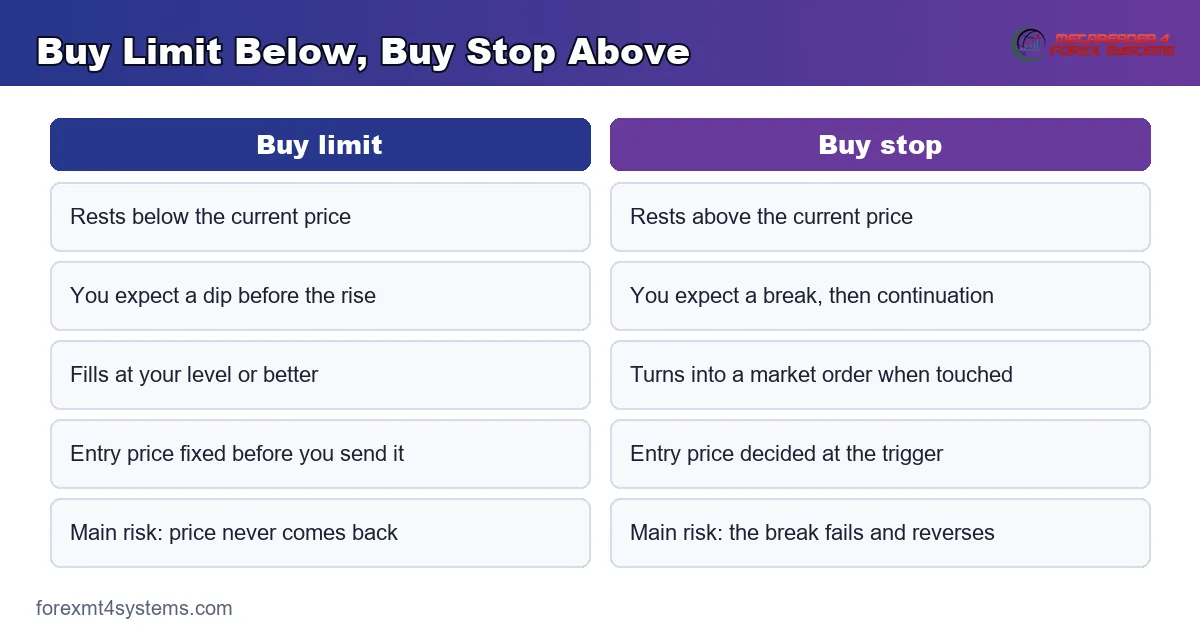
Step three explains why limits feel precise. Step four explains why stop entries sometimes fill a pip or two away from the number you chose.
The Buy Limit Fill
A buy limit fills at your level or lower, never higher. That rule holds in calm markets and fast ones alike.
Positive slippage therefore favours you here. If price gaps down through the level, your fill lands below the number you typed, which improves the entry.
The catch sits on the other side. Price must actually trade at your level, and a market that turns one pip above it leaves you watching.
The Buy Stop Fill
A buy stop converts the moment price touches it. From that instant the order behaves exactly like a market order.
Slippage therefore runs in both directions. In a fast break your fill sits above the trigger, while a calm touch usually fills within a pip.
So a stop entry buys certainty of participation. The price you pay stays uncertain until the confirmation lands.
Gaps Treat Them Differently
A weekend gap shows the split clearly. Price opens away from Friday’s close, and the two instructions respond in opposite ways.
A buy limit inside the gap fills at the opening price whenever that price sits below your level. You get a better entry than you asked for, though the market that produced it may not be one you wanted.
A buy stop inside the gap triggers immediately at the open. The fill can land far above your level, which widens the risk before the week has properly started.
The Rejection Message You Will Meet
Put a buy limit above price and the platform rejects it. Put a buy stop below price and you get the same result.
That error message is a feature. It stops the mistake before your money reaches the market, so read it as a prompt rather than a fault.
Choosing the Level
Placement rules are easy. Choosing the number takes more thought.
Where a Buy Limit Belongs
Anchor the level to something the market already respects. A prior swing low, a session low or a level that turned price twice before all qualify.
Then step slightly inside it. Orders parked exactly on an obvious number often miss by a pip, so a small buffer improves your fill rate.
Our guide to support and resistance covers how to mark those levels before the setup appears.
Where a Buy Stop Belongs
Place it beyond the structure you want broken, not on top of it. A stop sitting exactly at the range high triggers on every probe.
Add a buffer measured from volatility rather than habit. A tenth of the daily range works as a starting point on most majors.
Traders who want the levels flagged automatically can browse our support and resistance indicators archive.
Distance, Measured in ATR
Round numbers feel tidy and mean nothing. Volatility gives you a better ruler, since it describes how far this market actually travels.
Measure the recent average range, then express your buffer as a fraction of it. Our forex volatility calculator turns that into a number in seconds.
Review the figure monthly. A buffer that suited a quiet June often fails badly in a volatile October.
Apply the same ruler to both sides. A limit set a quarter of a daily range below price and a stop set a quarter above it stay comparable, which makes your records far easier to read later.
What Each Order Says About Your Market View
Order type is a statement, not a setting. Reading it that way makes the choice obvious.
The Limit Trader’s Assumption
A buy limit assumes the market overshoots and comes back. That assumption suits ranges, pullbacks inside a trend and any market with a habit of returning to value.
Check it against recent bars. If the last ten advances started without a meaningful dip, your limits will keep missing.
The Stop Trader’s Assumption
A buy stop assumes momentum continues once a level breaks. That assumption suits expanding volatility, session opens and markets escaping a long range.
Check that one too. If recent breaks have mostly faded within a few bars, your stops will keep buying the top of small moves.
Letting the Market Pick for You
Neither assumption holds forever. Conditions rotate, so the order type that suited last month can misfire this month.
Review the last twenty setups every few weeks. Count how many pulled back before running, then let that count choose your default placement.
A Worked Example: The Breakout That Held
Stop entries look best when the break carries on. The chart below shows one that did.
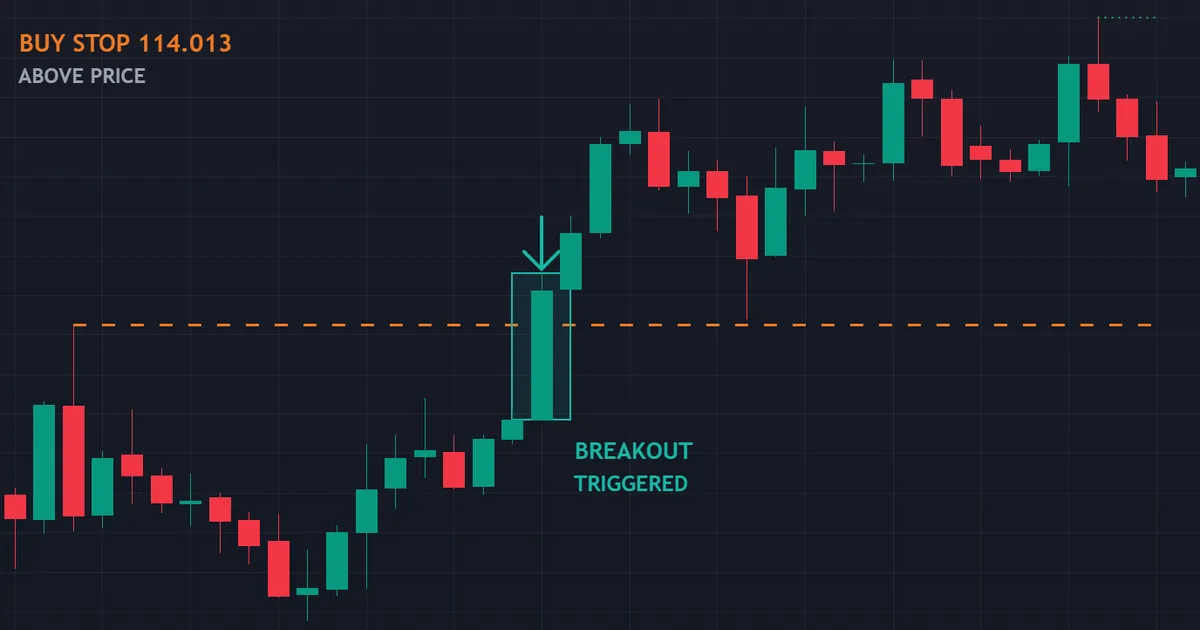
A buy stop rested at 114.013 on AUDJPY hourly bars, set at 14:00 on 20 July 2026. Price triggered it during the 06:00 hour on 21 July.
What the Hour Showed
That hour opened at 113.892 and pushed to 114.078, clearing the order level on the way. It then closed at 114.055, comfortably above the trigger.
A close above your entry after a break is the friendliest signal available. It suggests buyers stayed involved rather than fading the first push.
Adverse movement afterwards came to 0.93 ATR. Favourable movement reached 2.97 ATR, so the trade paid roughly three times its worst moment.
Where the Protective Exit Belonged
A breakout entry needs a level that invalidates it. Below the broken structure works well, since a return there says the break failed.
On this example the trade dipped 0.93 ATR at worst. A stop placed one full ATR below the entry would have survived that dip comfortably, while a half-ATR stop would not.
So the placement question follows the entry question immediately. Choose the order type, then choose the room, then choose the size.
A Buy Limit at the Same Number
Now flip the instruction. A buy limit at 114.013 with price below it would have been rejected outright, since a buy limit must rest under the market.
Had price instead approached 114.013 from above, that same limit would have filled on the dip. Direction of approach decides which order the level can even hold.
Our comparison of limit order vs market order takes the fill-versus-price question one step further.
Download the complete indicator database
Put these concepts on your charts. One email unlocks the full library of 1,380+ indicators with compiled MT4 and MT5 files, plus my TradingView scripts. No paywall, no spam, unsubscribe any time.
Get free access to my indicator database
One email unlocks 1,380+ free MT4, MT5 and TradingView indicators — the complete library. No single-tool download; you get the whole database.
The Risk Each Placement Carries
Neither order removes risk. Each one simply relocates it.
The Buy Limit Risk
Two problems show up. The order can miss entirely, and the order can fill straight into a market that keeps falling.
Missing costs you an opportunity nobody records. Filling into a slide costs you real money, which is why a limit entry still needs a stop beneath it.
Traders often treat a limit as a safety feature. It is not: it controls the entry price and nothing else.
The Buy Stop Risk
One problem dominates. The break can trigger your order and then reverse, which happens often enough to have its own name.
False breaks punish stop entries specifically. You bought at the top of the move, so the reversal starts from your entry rather than from a discount.
Slippage adds a second layer. Fast breaks fill above the trigger, which widens your risk before the trade has done anything.
Combining Both on One Idea
Some traders place both. A buy limit sits at the pullback level and a buy stop sits above the range, so either path leaves them with a position.
That approach doubles your exposure whenever both fire. Cancel one automatically as the other triggers, or halve the size on each.
Platforms differ here. Some support linked orders directly, while others need a small script or plain manual attention.
Stops Belong on Both
Attach a protective exit to either instruction. Most platforms let you set it on the pending order itself, so it activates with the position.
Our guide on how to use a stop loss covers where that level belongs. Size the position from the distance, using our position size calculator.
Common Mistakes and the Fixes
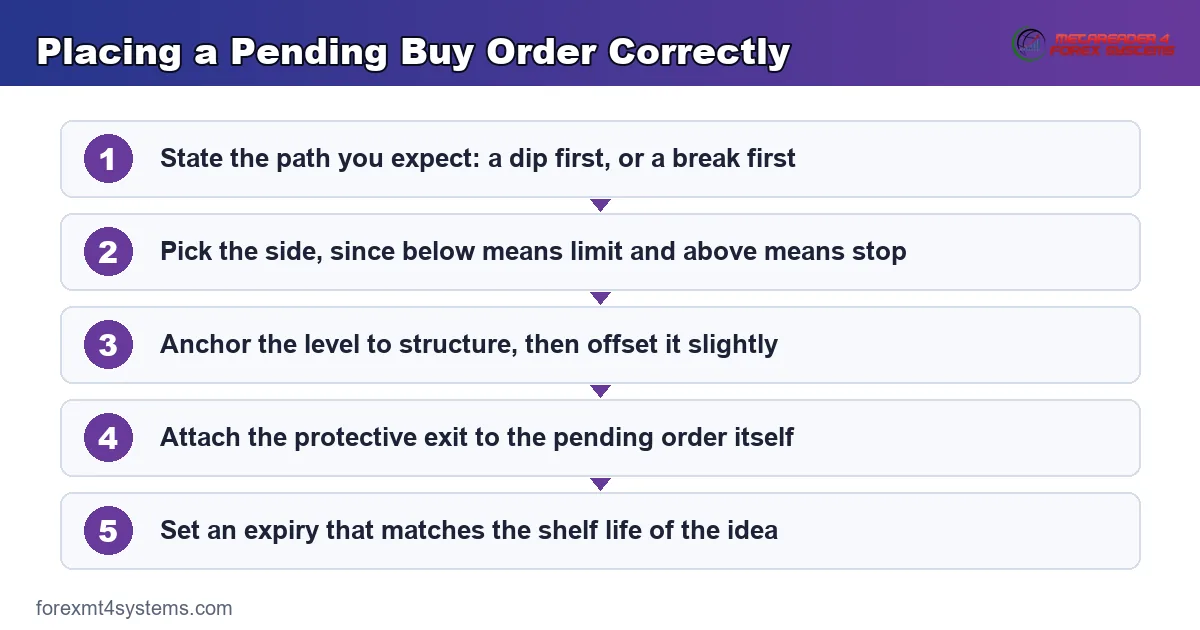
Six habits account for most order-placement errors. The panel below collects the corrections.
Reversing the Two Instructions
The classic error puts a buy limit above price. Read the platform rejection as a signal, then flip the order type rather than nudging the level.
Parking the Level on an Obvious Number
Round figures attract crowds and probes. Offset your level slightly, so a single wick does not decide your entire trade.
Forgetting the Order Exists
A pending order set on Monday can trigger on Thursday into completely different conditions. Set an expiry time, then review the list each evening.
Treating a Limit as a Stop Loss
A buy limit controls the entry, and it does nothing to protect the trade afterwards. Attach a separate protective exit every time.
Sizing Before the Level Exists
Lot size follows stop distance, not the other way round. Choose the level first, measure the distance, then work out the size.
Chasing After a Missed Limit
Missing a pullback stings, so traders often flip to a market order at a worse price. That reflex turns a planned entry into an impulsive one.
Quick Reference: Which Side, Which Order
Keep this table beside your platform until the placement becomes automatic. It takes about a week.
| Your view | Order type | Where it rests | What can go wrong |
|---|---|---|---|
| Price dips, then rises | Buy limit | Below the market | Price never returns to the level |
| Price breaks higher and continues | Buy stop | Above the market | The break fails and reverses |
| Price rallies, then falls | Sell limit | Above the market | Price never reaches the level |
| Price breaks lower and continues | Sell stop | Below the market | The break fails and reverses |
| You want in immediately | Market order | At the current price | Slippage on entry |
Notice the symmetry. Limits always sit on the favourable side of price, and stops always sit on the unfavourable side.
What Goes Wrong: The False Break
The breakout triggered the order and then ran roughly 2.59 ATR back against it: the classic false break.
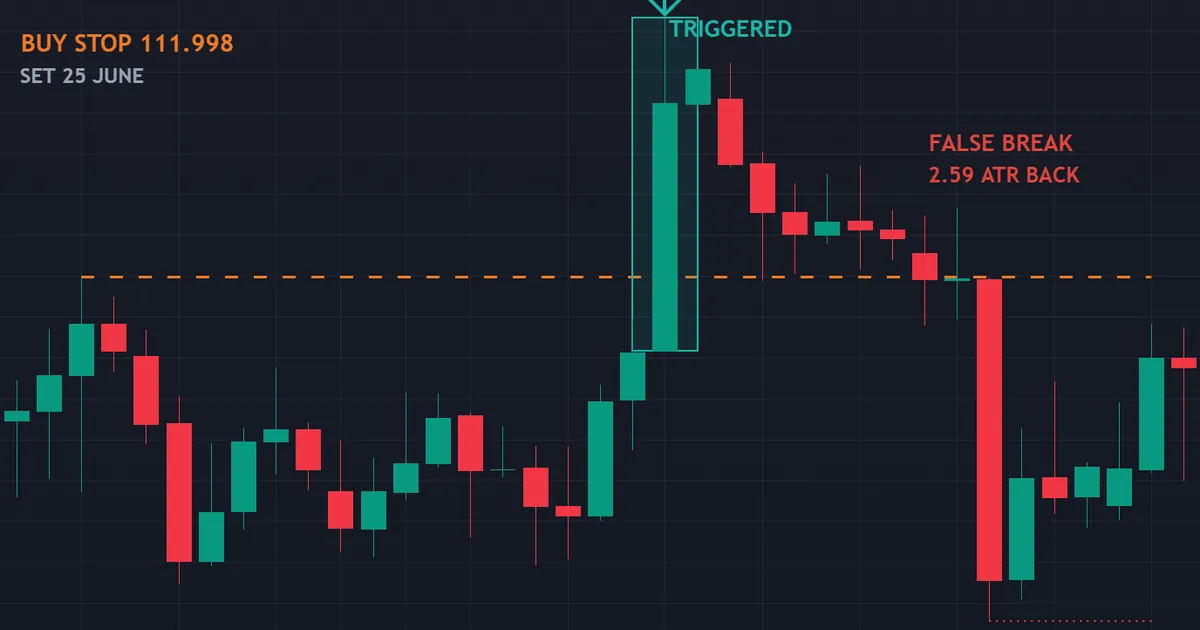
That instance sat on AUDJPY four-hour bars. A buy stop rested at 111.998 from 13:00 on 25 June 2026, and price triggered it during the 13:00 bar on 30 June.
Why the Trigger Bar Looked Convincing
The bar itself gave every encouraging sign. It opened at 111.816, ran to 112.631 and closed near the top at 112.422.
A strong close above the level usually reassures breakout traders. Here it reassured them right before the move handed most of it back.
Favourable movement did reach 2.25 ATR at some point. Adverse movement reached 2.59 ATR, so anyone holding a tight stop met it long before the good part arrived.
What the Failure Actually Teaches
It does not teach that buy stops fail. It teaches that a breakout entry starts you at the extreme of the move, which leaves no cushion.
So the fix lives in the stop and the size, not in the order type. Give the trade room measured from volatility, then size it so that room costs a planned amount.
Some traders answer this by waiting for a close beyond the level instead of a touch. That filter cuts false triggers, and it also costs you the earliest entries.
Comparing the Two Breakouts
Look back at the earlier example on hourly bars. Same instruction, same pair, and one carried on while the other reversed.
Nothing visible on the trigger bar separated them in advance. That uncertainty is the price of a breakout entry, and no placement rule removes it.
Building the Placement Into Your Routine
Rules only help when they run automatically. Three habits get you there.
Say the Direction Out Loud
Before you type anything, state whether you expect a dip or a break. The order type follows from that sentence without any further thought.
Traders who skip this step reach for whichever order they used last. That habit produces most reversed placements.
Set an Expiry With Every Order
A reason to buy has a shelf life. Give the pending order a matching expiry, so a stale idea cannot fire into a market that has moved on.
Daily setups usually deserve a few days. Intraday setups rarely deserve more than the session they belong to.
Review the Pending List Each Evening
Open the order list once a day and read every line. Ask whether the level still makes sense and whether the reason still holds.
Cancel anything you cannot justify in one sentence. That single question removes more bad trades than any indicator ever will.
Log the Orders That Never Filled
Cancelled and expired orders vanish from most statements. Copy them into your notes before they disappear.
Over a quarter that list answers a useful question. If your limits miss constantly, move them closer; if your stops trigger and reverse constantly, wait for a close instead.
Related Concepts Worth Reading Next
These two orders belong to a family of four. Reading the family together makes each one easier to remember.
Start with our overview of the pending order in forex, which lays out all four resting types side by side.
After that, read our separate guides to the limit order and the stop order. Each one goes deeper into the fill mechanics that this comparison only summarises.
FAQ
Can a buy limit ever sit above the current price?
No, and your platform will reject the attempt. A buy limit means buy at this price or better, and better always means lower for a purchase. If you want to buy above the market, the instruction you need is a buy stop.
Which one gives a better entry price?
The buy limit, whenever it fills. That is the whole point of resting below the market. The trade-off arrives on the days price never comes back, since a buy stop would have caught the move and the limit caught nothing.
Does a buy stop fill at exactly my level?
Rarely, and only by coincidence. A buy stop converts to a market order when price touches your number, so the fill lands wherever the book sits at that instant. Expect a pip of difference in calm conditions and more around a release.
Which order type suits a beginner better?
Buy limits teach patience, which most new traders need more than speed. They also let you plan an entry away from the screen and walk off. Add buy stops later, once you have logged enough breakouts to know how often they fail on your pairs.
Should I use a close beyond the level instead of a touch?
Many traders do, and it changes the trade-off rather than removing it. Waiting for a close filters some false breaks, though it also gives up the earliest and cheapest part of every real move. Test both on your own records before deciding.
How far from price should the order sit?
Far enough to reach real structure, close enough to fill. Measure recent pullbacks and recent breakout extensions in ATR, then place your level inside that observed range rather than at a distance that simply looks neat.
Do these orders work the same on every platform?
The logic holds everywhere, though the labels differ. Some platforms call a buy stop a stop-entry order, and a few merge pending types into a single dialogue with a direction toggle. Check how yours handles expiry and attached stops, then judge your results over a long run rather than a handful of trades. Results are not guaranteed; past performance is not indicative of future results.
External references
- For background on this concept, see Buy Stop Order at Investopedia.
- For broader market context, see Trade Order Timing at Corporate Finance Institute.

About the author
Written by Dominic Walsh, a Forex trader and MT4/MT5 indicator, Expert Advisor and script developer. Every tool on forexmt4systems.com is tested on live charts before release and ships with ready-to-use compiled MT4 (.ex4) and MT5 (.ex5) files. Learn more about the trader and developer behind this site.
How we build, test and correct every tool: Editorial & Testing Policy. Trading carries risk; see the disclaimer.