
Expert advisor risk settings decide whether a program survives a bad month. The entry logic gets all the attention, yet the inputs that control size, stops and caps do far more to keep an account alive.
Nothing in this guide makes a strategy profitable. Good expert advisor risk settings only change the shape of the damage when the strategy misbehaves, which happens to every strategy eventually.
Expert Advisor Risk Settings That Actually Matter
A typical robot exposes twenty inputs. Perhaps six of them decide survival, and the rest adjust flavour.
Sizing sits at the top of that short list. Everything else follows from how much the program stakes on each idea.

The panel above runs one identical set of trades through two sizing rules. Same signals, same order, and a very different depth of drawdown.
Fixed Lots Against Percent of Equity
A fixed lot input stakes the same volume whatever the balance does. It feels simple, and it behaves badly in both directions.
After a losing run, that fixed volume represents a larger share of a smaller account. Risk rises exactly when the account can least afford it.
Percent-of-equity sizing shrinks the stake as the account shrinks. So the drawdown flattens out instead of accelerating.
Why the Fixed Lot Path Falls Further
Look again at the two paths. Both suffer the same losing sequence, yet one keeps betting the original amount into a reduced balance.
The arithmetic compounds against it. Each loss makes the next loss a bigger percentage, and the curve steepens on the way down.
The Order to Set Them In
Set the account caps first, then risk per trade, then the stop rule. Working the other way round produces settings that contradict each other.
Our guide to what an expert advisor does covers how these inputs reach the order. Read it if the mechanics feel unfamiliar.
Sizing Rules Worth Using
Three sizing approaches cover almost every sensible program. Each one answers the same question differently.

The diagram above lists the settings to fix before anything goes live. Work down it once, then save the file.
Percent of Equity
Choose a share of the account to risk per trade, then let the program compute the lot size from the stop distance. Balance grows, size grows; balance falls, size falls.
Keep the percentage small. A figure between half a percent and one percent suits most automated rules, and larger numbers rarely improve anything except the marketing.
Stop Distance Drives the Lot
Lot size follows from the stop, never the reverse. Divide the money at risk by the distance to the stop, then convert into volume for that instrument.
Our position size calculator does that conversion. Run one trade through it by hand before trusting the code.
Volatility-Adjusted Sizing
Some programs measure recent range, then set the stop from it. A quiet market gets a tighter stop and a larger lot, while a wild one gets the opposite.
That approach keeps the money at risk steady across conditions. It also stops a program from taking huge positions during the calm before a release.
What Not to Use
Avoid any input that scales volume up after a loss. That family of settings converts a normal losing run into an account-ending event.
Growth inputs belong on the way up, never on the way down. Increase size after equity rises, not after it falls.
How Much Risk Per Trade Is Too Much
People argue about this endlessly. The arithmetic settles it quickly.
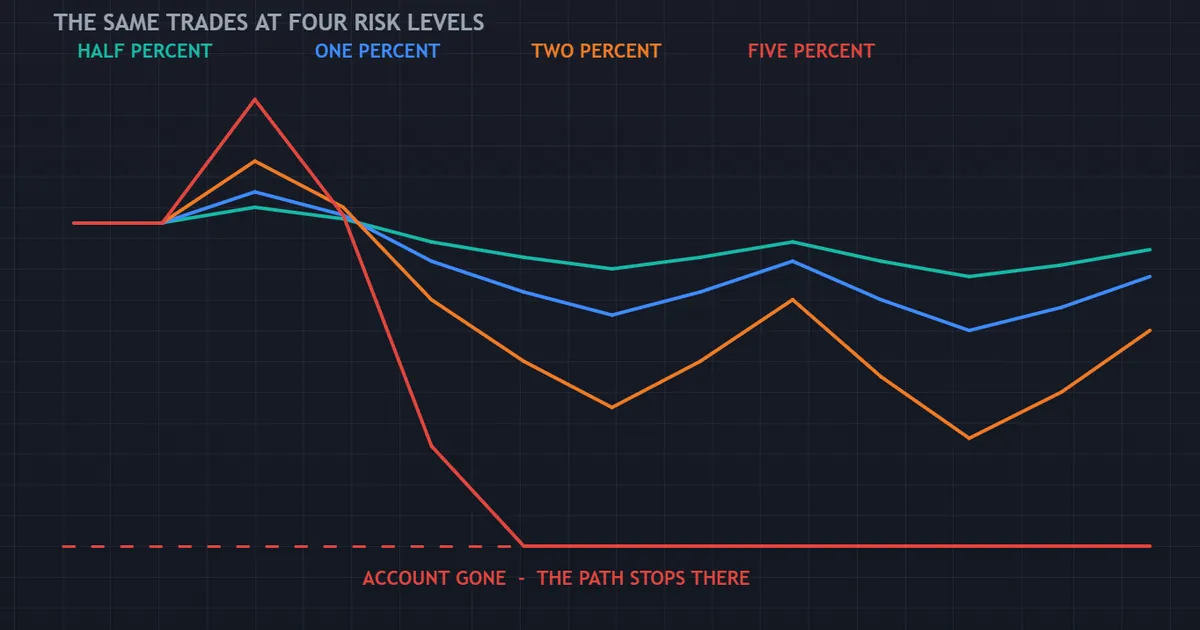
The ladder above runs the same trade sequence at four risk levels. Three survive, and the largest setting reaches zero.
Reading the Ladder
Notice how the shape changes rather than the direction. Every path takes the same losses, so only the stake separates them.
At the smallest setting the losing run looks like a dip. At the largest it looks like an ending.
Compounding Cuts Both Ways
Percent sizing grows the stake as equity rises. That helps on the way up and hurts nobody on the way down, since the stake shrinks in step.
Fixed lots do neither. They ignore the account entirely, which explains why they age so badly.
Risk of Ruin
Combine risk per trade with how often the rule wins and the average size of its results. Those three inputs give the probability of losing everything.
Try your own numbers in our risk of ruin calculator. Most people set risk lower afterwards.
Our note on risk per trade works through the same ground manually. Both routes reach the same conclusion.
Protective Inputs and Their Dangerous Twins
Many settings come in pairs. One member of each pair protects the account, and the other looks similar while doing the opposite.

The comparison above sets them side by side. Read the right column as a list of inputs that need a very good explanation.
Recovery Multipliers
A recovery multiplier increases volume after a loss so that one winner clears the deficit. The mechanism works while price comes back, and a trending market supplies no such return.
Exposure grows geometrically in that case. Six doublings turn a small stake into a very large one, and the account meets its margin limit long before the idea gets tested.
Grid Steps
A grid adds a new position every fixed distance against you. Closed profits accumulate while price oscillates, and open exposure accumulates while it does not.
Neither structure carries a promise of recovery. Describe them accurately, then decide with the arithmetic in front of you rather than the sales page.
Hidden Stops
Some programs keep the stop in memory rather than on the server. A dropped connection then leaves the position unprotected.
Place a real stop with every order. Add the hidden logic on top if you want, never instead.
Download the complete indicator database
Put these concepts on your charts. One email unlocks the full library of 1,380+ indicators with compiled MT4 and MT5 files, plus my TradingView scripts. No paywall, no spam, unsubscribe any time.
Get free access to my indicator database
One email unlocks 1,380+ free MT4, MT5 and TradingView indicators — the complete library. No single-tool download; you get the whole database.
Stop Settings: Too Tight Costs as Much as Too Wide
Traders obsess over stop placement and usually optimise it backwards. Both extremes fail, for different reasons.
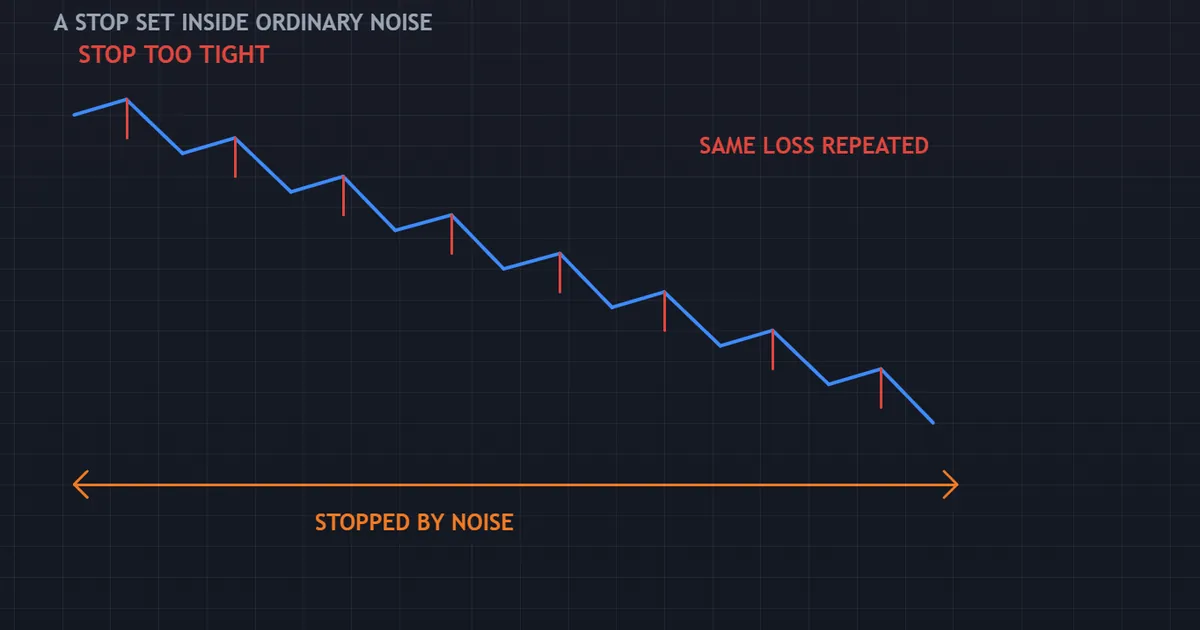
The panel above shows the tight-stop failure. A run of small losses arrives one after another, each one closed by ordinary movement rather than by a wrong idea.
Noise Has a Size
Every instrument moves a certain amount without meaning anything. A stop inside that range gets hit constantly, whatever the entry logic thought.
Measure the recent average range, then place the stop beyond it. The trade needs room to be wrong briefly.
Wide Stops Need Small Lots
A wide stop protects the idea and costs more when wrong. That trade-off works only when the lot size falls to match.
Keep the money at risk constant. Distance and volume move in opposite directions, and the product of the two stays where you set it.
Spread, Commission and the Minimum Distance
Brokers enforce a minimum stop distance on many instruments. A program that requests a tighter one gets rejected, sometimes silently.
Add the spread to the stop distance in the calculation. Otherwise the effective risk exceeds the number in your input file.
Trailing Rules
A trailing stop locks in movement and gives up some of the run. Set the trail from volatility rather than from a round number of points.
Moving to breakeven too early causes its own damage. Many small trades then close flat, and the winners that would have paid for them never develop.
Account-Level Caps
Per-trade settings limit one mistake. Account-level caps limit a bad day, and they matter more.
Daily Loss Cap
Give the program a figure it may lose in one day, then have it stop opening trades once it gets there. Measure that against equity, since floating losses count.
Choose a number you can accept without argument. A cap you override during a bad session provides no protection at all.
Maximum Open Positions
Limit how many trades run at once. Three simultaneous positions triple the exposure, whatever the per-trade setting says.
Count pending orders in that total as well. A ladder of untriggered entries can fill together during a fast move.
Correlation and Portfolio Heat
Related instruments move together. Long positions in several currencies against the same counter currency behave as one larger trade when news lands.
Total the risk across everything open with our portfolio heat calculator. The combined figure usually surprises people.
Weekend and News Behaviour
Decide what happens before the weekend and before major releases. A gap through a stop costs more than the stop distance suggested.
Flatten, reduce or accept, but choose deliberately. Leaving the decision to chance counts as a setting too.
Leverage, Margin and the Stop Out
Leverage does not change risk by itself. It changes how much room the account has before the broker intervenes.
Margin Is a Deposit, Not a Cost
Opening a position sets aside margin. That money returns when the trade closes, so it never represents the risk on the trade.
Risk comes from the stop distance and the lot size. Confusing the two leads people to size by margin, which has no relationship to loss.
The Stop Out Level
When equity falls to a set fraction of used margin, the broker starts closing positions. That closure happens at market, in whatever conditions caused the fall.
Our explainer on margin calls and stop outs covers the sequence. Design your caps so the program stops long before the broker does.
High Leverage and Automated Programs
A large leverage figure lets a program open more than it should. Some robots size from available margin rather than from a stop, which turns leverage directly into exposure.
Check the sizing formula in the inputs. If margin appears anywhere in it, treat that as a warning rather than a feature.
Settings That Look Protective and Are Not
Four inputs get sold as safety features. Each one deserves a second look.
Equity Stop as the Only Guard
An equity stop that closes everything at a loss threshold sounds reassuring. On its own it merely decides how the account ends rather than preventing it.
Hedging the Losing Position
Opening an opposite trade freezes the loss and adds cost. It also postpones the decision, and the position still needs closing eventually.
Time-Based Exits Without a Stop
Closing after a fixed number of bars limits exposure in time, not in money. A fast move inside that window costs whatever it costs.
Very High Take Profit Targets
A distant target makes a record look tidy, since few trades close as losses until they close badly. Read the floating drawdown rather than the closed results.
Our guide on how to evaluate a forex EA shows how to spot that pattern in a trade list.
Reading the Input List of an Unfamiliar Program
Open the settings window before the strategy description. Input names give away the design faster than any sales page.
Words That Describe Exposure
Look for multiplier, martingale, recovery, averaging, grid step and level count. Each one adds positions or volume while a trade goes against you.
None of those words condemns a program by itself. Together they describe a design where losses grow rather than close.
Words That Describe Protection
Look for stop loss points, risk percent, maximum spread, maximum positions, daily loss and equity stop. A program with none of these leaves protection entirely to you.
Check that each protective input actually does something. Some robots expose a stop loss field that the code ignores under certain conditions.
Defaults Are Marketing
Default values usually suit a demonstration rather than an account. They often assume a large balance, a tight spread and a friendly instrument.
Change every number deliberately. A default you kept because you did not understand it counts as a decision you never made.
Scaling Up Without Undoing the Work
Growth breaks careful settings more often than losses do. Three habits keep the discipline intact.
Scale by Rule, Not by Mood
Decide in advance what triggers an increase. A fixed equity milestone works well, while a good fortnight does not.
Write the rule down beside the settings file. Otherwise the increase arrives on the day you feel most confident, which tends to be the worst day for it.
Increase One Thing at a Time
Raise risk per trade or raise the position cap, never both at once. Changing two inputs together makes the result impossible to attribute.
Leave the new setting alone for a meaningful sample. A fortnight tells you nothing worth knowing.
Watch Liquidity as Size Grows
Small accounts fill instantly. Larger volume starts to move the price you receive, and slippage grows quietly with every increase.
Compare requested prices against fills after each step. Rising slippage tells you the strategy has outgrown its instrument.
Testing Your Risk Settings
Settings need testing separately from the strategy. The tests are quick and unglamorous.
Run the Worst Sequence
Find the longest losing run in the record, then apply your settings to it. Note the depth, then ask whether you would leave the program running through that.
Break the Connection Deliberately
Close the terminal mid-trade, then reopen it. Check that the stop still sits on the server and that the program recognises its own open position.
Feed It a Bad Fill
Test on an account with wider spread than usual. A rule that only clears its costs on the tightest pricing will not survive an ordinary week.
Check the Sizing on Every Instrument
Contract sizes differ between instruments. A formula that works on one pair can produce a wildly wrong lot on another, especially on metals and indices.
Signal quality matters too, and our pillar guide to MT4 indicators covers the tools these programs read.
A Settings Checklist Before Going Live
Work down this table once. Blank rows explain most blown accounts better than any chart.
| Setting | Sensible starting point | Warning sign |
|---|---|---|
| Risk per trade | Half to one percent of equity | A fixed lot with no reference to balance |
| Stop loss | Beyond recent average range, sent to the server | Held in memory, or absent entirely |
| Daily loss cap | A figure measured on equity that pauses trading | No cap, or one you can override |
| Maximum open trades | Small, with correlated pairs counted together | Unlimited simultaneous orders |
| Size after a loss | Unchanged or smaller | Any multiplier above one |
| News and weekend rule | A deliberate choice written into the code | Whatever happens to happen |
Save the file with a date in its name. Six months later you will want to know exactly which version produced which log.
Keep a short note beside each change explaining why you made it. Reasons fade quickly, and a settings file without them turns into guesswork by the following quarter.
Monitoring After Launch
Settings drift out of date without anybody touching them. A short weekly review catches most of it.
Compare Intended Risk Against Actual Risk
Take a handful of closed trades, then work out what each one really staked. Rounding, minimum volumes and spread all push the true figure above the input.
A small gap is normal. A large one means the sizing formula misreads the instrument.
Watch the Terminal Log
Rejected orders, invalid stops and margin warnings all appear there first. Balance shows the same problems weeks later and far more expensively.
Read it every week for five minutes. Errors surface long before they cost anything.
Recheck After Any Broker Change
Symbol names, minimum volumes, stop distances and margin rules all change from time to time. Each one can break a sizing formula silently.
Run one manual calculation after any change. That single check catches the fault before the program does something expensive with it.
What These Settings Cannot Do
Risk control limits damage. It does not create an edge, and pretending otherwise leads to expensive surprises.
A losing strategy sized carefully still loses. It simply loses slowly enough for you to notice and switch it off.
No setting protects against a gap. Price can jump past a stop at the weekend open, and the fill lands wherever the market reopens.
What good settings buy you is time. They keep the account alive long enough for the evidence to arrive, which is the only thing that ever settles the question.
Treat that as the whole purpose. A careful set of inputs turns a violent outcome into a slow one, and slow outcomes leave room for a decision.
FAQ
What risk per trade should an expert advisor use?
Most automated rules suit a figure between half a percent and one percent of equity. Larger settings shorten the time an account can survive a normal losing run, and they rarely improve long-run growth once drawdown gets accounted for. Start below your comfort level, then review after a few hundred trades rather than after a good week.
Should the program size in fixed lots or percent of equity?
Percent of equity, in almost every case. Fixed lots keep the stake constant while the account shrinks, so risk rises exactly when the balance can least support it. Fixed lots make sense only on a very small account where the minimum volume already exceeds the percentage figure.
Is a martingale multiplier ever acceptable?
The mechanism needs price to retrace, and a trending market supplies no retracement. Exposure doubles at each step, so the account meets its margin limit while the position sits at its largest and most fragile. Understand the arithmetic before running anything with that input, and never assume a recovery arrives.
How tight should a stop be?
Beyond normal noise for that instrument, which usually means a multiple of the recent average range rather than a round number of points. A stop inside the noise band closes trades for reasons unrelated to the idea, producing a long string of small losses. Widen the stop and cut the lot size together, so the money at risk stays where you set it.
Do these settings make an automated strategy safe?
No, and treating them that way causes real damage. Risk settings shape the losses that a strategy produces; they cannot turn a strategy without an edge into one that has an edge. Their job is to keep the account alive long enough for honest evidence to arrive, and to make the eventual outcome survivable either way. Results are not guaranteed; past performance is not indicative of future results.
External references
- For background on this concept, see OrderSend in the MQL5 Documentation.
- For broader market context, see Volatility Targeting in the BabyPips Forexpedia.

About the author
Written by Dominic Walsh, a Forex trader and MT4/MT5 indicator, Expert Advisor and script developer. Every tool on forexmt4systems.com is tested on live charts before release and ships with ready-to-use compiled MT4 (.ex4) and MT5 (.ex5) files. Learn more about the trader and developer behind this site.
How we build, test and correct every tool: Editorial & Testing Policy. Trading carries risk; see the disclaimer.