
Ask ten traders what is a trailing stop and you will hear ten different answers. Most of them describe the checkbox in the order ticket rather than the mechanism behind it.
This guide covers the ratchet itself, three ways to pick a trail distance, and the trade-off nobody mentions. Three real trailing exits anchor it, including one that handed back more than it locked in.
What Is a Trailing Stop, in Plain Terms
A trailing stop sits behind your position at a set distance. When price moves in your favour, the stop follows it. When price moves against you, the stop holds its ground.
That one-way movement carries the whole idea. Traders call it a ratchet, because a ratchet turns one way and locks against the other.
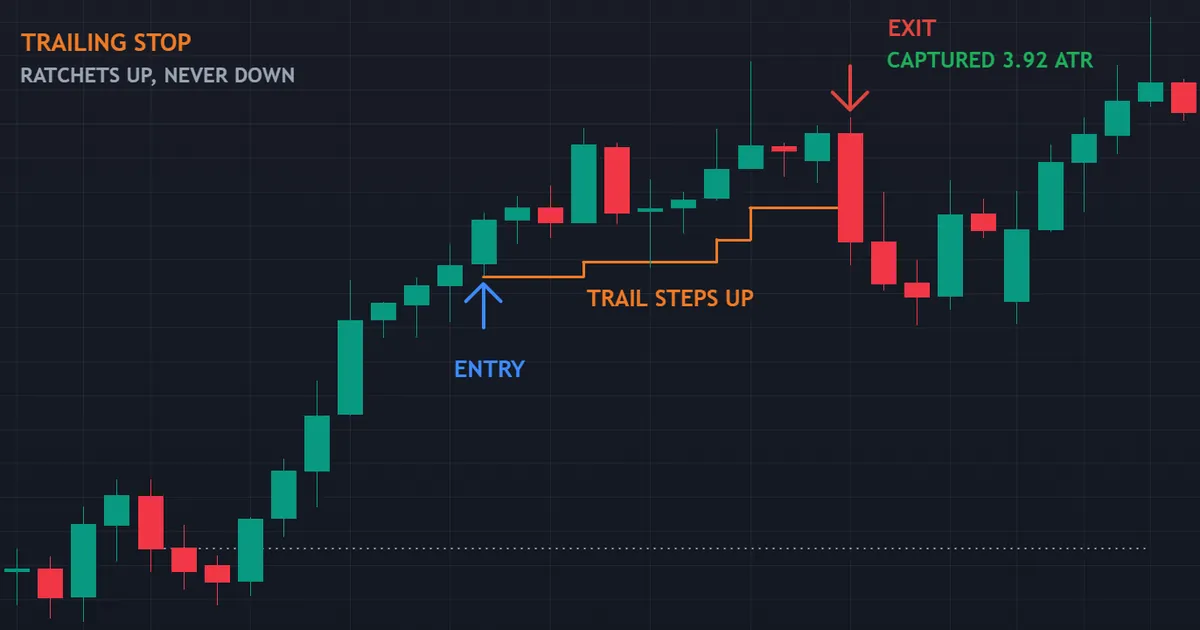
The chart above shows a trailing exit on AUDJPY four-hour bars. Price ran 4.2 ATR into 15 July 2026, the trail followed for eleven bars, and the exit early on 17 July captured 3.92 ATR.
Long Trades and Short Trades
On a long position the stop sits below price and climbs. On a short position it sits above price and falls.
Direction flips, and the logic does not. In both cases the stop travels only towards profit, then freezes when the move pauses.
Platforms handle both automatically. You supply one number, the distance, and the terminal works out the rest.
What a Trailing Stop Cannot Do
It does not read the market. The tool applies arithmetic to price, and nothing more.
It also cannot pin your exit price. A stop turns into a market order the moment price touches it, so the fill can land worse than the level you chose. Our guide to slippage in trading covers why that gap opens.
Some brokers sell a separate product that fixes the exit price for a fee. That product costs a wider spread or an explicit premium, and it behaves differently from an ordinary stop.
Why Traders Reach for It
Two motives dominate. One group wants to protect an open profit without watching the screen all day.
Another group wants to ride a trend far longer than any fixed target allows. Both motives make sense, and neither one makes the tool costless.
A third motive shows up less often, though it matters. Traders in distant time zones lean on a trail to manage an open position while they sleep.
How the Ratchet Works, Step by Step
Five steps cover the mechanics. Run through them once and the behaviour stops feeling mysterious.
- Set a trail distance. Pick a number of pips, an ATR multiple, or a structural reference such as the last swing low.
- Place the first stop. On a long trade that stop sits one trail distance below your entry.
- Wait for a new extreme. Each time price prints a fresh high, the platform recalculates the level.
- Ratchet the stop up. The stop jumps to the new high minus the trail distance.
- Never move it back. If price falls, the stop simply holds its last level.
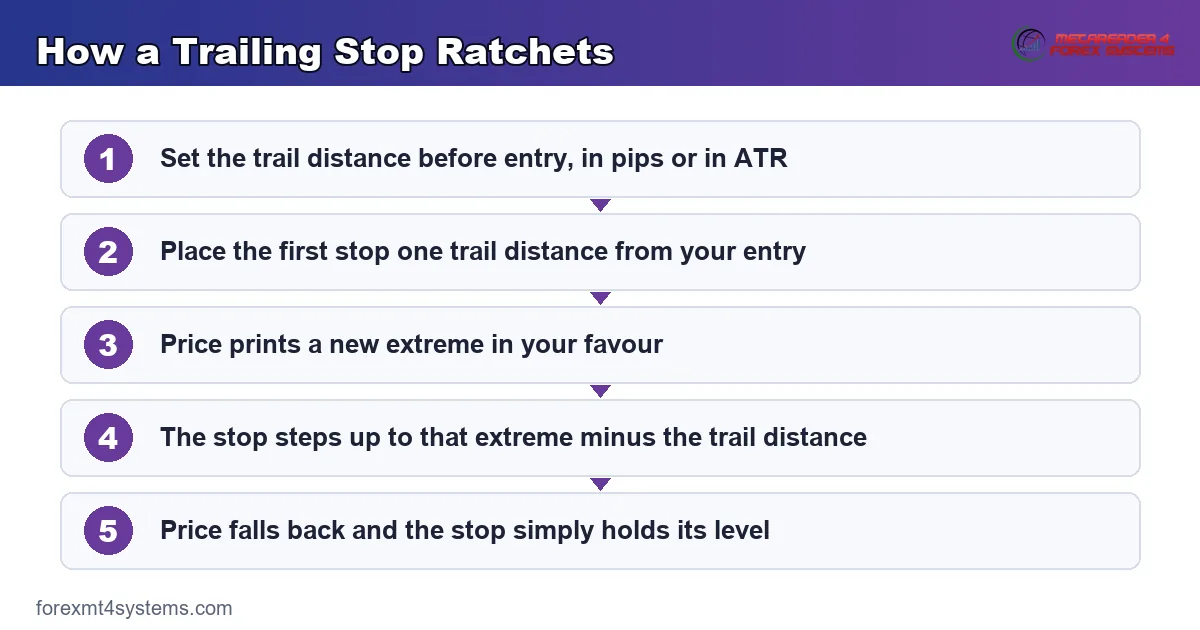
Step five carries all the weight. Drop it and you no longer own a trailing stop, only a stop you keep dragging around by hand.
A Worked Example in Pips
Picture a long entry at 1.1000 with a thirty-pip trail. The first stop sits at 1.0970.
Price rises to 1.1040, so the stop climbs to 1.1010. Your worst case now shows a ten-pip gain rather than a thirty-pip loss.
Price then slips back to 1.1020. The stop stays at 1.1010, because a ratchet never reverses.
Price recovers to 1.1080 and the stop follows to 1.1050. From there a thirty-pip drop ends the trade at a fifty-pip gain.
Where the Platform Does the Work
MetaTrader trails on the client side by default. Close the terminal and the trail stops updating, though the last level stays with the broker.
Server-side trailing closes that gap. Check which version your broker offers before you lean on the feature overnight.
A hosted virtual server solves the problem for client-side trailing. Traders who automate their execution usually run one for exactly this reason.
Tick Trailing Versus Close Trailing
Tick trailing reacts to every new extreme, including a single wick. Close trailing waits for the bar to finish before it moves anything.
The second approach ignores plenty of noise. It also hands back more when a move ends abruptly.
Neither setting wins outright. Choose one, write it down, and keep it steady long enough to judge the results.
Setting a Trailing Stop in MetaTrader
The built-in tool takes seconds to switch on. Its limits matter more than its settings, so learn both together.
The Built-In Menu
Right-click an open position in the Terminal window, then choose Trailing Stop. Pick one of the preset pip distances, or open the custom option and type your own.
The terminal then watches every tick. Once profit exceeds your chosen distance, it starts moving the stop.
One detail catches people out. Nothing appears to happen at first, because the trail only engages after the position shows more profit than the distance you set.
The Limits Worth Knowing
Presets come in pips only, so the built-in tool cannot scale with volatility. Traders who want an ATR trail need a separate indicator or a small robot to handle the arithmetic.
The setting also applies per position rather than per account. Open three trades and you set three trails, which is easy to forget in a busy session.
Check the Broker’s Stop Level
Most brokers enforce a minimum distance between price and any resting stop. A trail tighter than that minimum simply refuses to move.
Look up the stop level for each symbol you trade. It widens during volatile periods on many accounts, which quietly disables tight trails exactly when they would matter.
Choosing the Trail Distance
Three methods cover nearly everything traders use. Each one answers a single question differently: how much noise should this trade tolerate?
Fixed Pips
The simplest method uses a constant distance, say thirty pips. It takes five seconds to configure and needs no arithmetic.
The weakness appears when volatility shifts. Thirty pips means one thing on a quiet Tuesday and something else entirely during a data release.
ATR Multiples
An ATR trail scales with recent range. Take the average true range, multiply by a factor such as two, and trail by that amount.
Because the input updates every bar, the method adapts on its own. Quiet markets tighten the trail, and busy markets widen it without any effort from you.
Our note on ATR stop-loss distance works through the arithmetic, and the same logic drives a trail. For a refresher on the indicator itself, read our guide to ATR in trading.
Structure
A structural trail follows the chart rather than a number. On a long trade you shift the stop below each new higher low.
This method respects what price actually did. It also moves in uneven jumps, so the open risk on the trade changes shape as the move develops.
Traders who mark levels first usually prefer it. Our volatility indicators archive holds tools that plot ATR bands and swing structure together, while the forex volatility calculator returns current range figures in seconds.
Which Method Suits Which Market
Fast, thin markets punish fixed distances hardest. An ATR trail handles them better, because the input updates as conditions change.
Slow, orderly trends suit a structural trail. Higher lows arrive at readable intervals, so the stop has obvious places to sit.
Fixed pips still earn a place on very short holds. When a trade lasts minutes, volatility barely shifts, and simplicity beats precision.
Mixing methods across a watchlist works perfectly well. Nothing forces a single rule onto every symbol you follow.
A Longer Ratchet on the Daily Chart
The second capture moves to a different market and a much slower timeframe. On AUDUSD daily bars, a long had already run 4.45 ATR into 22 January 2026. The trail then took it out on 1 February, six bars later.

Captured range came to 5.55 ATR. That figure exceeds the measured run, because the two numbers anchor at different points and the move extended past the reference bar.
Six Big Bars Versus Eleven Small Ones
Compare the two captures directly. The four-hour trade held eleven bars, the daily trade held six, and both kept most of what the move offered.
Bar count says very little on its own. What matters is how far each bar travels, and a daily bar on a major pair covers far more ground than a four-hour one.
So pick the timeframe for the move you want to hold. The ratchet then does the same job at either speed.
Give-Back Arithmetic in Practice
Every trailing exit hands something back. That amount roughly equals your trail distance, measured down from the best price the trade reached.
The four-hour example shows it plainly. It returned about 0.28 ATR of its run, which tells you the trail sat fairly close behind price.
So a two-ATR trail returns about two ATR at the exit. No setting removes that cost, and any tightening that shrinks it also raises the odds of an early exit.
Record both numbers afterwards. Converting them into R makes the comparison easy, and our guide to R multiples shows the method.
Download the complete indicator database
Put these concepts on your charts. One email unlocks the full library of 1,380+ indicators with compiled MT4 and MT5 files, plus my TradingView scripts. No paywall, no spam, unsubscribe any time.
Get free access to my indicator database
One email unlocks 1,380+ free MT4, MT5 and TradingView indicators — the complete library. No single-tool download; you get the whole database.
Common Mistakes and the Fixes
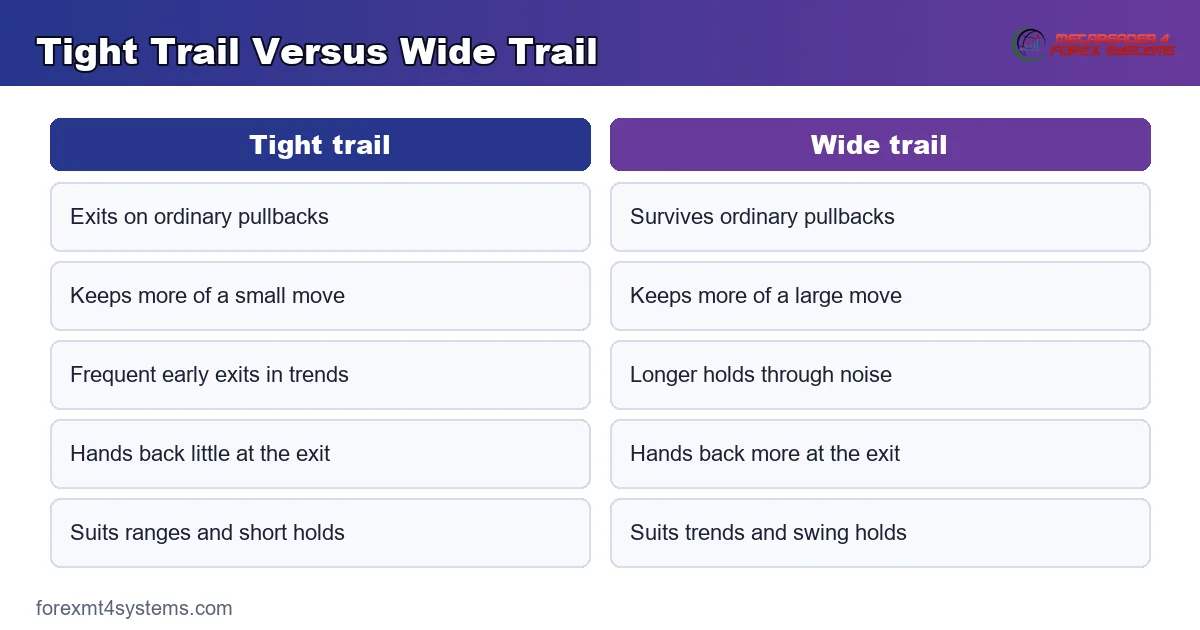
Six habits turn an ordinary trailing exit into an expensive one. The panel below collects the fixes.
Trailing Far Too Tight
A tight trail exits on normal noise. Measure the typical pullback inside a trend on your timeframe, then keep the trail wider than that.
Starting the Trail Immediately
A trade needs room before the ratchet helps at all. Many traders wait until price covers one full risk unit, then switch trailing on.
Loosening the Distance Mid-Trade
Widening a trail because the exit looks close defeats the purpose. Set the distance before entry, then leave it alone.
Expecting a Fixed Exit Price
The trail sets a trigger, never a fill. Weekend gaps and fast releases both fill stops well beyond the level, as our page on stop orders explains.
Using One Distance Everywhere
Gold and a major currency pair move at completely different speeds. Scale the trail to each market rather than copying one number across the watchlist.
Trailing Instead of Planning the Exit
A trail answers where to leave, never whether to enter. Build the full bracket first, then treat the ratchet as one option inside it.
Quick Reference Checklist
Run this table before you switch trailing on. Five decisions cover almost every case.
| Decision | Sensible default | What it protects against |
|---|---|---|
| Trail method | ATR multiple on fast markets, structure on slower ones | A fixed number that ignores volatility |
| Trail distance | Wider than the typical pullback in the current trend | Exits on ordinary noise |
| Activation point | Start trailing after price covers one risk unit | Choking a trade before it breathes |
| Update trigger | Bar close on higher timeframes, tick on short holds | Single wicks moving your stop |
| Partial exits | Bank part of the position, then trail the rest | Handing the whole move back |
Those five choices belong in your plan, not in the moment. Deciding them under pressure produces the habits the next section warns about.
Where the Trail Sits Beside a Fixed Target
Most traders treat this as a choice between two exits. Running both together usually works better than either alone.
Splitting the Position
Bank part of the size at a planned level, then trail the remainder. The first exit pays for the trade, and the second one chases the tail.
Our multi take profit calculator splits the size for you. Decide the proportions before entry, because that decision gets much harder once money starts moving.
Ratios vary by trader. Half at target and half on the trail suits plenty of people, while others bank a third and let the remainder run.
Why the Combination Helps
A fixed target keeps the give-back small on the part you close. The trail keeps the upside open on the part you hold.
Neither piece cures the other’s weakness completely. Together they smooth the distribution of outcomes, which usually matters more than any single result.
When the Trail Gives Back More Than It Locked In
The trailing stop followed the move up and then exited at about -0.6 ATR relative to where the run began — it gave back more than it locked in.
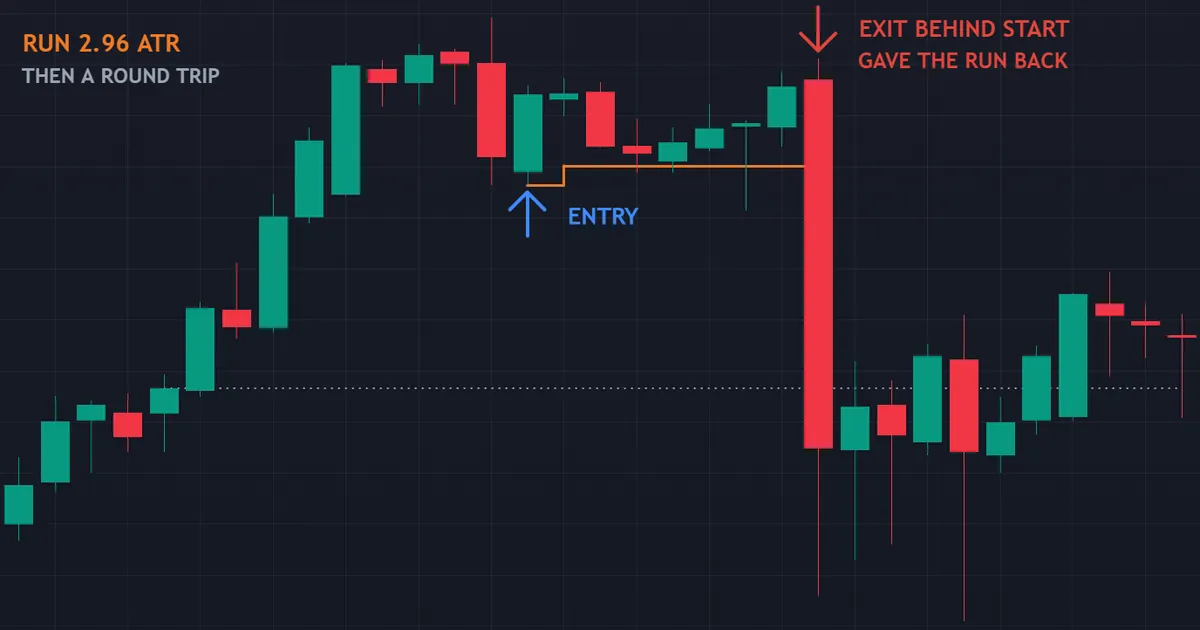
That exit came from EURJPY daily bars. The entry bar closed at 187.204 on 19 April 2026, the run measured 2.96 ATR, and the trail followed for eight bars before the exit on 29 April.
How a Winner Turns Negative
Eight daily bars give a trend plenty of time to change its mind. The trail lifted the stop as price advanced, yet it never climbed far enough to bank that advance.
Then the move unwound. Price retraced through the ratcheted level and kept going, so the exit landed below where the run had started.
Nothing malfunctioned here. The trail did exactly what the arithmetic said, and the arithmetic simply lost to a full round trip.
The Honest Lesson
A trailing stop shifts your outcome distribution rather than improving it. You swap a chance of a bigger win for a certainty of handing something back.
On markets that round-trip a move, that swap can go badly. Banking part of the position at a planned level removes the worst version of this outcome.
Note the timeframe too. A daily trail on a major pair carries a wide distance by necessity, and wide distances hand back plenty when a trend fails.
Testing a Trail Before You Trust It
A trail distance works as a rule, so treat it like one. Rules earn their place through records rather than through intuition.
Log the Two Numbers That Matter
After every trailing exit, note the best price the trade reached and the price where it closed. That difference is your realised give-back.
Twenty of those rows tell you plenty. If the give-back looks small but the exits keep arriving early, your trail sits too tight for the market.
Change One Setting at a Time
Adjust the distance or the activation point, never both at once. Altering two rules together leaves you unable to explain the result.
Give each version enough trades to mean something. Five exits prove nothing, and fifty start to look like evidence.
Watch for the Market Changing Instead
Volatility drifts over weeks and months. A trail that suited a quiet quarter can exit far too early once ranges expand.
An ATR-based distance absorbs some of that drift on its own. A fixed pip trail needs a periodic review, which is one more reason to diarise it.
Related Ideas Worth Reading Next
Two topics sit right next to this one. Read them together and the whole exit question gets simpler.
Start with the bracket you place at entry. Our guide to stop loss and take profit covers where both levels belong before any trailing logic joins in.
After that, look at execution quality. Fills matter most at exactly the moments a trail fires, which usually means fast markets and thin hours.
Then test the setting on your own records. Twenty trailing exits tell you more about a distance than any article can, including this one.
FAQ
What is a trailing stop in simple words?
It is a stop order that follows price in one direction only. On a long trade it rises as price rises, and it never moves back down. The gap between price and the stop stays roughly constant while the trade works in your favour.
How far behind price should a trailing stop sit?
Wider than the pullbacks that happen inside a normal trend on your timeframe. Many traders start with two or three times the average true range. Anything tighter tends to exit on ordinary retracements rather than on real reversals.
Does a trailing stop lock in my profit?
It locks in a trigger level, not a fill price. Once price touches the stop, the order becomes a market order and takes whatever the book offers. In quiet conditions that difference stays tiny, and around releases or the weekend open it can grow large.
Should I use a trailing stop on every trade?
No. A trail helps most when a trade can run much further than your original target, which usually means a trending market. Inside a range, a fixed target often keeps more of the move than a trail does.
Is an ATR trail better than a fixed pip trail?
An ATR trail adapts, which counts as a real advantage when volatility changes. A fixed distance stays simpler and much easier to audit later. Pick whichever one you will apply consistently, because consistency matters more than the choice itself.
Why will my platform not accept a tight trailing stop?
Brokers enforce a minimum distance between the current price and any resting stop order. A trail inside that boundary gets rejected or simply never updates. Check the stop level for the symbol, and remember that many accounts widen it when markets move quickly.
Can a trailing stop move against me?
Not by design. On a long position the stop only moves up, and on a short position it only moves down. If your platform appears to shift a stop backwards, check whether a second copy of the same robot is managing the trade.
Does a trailing stop work on every instrument?
Most brokers offer it across currencies, metals and indices. The distance you need varies enormously between them, though. A setting that suits a major currency pair sits far too tight on gold or on a volatile index, so scale the number per symbol rather than copying it across.
What happens if my platform disconnects?
Client-side trailing pauses. The last stop level your terminal sent stays active at the broker, so protection remains in place, though it stops improving. Server-side trailing or a hosted terminal avoids that pause altogether. Results are not guaranteed; past performance is not indicative of future results.
External references
- For background on this concept, see Trailing Stop Loss at Investopedia.
- For broader market context, see Ratchet Effect on Wikipedia.

About the author
Written by Dominic Walsh, a Forex trader and MT4/MT5 indicator, Expert Advisor and script developer. Every tool on forexmt4systems.com is tested on live charts before release and ships with ready-to-use compiled MT4 (.ex4) and MT5 (.ex5) files. Learn more about the trader and developer behind this site.
How we build, test and correct every tool: Editorial & Testing Policy. Trading carries risk; see the disclaimer.