
The order block vs supply and demand debate trips up almost every trader who moves from classic zones into smart money concepts. Both mark an area where price reversed sharply. Yet an order block is a precise single candle, while a supply or demand zone is a broader base. So one is a scalpel and the other is a highlighter.
This guide defines each one exactly, shows how to draw both on the same chart, and explains when precision beats area and when it does not. So by the end, you will qualify a real order block, mark a proper supply or demand zone, and know which tool fits the trade in front of you.
Order Block vs Supply and Demand at a Glance
Supply and demand is the older, broader idea. It marks a zone where price left a level quickly, implying resting orders that may react again. The order block is a newer refinement from the work of Michael Huddleston, the Inner Circle Trader. It narrows that zone to one specific candle with strict conditions attached.
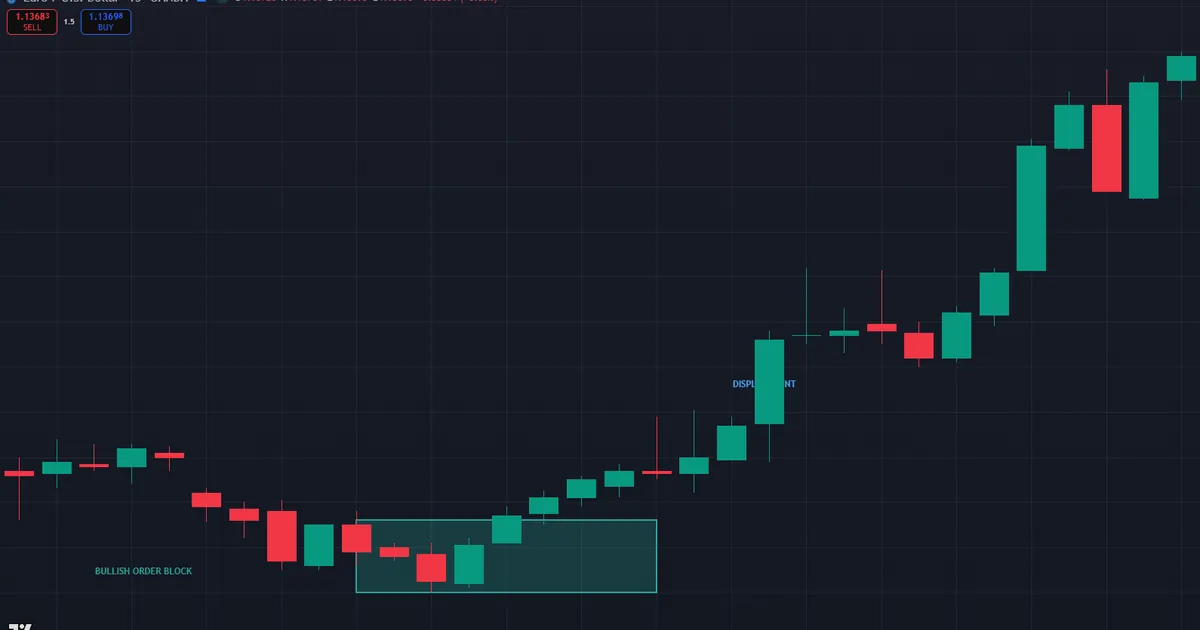
The chart below shows a textbook bullish order block. EURUSD prints a final down-close candle near 1.1408 on the fifteen-minute chart, then a strong bullish displacement breaks the last swing high and leaves a fair value gap. That single down candle is the order block, and price returns to it before continuing up.
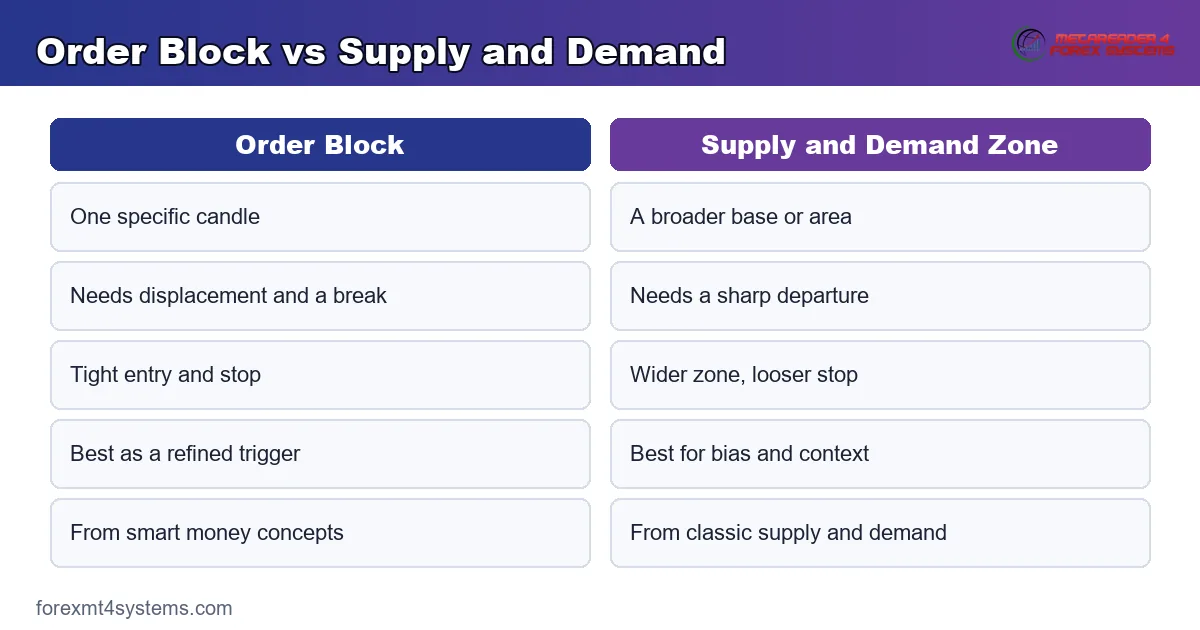
| Feature | Order Block | Supply and Demand Zone |
|---|---|---|
| Size | One specific candle | A broader base or area |
| Conditions | Displacement and a structure break | A sharp departure from the level |
| Origin | Smart money concepts and ICT | Classic supply and demand trading |
| Precision | Tight entry and stop | Wider zone, looser stop |
| Best use | Refined trigger | Bias and broad context |
Read the table as scalpel versus highlighter. The supply or demand zone shows you roughly where price cares. The order block tells you the exact candle to act from. So they answer different questions, and the smart move is to use each for its own job.
Keep the lineage in mind as you read on. The order block did not replace supply and demand; it grew out of it. So when a course frames them as rivals, remember that one is simply a stricter, rule-based version of the other. Both point at resting orders left behind by a sharp move.
What a Supply or Demand Zone Really Is
Supply and demand trading predates every modern label. The idea is simple: where price rallied or dropped sharply, orders were left behind. So when price returns to that area, those unfilled orders may push it away again. Traders mark the zone as a rectangle and wait for a reaction.
The base is the heart of the concept. Before a sharp move, price usually pauses in a small consolidation, and that pause is where the large orders accumulate. So a demand zone is the base before a rally, and a supply zone is the base before a drop. The wider the base, the wider the zone you draw.
Strength of the departure matters most. A zone that price left with one huge candle and never revisited is fresh and strong. Meanwhile, a zone tapped several times grows weaker with each visit, because the resting orders keep getting filled. So freshness and departure speed grade a zone’s quality.
Two zone types are worth naming. A rally-base-rally or drop-base-drop zone forms mid-trend and favors continuation. A rally-base-drop or drop-base-rally zone forms at a turn and favors reversal. So the shape around the base hints at what price will do when it returns. Reading that shape keeps you on the right side of the move.
The Weakness of Broad Zones
Width is the trade-off. A demand zone might span thirty pips, and you rarely know which edge price will respect. So the stop sits below the whole area, which widens your risk. Classic supply and demand is excellent for bias, yet it leaves the exact trigger vague, and that vagueness is the gap order blocks close.
How to Draw a Clean Zone
Consistency beats guesswork when you mark zones. Use the base of the move, not the spike, as your anchor. So find the last few candles that consolidated before price left, and draw the rectangle around their bodies. Then extend it right until price returns to test it.
Grade every zone as you draw it. A fresh zone with a violent departure earns full trust. Meanwhile, a zone tapped twice already earns caution, and one tapped three times often earns a skip. So your rectangle is only half the work; the grade you assign it decides whether you act at all.
What Makes an Order Block Different
An order block is a supply or demand idea with strict rules. Rather than a wide base, it is the single candle that launched the move. In a bullish case it is the last down-close candle before the rally. In a bearish case it is the last up-close candle before the drop.
Two conditions separate a real order block from a random candle. First, the move that leaves it must displace: large bodies, real speed, and a fair value gap. Second, that move must break structure, taking out the last relevant swing. Without both, the candle is just a candle. Our fair value gap vs order block guide shows how the imbalance and the block work together.
The payoff is precision. Because the order block is one candle, your entry zone and stop shrink to a few pips. So the risk-to-reward improves, and the invalidation is unambiguous. That precision is exactly why SMC traders prefer the block to the broad zone once they learn to qualify it.
Qualifying a Real Order Block
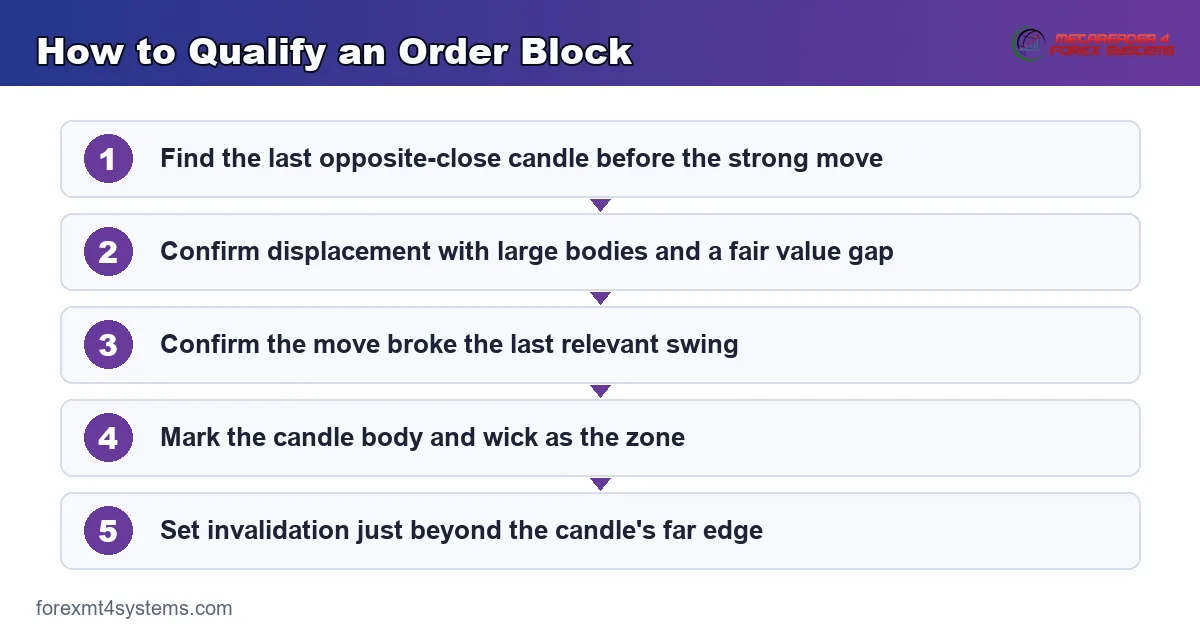
Use this quick routine to qualify any order block before you trust it.
- Find the last opposite-close candle before the strong move.
- Confirm the move displaced with large bodies and a fair value gap.
- Confirm the move broke the last relevant swing structure.
- Mark the candle’s body and wick as your zone.
- Set the invalidation just beyond the far edge of that candle.
The concept graphic below sets the broad zone against the refined block so the difference in scale is obvious.
Why the Structure Break Matters
The structure break is the condition traders skip most. A candle that displaces but breaks nothing may just be a strong pullback inside a range. So the break is what proves intent: it shows the move took out real liquidity and shifted the balance. Without it, the block sits inside noise.
Think of the break as the block’s certificate. It tells you the origin candle launched a move that mattered, not a wiggle that fizzled. So when you qualify a block, trace the swing it broke and confirm the close beyond it. That single check filters out most of the weak blocks that trap beginners.
Where Each Tool Fits in a Workflow
Both belong in the same top-down routine, at different stages. Use the broad zone for context and the order block for the trigger. Read the higher timeframe first, then refine downward.
Start on the four-hour or one-hour chart. Mark the obvious supply and demand zones and the dominant trend. Those wide areas set your bias and point to the likely draw on liquidity. Our draw on liquidity guide shows how to pick that target with discipline.
Drop to the five-minute or fifteen-minute chart inside the zone. There you hunt the precise order block: the candle that displaced and broke structure as price reacted. The market structure guide shows how to read that break cleanly. Then enter at the block with a stop beyond its edge.
Timing adds the final filter. Indeed, the cleanest reactions land in the London kill zone, roughly 2:00 to 5:00 a.m. New York time, and the New York morning, 8:30 to 11:00 a.m. So a zone tapped during a dead hour deserves less trust than one tapped as a session opens.
Letting the Zone Frame the Block
The two tools work best in sequence, not in parallel. First the higher-timeframe zone tells you a reaction is likely and in which direction. Then you wait for price to arrive and watch the small chart. So you are not hunting blocks everywhere; you are hunting one block, at one zone, in one direction.
That discipline cuts noise dramatically. Without the zone, every displacement candle looks like a possible block, and you drown in signals. With the zone, you ignore all of them except the ones that print where your bias already pointed. Hence the zone is not a rival to the block; it is the filter that makes the block tradeable.
Worked Example: A Supply Zone Short on GBPUSD
Now flip the direction and widen the lens. GBPUSD rallies into a four-hour supply zone between 1.33900 and 1.33960, a base it dropped from sharply two days earlier. The zone is fresh, and the departure was violent, so it grades as strong.
Price pushes up into the zone and stalls near 1.33930. On the fifteen-minute chart, a sharp bearish displacement then breaks the last swing low and leaves a fair value gap. The last up-close candle before that drop, at 1.33880, is the bearish order block inside the wider supply zone. The chart below shows the broad zone and the refined block together.
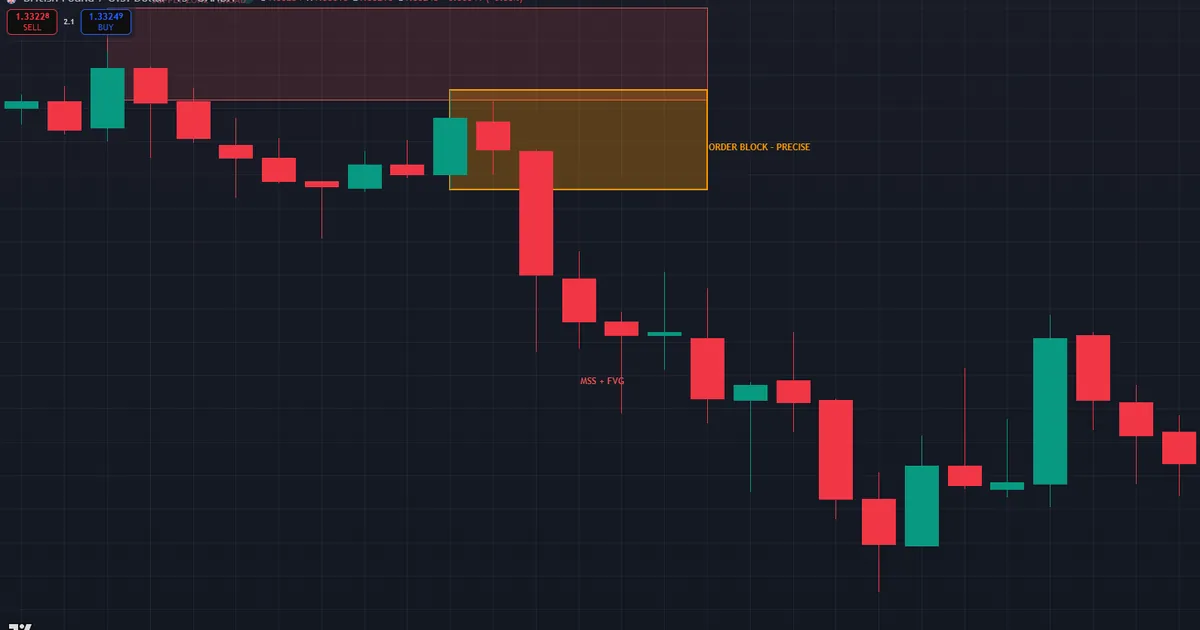
Then the trade assembles with two layers. The supply zone gave the bias: sell into strength here. The order block gave the trigger: short the retrace into 1.33880 with a stop above the 1.33960 zone high, roughly 8 pips of risk. Meanwhile, the first target is the session low near 1.33500, with deeper liquidity below.
Notice how the two tools cooperated. The zone told you where to look and which way to lean. The order block told you the exact candle and the tight stop. So you traded a broad idea with a precise entry, which is the whole point of using both.
Comparing the Risk of Each Entry
Compare the risk on this trade against a pure zone approach. A trader using only the supply zone would place the stop above 1.33960, the zone high, and enter somewhere inside the wide area. So the entry is looser and the risk larger. The block trader entered at 1.33880 with a stop just above, capturing the same idea for less exposure. That gap in efficiency compounds over many trades.
Do not force the block, though. If no candle inside the zone displaces and breaks structure, there is no valid block to trade. So on those days you either take the wider zone entry with a bigger stop or stand aside. Waiting for a clean block is often better than manufacturing one that does not exist.
Download the complete indicator database
Put these concepts on your charts. One email unlocks the full library of 1,380+ indicators with compiled MT4 and MT5 files, plus my TradingView scripts. No paywall, no spam, unsubscribe any time.
Get free access to my indicator database
One email unlocks 1,380+ free MT4, MT5 and TradingView indicators — the complete library. No single-tool download; you get the whole database.
Common Mistakes and How to Fix Them
Confusing the two tools produces the same errors repeatedly. The graphic below gathers the most common ones, and each correction follows beneath it.
Calling every base an order block
A broad demand base is a zone, not a block. So reserve the order block label for the single candle that displaced and broke structure. Mislabeling widens your stop for no reason.
Marking a block with no displacement
A down candle followed by a slow drift is not an order block. Instead, demand real displacement and a fair value gap. Without them, the candle carries no special weight.
Ignoring the structure break
An order block that never breaks structure is just a pause. Confirm the move took out the last swing before you trust the block. Continuation without a break is far weaker.
Trading a stale zone
A supply or demand zone weakens with every tap. So favor fresh, untested zones and downgrade ones price has already visited twice. Old zones fail more often than new ones.
Using the wrong tool for the job
Do not enter off a thirty-pip zone edge when a tight block exists inside it. Use the zone for bias and the block for the trigger. Mixing their roles blurs both.
Quick-Reference Checklist
Run this list before you act on any zone or block. It keeps precision and context in their proper places.
- The higher-timeframe supply or demand zone is marked for bias.
- A clear draw on liquidity sits beyond the zone as the target.
- The order block candle displaced with a fair value gap.
- The displacement broke the last relevant swing structure.
- The zone is fresh rather than tapped several times.
- An active session produced the reaction.
- Entry, stop, and target are mapped before the retest arrives.
Where the Order Block Label Can Fail
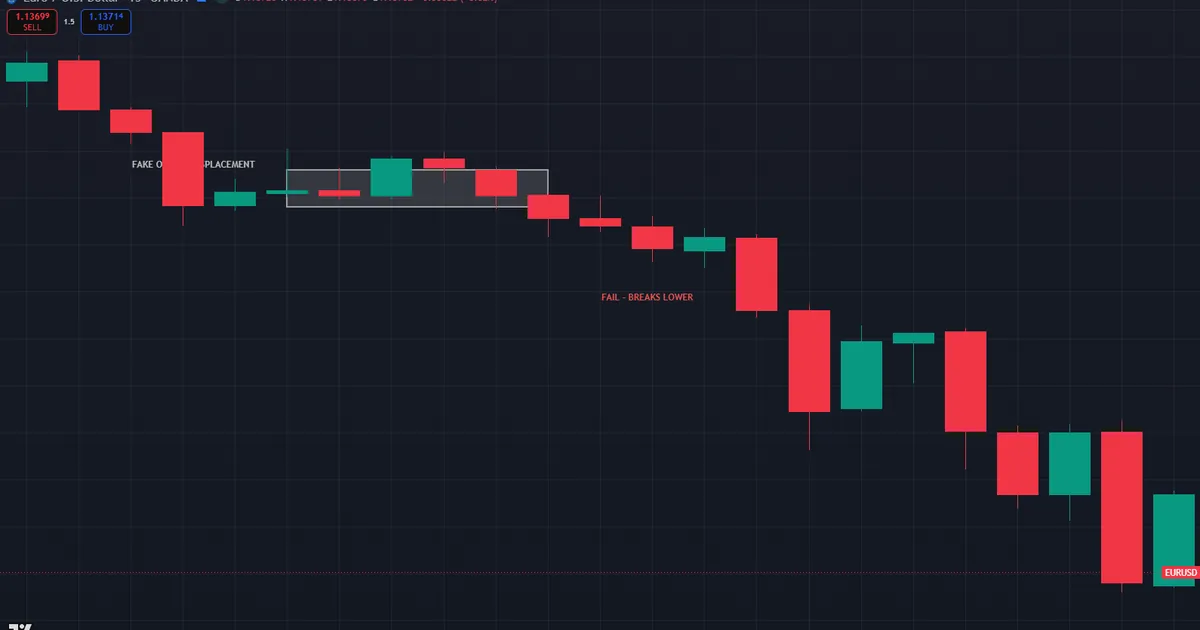
Now study the failure case, because a mislabeled block costs money fast. The classic trap is marking a candle as an order block when the move that left it never displaced or broke structure. So the block looks valid on a static chart but has no force behind it.
Picture EURUSD drifting lower in a quiet range. A single down candle at 1.14110 catches your eye, so you mark it as a bullish order block and buy the retrace. Yet the move up from it was slow, left no fair value gap, and broke no swing high. Price returns, pauses at 1.14110 for a few candles, then continues lower straight through the zone. The chart below shows the fake block, the missing displacement, and the failed long.
The Invalidation and the Fix
The invalidation rule keeps the damage small. Once price closes a body below the order block against your long, the idea is void. So exit at once, without averaging. The lesson is that an order block without displacement and a structure break is only a supply or demand zone wearing a costume.
Afterwards, log three facts in your trade journal: whether the origin move displaced, whether it broke structure, and whether a fair value gap formed. Blocks that skip those ingredients fail in clusters, and your own records will teach you to demand all three before risking a cent.
The mirror error hurts too. Sometimes a valid block exists, but a trader draws it in the wrong place, marking the spike candle instead of the true origin. So the entry sits a few pips off, the stop lands in the wrong spot, and ordinary noise clips the position. Precision only helps when you apply it to the correct candle. Slow down, trace the move back to its real origin, and mark the exact body that launched the displacement rather than the loudest-looking candle nearby.
Precision Versus Area: Which to Trust
Neither tool wins outright; they answer different questions. The zone is better for bias, because it captures the whole area price cares about. The block is better for the trigger, because it defines the exact candle and the tight stop. So the honest answer is to use both, in that order.
Beginners often reach for precision too early. A tight block feels safer, yet without the broad zone for context it can point the wrong way. So master the zone first, then refine into the block. Compare the block against its cousin the breaker in our breaker block vs order block guide.
There is also a market-condition angle. In fast, trending markets, the tight block shines, because displacement is frequent and structure breaks are clean. In slow, choppy markets, the broad zone often serves better, because precise blocks get chopped up by noise. So let the market’s character decide which tool leads. Forcing a scalpel through a ranging chart wastes stops, while relying only on wide zones in a strong trend leaves easy risk-to-reward on the table.
Related Concepts to Study Next
A couple of neighboring ideas complete this map. The full guide to order block trading expands the block into a complete entry model with more examples. Meanwhile, the market structure guide you met earlier explains the break that turns a candle into a valid block. Stack the pieces, then let the smart money indicators mark zones and blocks automatically while you keep bias on the higher timeframe. A short drill helps: mark one chart with broad zones, then refine each into its order block, and note how often the tight block sits at one edge of the wide zone.
FAQ
Is an order block just a small supply or demand zone?
Almost. An order block is the single candle inside a supply or demand area that displaced and broke structure. So it is a refined, rule-based version of the broader zone, not a different concept entirely.
Do I need displacement for a valid order block?
Yes. Displacement and a structure break are what separate an order block from a random candle. Without them, you are simply marking a supply or demand zone and calling it a block.
Which gives a better entry, a block or a zone?
The order block gives the tighter entry and stop, which improves risk-to-reward. The zone gives better context. So combine them: use the zone to find the trade and the block to time it. Neither works well when you strip it out of that partnership and rely on it alone.
Can a supply or demand zone contain several order blocks?
Yes. A wide zone often holds more than one qualifying candle as price reacts inside it. So drop a timeframe, find the block that displaced and broke structure, and trade that one rather than the whole area. The nearest qualifying block to the zone edge usually offers the cleanest reaction.
Why do fresh zones matter so much?
A fresh zone still holds most of its resting orders, so the reaction can be strong. Each tap fills some of those orders and weakens the level. So an untested zone generally offers a cleaner trade than a repeatedly visited one.
Should I trade every order block I find?
No. Most practitioners require displacement, a structure break, a fresh zone, and higher-timeframe alignment before acting. Even then, position sizing and disciplined stops matter far more than the label itself. Results are not guaranteed; past performance is not indicative of future results.
External references
- For background on this concept, see Supply and Demand on Wikipedia.
- For broader market context, see Law of Supply and Demand at Investopedia.

About the author
Written by Dominic Walsh, a Forex trader and MT4/MT5 indicator, Expert Advisor and script developer. Every tool on forexmt4systems.com is tested on live charts before release and ships with ready-to-use compiled MT4 (.ex4) and MT5 (.ex5) files. Learn more about the trader and developer behind this site.
How we build, test and correct every tool: Editorial & Testing Policy. Trading carries risk; see the disclaimer.